備份和移動 Weblate
Project level backups
在 4.14 版本新加入.
警告
Restoring backups is only supported when using PostgreSQL or MariaDB 10.5+ as a database.
The project backups all translation content from Weblate (project, components, translations, string comments, suggestions or checks). It is suitable for transferring a project to another Weblate instance.
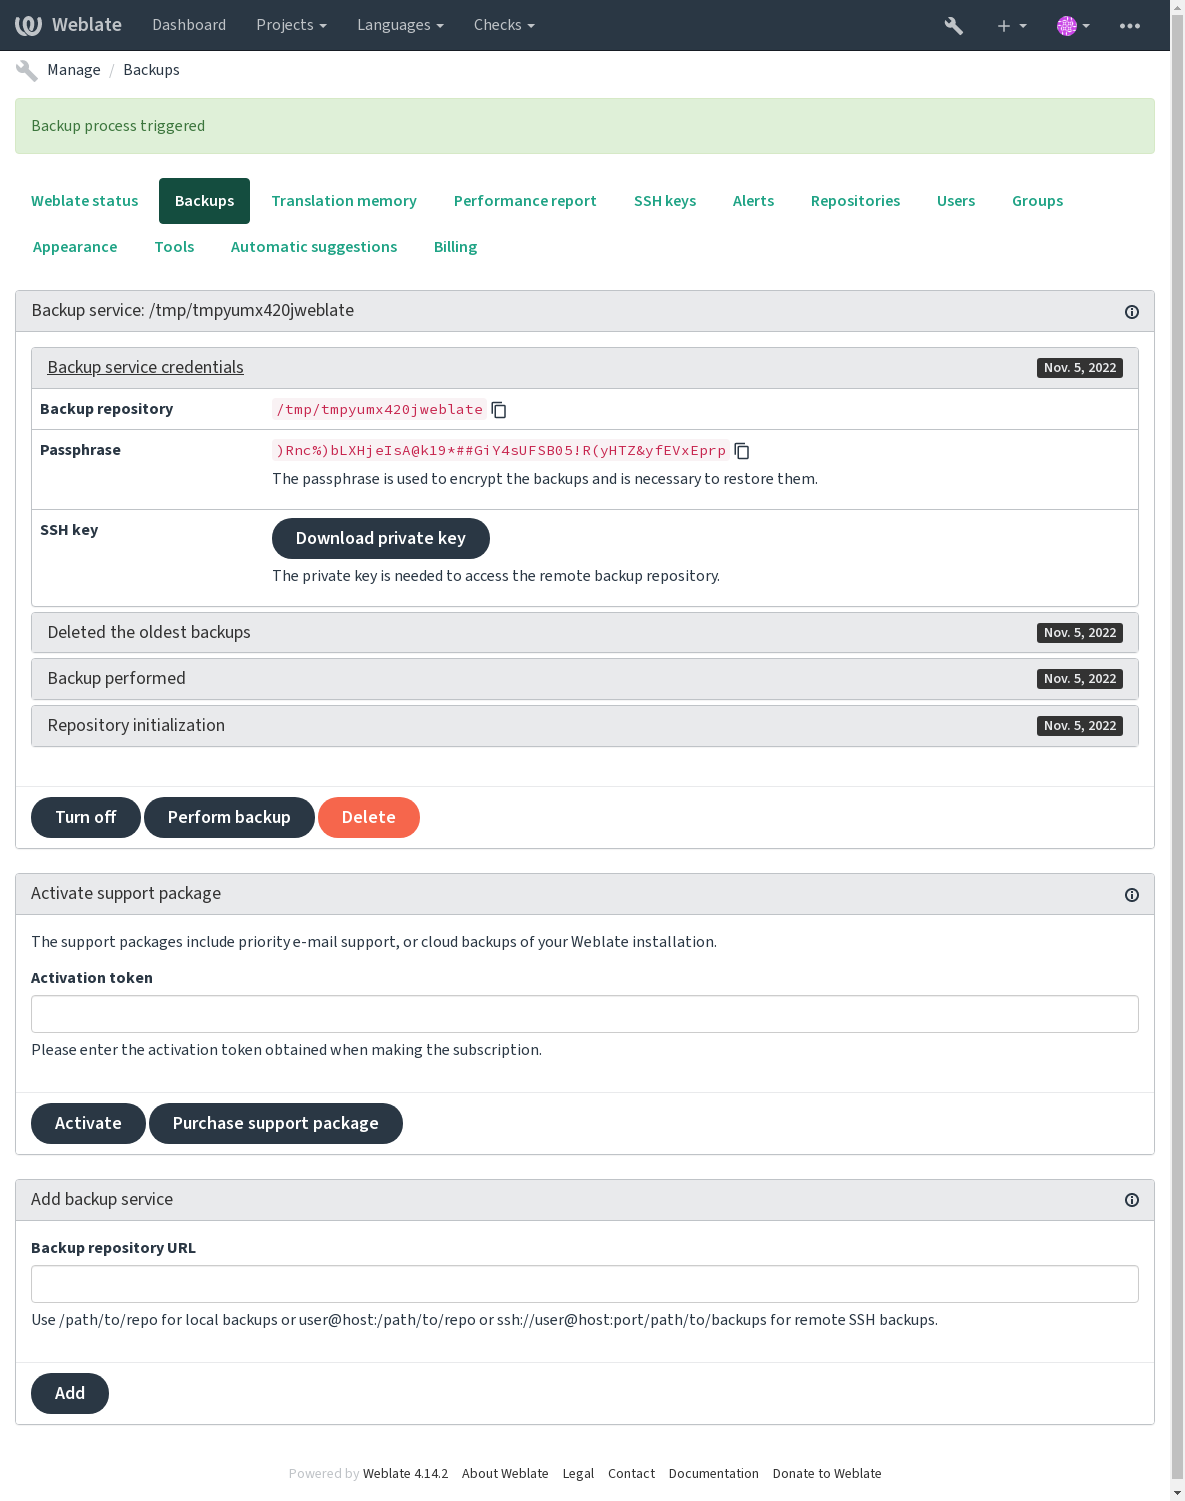
You can perform a project backup in Manage ↓ Backups. The backup can be restored when creating a project (see 添加翻譯項目和組件).
The backups currently do not include access control information and history.
The comments and suggestions are backed up with an username of user who did create them. Upon import it is assigned to a matching user. If there is no user with such username, it is assigned to anonymous user.
The generated backups are kept on the server as configured by
PROJECT_BACKUP_KEEP_DAYS and PROJECT_BACKUP_KEEP_COUNT
(it defaults to keep at most 3 backups for 30 days).
Automated backup using BorgBackup
在 3.9 版本新加入.
Weblate 內置了對使用 BorgBackup 創建服務備份的支持。 Borg 創建了節省空間的加密備份,可以安全地存儲在雲中。可以從管理界面中的 Backups 選項卡上控製備份。
在 4.4.1 版本變更: PostgreSQL 和 MySQL/MariaDB 數據庫都包括在自動備份中。
使用 Borg 的備份是遞增的, Weblate 配置為保留後面的備份:
Daily backups for 14 days back
每周備份8週回來
每月備份6個月回來
Borg encryption key
BorgBackup 創建加密的備份,如果沒有密碼,你將無法恢復它們。密碼是在添加新的備份服務時生成的,你應該複製它並將其保存在一個安全的地方。
如果你在使用 Weblate provisioned backup storage,請同樣備份你的私有 SSH 密鑰,因為它用來訪問你的備份。
也參考
Customizing backup
The database backup can be configured via
DATABASE_BACKUP.The backup creation can be customized using
BORG_EXTRA_ARGS.
Weblate provisioned backup storage
備份你的 Weblate 實例的最簡單方式是在 weblate.org 購買 『備份服務』 <https://weblate.org/support/#backup>`_。這是你如何讓它運行起來的方式:
在 https://weblate.org/support/#backup 購買 備份服務。
在管理界面輸入得到的密鑰,請參見 集成支持。
Weblate 將連接到雲服務,並獲取備份的訪問信息。
從 Backups 標籤開啟新的備份配置。
Backup your Borg credentials to be able to restore the backups, see Borg encryption key.
提示
為了安全起見,有打開所有東西的手動步驟。沒有你的同意,就不會有數據發送到通過註冊步驟得到的備份倉庫。
使用客戶的備份存儲
也可以使用自己的存儲來備份。 SSH 可以用於在遠程目的地存儲備份,目標服務器需要安裝 BorgBackup。
也參考
General 在 Borg 文件中
本地文件系統
推薦去指定本地備份的絕對路徑,例如 /path/to/backup。該目錄必須可由運行 weblate 的用戶寫入(請參見 文件系統權限)。在目錄不存在的情況下,Weblate 會嘗試新建它,但需要適當的權限才能這麼做。
提示
在 Docker 中運行 Weblate時,請確保備份位置暴露為來自 Weblate 容器的一個卷。否則,備份文件將在其所在的容器重啟時被 Docker 丟棄。
一個選項是將備份放置在一個現有的捲中。例如, /app/data/borgbackup。這是容器中的一個現有的捲。
你也可以在 Docker 的編寫文件中為備份目的添加一個新的容器,例如使用 /borgbackup:
services:
  weblate:
    volumes:
      - /home/weblate/data:/app/data
      - /home/weblate/borgbackup:/borgbackup
備份所存儲的目錄由 UID 1000 所有,否則 Weblate 將無法把備份寫入那裡。
Remote backups
For creating remote backups, you will have to install BorgBackup onto another server that’s accessible for your Weblate deployment via SSH using the Weblate SSH key:
Prepare a server where your backups will be stored.
Install the SSH server on it (you will get it by default with most Linux distributions).
Install BorgBackup on that server; most Linux distributions have packages available (see Installation).
Choose an existing user or create a new user that will be used for backing up.
Add Weblate SSH key to the user so that Weblate can SSH to the server without a password (see Weblate SSH 密鑰).
Configure the backup location in Weblate as
user@host:/path/to/backupsorssh://user@host:port/path/to/backups.
提示
Weblate provisioned backup storage provides you automated remote backups without any effort.
也參考
Restoring from BorgBackup
恢復功能會訪問你的備份倉庫,並準備備份密碼。
用 ``borg list REPOSITORY``列出服務器上的所有備份。
使用
borg extract REPOSITORY::ARCHIVE將所需備份恢復到當前目錄。從放置在 Weblate 數據目錄下
backup目錄中的 SQL 備份中恢復數據庫(請參見 下載的數據用於備份)。將 Weblate 配置 (
backups/settings.py,請參見 下載的數據用於備份 )複製到正確的位置,請參見 調整配置。When using Docker container, the settings file is already included in the container and you should restore the original environment variables. The
environment.ymlfile might help you with this (see 下載的數據用於備份).將整個存儲的數據目錄複製到
DATA_DIR所配置的位置。When using Docker container place the data into the data volume, see Docker container volumes.
Please make sure the files have correct ownership and permissions, see 文件系統權限.
Borg 會話可能看上去是這個樣子的:
$ borg list /tmp/xxx
Enter passphrase for key /tmp/xxx:
2019-09-26T14:56:08                  Thu, 2019-09-26 14:56:08 [de0e0f13643635d5090e9896bdaceb92a023050749ad3f3350e788f1a65576a5]
$ borg extract /tmp/xxx::2019-09-26T14:56:08
Enter passphrase for key /tmp/xxx:
也參考
手動備份
取決於你想保存什麼, Weblate 存儲的類型數據會備份在各自的位置。
提示
如果你正進行手動備份,你也許想要關閉Weblate 關於缺乏備份的警告,方法是添加``weblate.I028`` 到:file:settings.py 中的:setting:django:SILENCED_SYSTEM_CHECKS;對於Docker,則是:envvar:WEBLATE_SILENCED_SYSTEM_CHECKS。
SILENCED_SYSTEM_CHECKS.append("weblate.I028")
數據庫
實際存儲位置依賴於數據庫的設置。
提示
數據庫是最重要的存儲。定期對數據庫進行備份。沒有數據庫,所有的翻譯都會消失。
Native database backup
推薦的方式是使用數據庫的本地工具如 pg_dump 或 mysqldump 來保存數據庫的轉儲。這通常比 Django 備份表現得好,並且可以連同數據一道,恢復完整表格。
你可以在較新的 Weblate 發行版中恢復這個備份,當運行於 migrate 時,它將執行所有必需的遷移。請參考 升級 Weblate 了解如何在版本間升級的更多詳細信息。
Django database backup
另外,可以使用 Django 的 dumpdata 命令備份你的數據庫。那種方式是不依托數據庫的,並且可以用於先要更改數據庫後端的情況。
恢復數據庫之前,你需要確保恢復備份和執行備份的實例運行的是完全相同的 Weblate 版本。這是必要的,因為數據庫結構在不同版本之間會發生變化,你可能會以某種方式破壞數據。安裝相同版本後,用 migrate 運行所有數據庫遷移。
之後,一些條目將已經在數據庫中創建,你也會在數據庫備份中看到它們。推薦的方法是使用管理 shell 手動刪除這些條目 (見:ref:invoke-manage):
weblate shell
>>> from weblate.auth.models import User
>>> User.objects.get(username='anonymous').delete()
檔案
如果你有足夠的備份空間,只需備份整個 DATA_DIR。這是一個安全帶,即使它包含一些你不想要的文件。下面的部分詳細描述了應該備份和可以跳過的內容。
下載的數據用於備份
在 4.7 版本變更: The environment dump was added as environment.yml to help in
restoring in the Docker environments.
存儲在 DATA_DIR /backups 中。
Weblate 這裡備份各種數據,可以包括這些文件用於更完整的備份。文件每日更新(需要運行 Celery beat 服務器,請參見 使用 Celery 的後台任務 )。當前,這包括:
Weblate 設置為
settings.py(還有擴展版,在settings-expanded.py)。PostgreSQL 數據庫備份為
database.sql。Environment dump as
environment.yml.
數據庫備份默認保存為純文本,但也可以通過 :setting:`DATABASE_BACKUP`來進行壓縮或整個跳過。
To restore the database backup load it using database tools, for example:
psql --file=database.sql weblate
Version control repositories
版本控制存儲庫包含帶有 Weblate 更改的上游存儲庫的副本。如果你對所有翻譯組件啟用了:ref:component-push_on_commit`,那麼所有 Weblate 變化都包括在上游。不需要在 Weblate 端備份存儲庫,因為它們可以從上游位置再次克隆,不會丟失數據。
SSH 和 GPG 密鑰
存儲在 DATA_DIR /ssh 和 DATA_DIR /home 中。
如果正在使用 Weblate 生成的 SSH 或 GPG 密鑰,你應該備份這些位置。否則將丟失私有密鑰,並且你將不得不重新生成新的密鑰。
User uploaded files
存儲在 DATA_DIR /media 中。
你應當備份所有用戶上傳的文件(例如 字符串的可見語境 )。
Celery 任務
Celery 任務隊列可能會包含一些信息,但通常無需進行備份。你最多會丟失尚未被翻譯記憶庫處理的更新。無論如何,建議在恢復時執行全文或存儲庫更新,這樣就不會有丟失這些內容的問題。
也參考
手動備份的命令行
使用 cron 作業,您可以設置一條每天執行的 Bash 命令,例如:
$ XZ_OPT="-9" tar -Jcf ~/backup/weblate-backup-$(date -u +%Y-%m-%d_%H%M%S).xz backups vcs ssh home media fonts secret
`XZ_OPT`後面引號之間的字符串允許你選擇自己的 xz 選項,例如用於壓縮的內存量;見 https://linux.die.net/man/1/xz
你可以根據需要調整文件夾和文件的列表。為了避免保存翻譯記憶庫(在備份文件夾中),你可以使用:
$ XZ_OPT="-9" tar -Jcf ~/backup/weblate-backup-$(date -u +%Y-%m-%d_%H%M%S).xz backups/database.sql backups/settings.py vcs ssh home media fonts secret
Restoring manual backup
將已經備份的所有數據恢復。
使用
updategit更新所有倉庫。weblate updategit --all
移動 Weblate 安裝
按照上面備份與恢復說明,將你的安裝遷移到不同系統。