Weblate のバックアップと移動
BorgBackup を使用した自動バックアップ
バージョン 3.9 で追加.
Weblate は BorgBackup を使用して、サービスのバックアップを作成する機能が付属しています。Borg はスペース効率の高い暗号化されたバックアップを作成し、クラウドに安全に保存します。バックアップは、管理画面の バックアップ タブからコントロールします。
バージョン 4.4.1 で変更: PostgreSQL と MySQL/MariaDB の両方のデータベースが自動バックアップに含まれています。
Borg を使用したバックアップは増分バックアップです。 Webrate は以下のバックアップを保持します。
日次バックアップ、過去 14 日分
週次バックアップ、過去 6 週分
月次バックアップ、過去 6 か月分
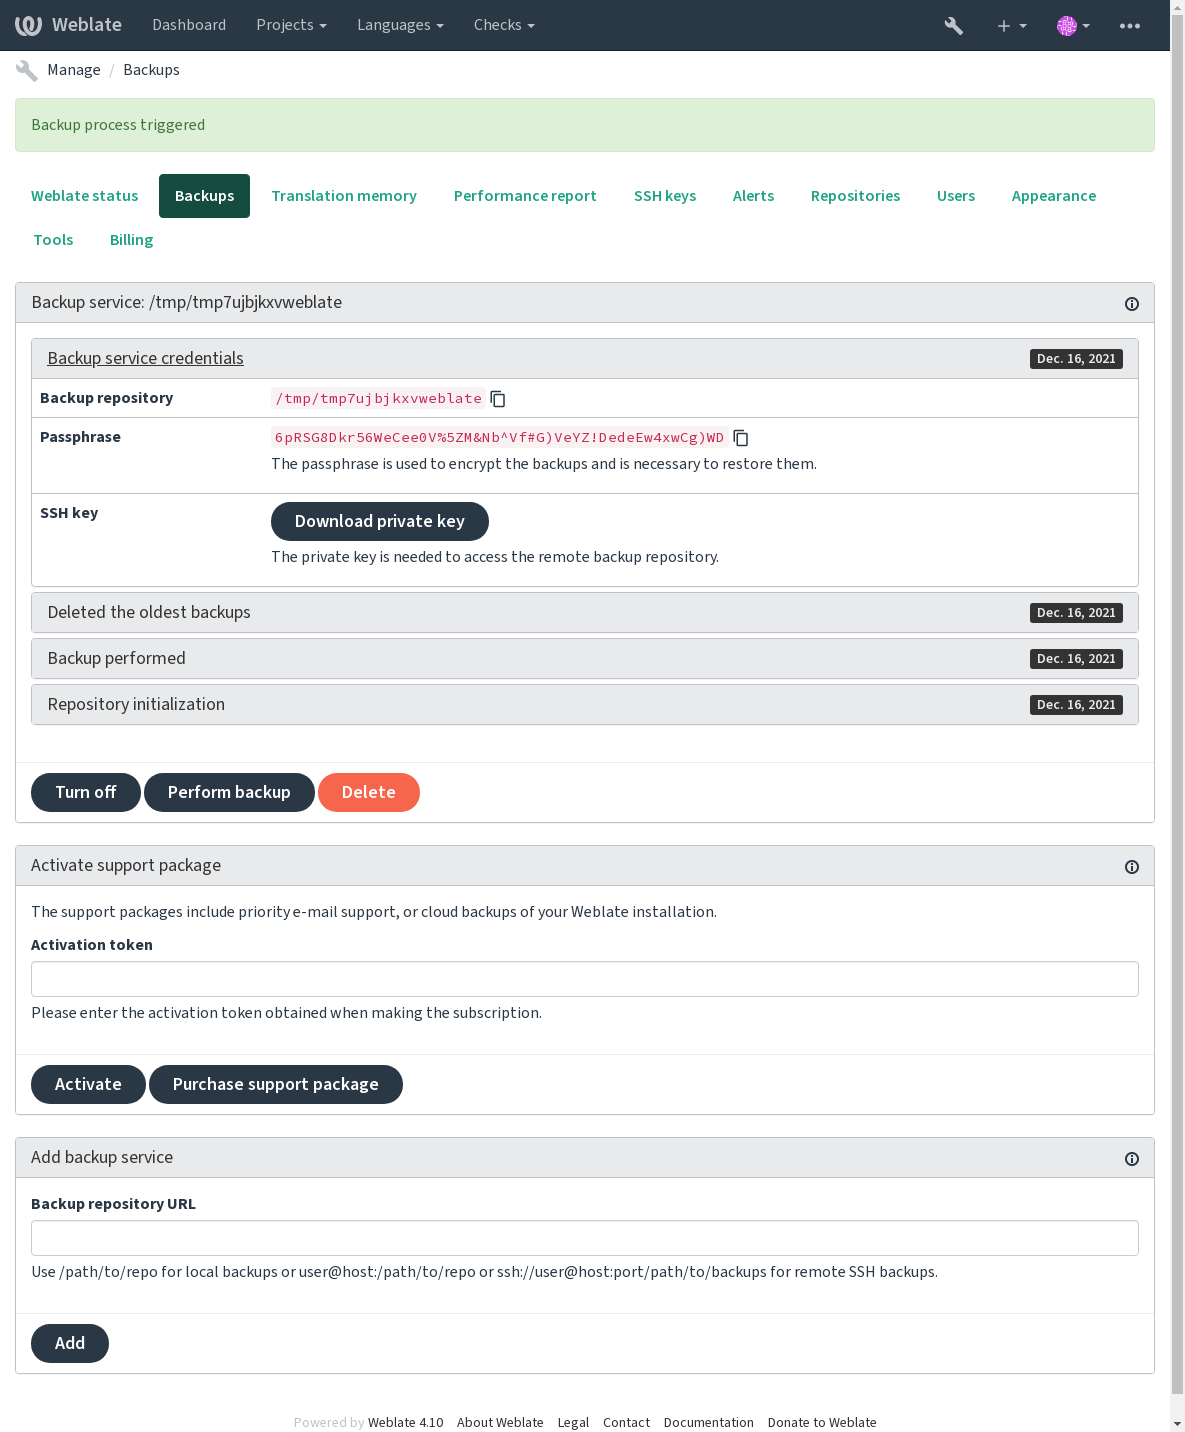
Borg 暗号鍵
BorgBackup は暗号化したバックアップを作成するので、パスフレーズがないと復元できません。パスフレーズは、新しいバックアップ サービスを追加するときに生成されるので、コピーして安全な場所に保管しておくことが必要です。
Weblate 専用のバックアップ ストレージ を使用している場合は、バックアップに接続するための SSH 秘密鍵もバックアップしてください。
参考
Customizing backup
The database backup can be configured via
DATABASE_BACKUP.The backup creation can be customized using
BORG_EXTRA_ARGS.
Weblate 専用のバックアップ ストレージ
Weblate のインスタンスをバックアップする最も簡単な方法は、weblate.org のバックアップサービス を購入することです。導入方法:
https://weblate.org/support/#backup から バックアップ サービス を購入する。
取得したキーを管理画面から入力する。参照: サポートの統合。
Weblate はクラウド サービスに接続し、バックアップのための接続情報を取得する。
バックアップ タブから、新しいバックアップの設定を有効にする。
Borg 資格情報をバックアップして、バックアップを復元できるようにします。参照: Borg 暗号鍵。
ヒント
手動ですべてを有効にすることが必要なのは、安全のためです。ユーザーの同意がなければ、登録の過程で取得したデータはバックアップ リポジトリに送信しません。
独自のバックアップ ストレージの使用
バックアップには、独自のストレージも使用できます。SSH を使用してリモート接続先にバックアップを保存できます。対象のサーバーには BorgBackup のインストールが必要です。
参考
Borgドキュメント項目 General
ローカル ファイルシステム
ローカルバックアップの絶対パスを、例えば /path/to/backup のように指定することを推奨します。このディレクトリは、Weblate を実行しているユーザーが書き込み可能であることが必要です(参照: ファイル システムのアクセス権)。存在しない場合は、Weblate が作成を試みますが、そのためには適切なアクセス権が必要です。
ヒント
Docker で Weblate を実行する場合は、バックアップの場所が Weblate コンテナからボリュームとして公開されていることを確認してください。それ以外の場合、バックアップは、Docker が含まれているコンテナーを再起動したときに Docker によって破棄されます。
1 つの選択肢は、バックアップを既存のボリュームに配置することです。例えば、/app/data/borgbackup。これは、コンテナ内の既存のボリュームです。
例えば /borgbackup として、バックアップ用の新しいコンテナをDocker Composeファイルに追加する方法:
services:
  weblate:
    volumes:
      - /home/weblate/data:/app/data
      - /home/weblate/borgbackup:/borgbackup
バックアップが保存されるディレクトリは、UID 1000 が所有者であることが必要です。異なる場合、Weblate はそこにバックアップを書き込むことができません。
リモート バックアップ
リモート バックアップを作成ためには、Weblate の SSH キーを使用して SSH でアクセス可能な展開した Weblate のとは別のサーバーに BorgBackup をインストールすることが必要であり、その方法:
Prepare a server where your backups will be stored.
Install the SSH server on it (you will get it by default with most Linux distributions).
Install BorgBackup on that server; most Linux distributions have packages available (see Installation).
Choose an existing user or create a new user that will be used for backing up.
Add Weblate SSH key to the user so that Weblate can SSH to the server without a password (see Weblate SSH キー).
Configure the backup location in Weblate as
user@host:/path/to/backupsorssh://user@host:port/path/to/backups.
ヒント
Weblate 専用のバックアップ ストレージ を使用すると、リモート バックアップを簡単に自動化できます。
BorgBackup からの復元
バックアップ リポジトリへのアクセスを復元し、バックアップ パスフレーズを準備します。
borg list REPOSITORYを使用して、サーバー上のすべてのバックアップを一覧表示します。borg extract REPOSITORY::ARCHIVEを使用して、目的のバックアップを現在のディレクトリに復元します。Weblate データー ディレクトリーの
backupディレクトリーに置かれた SQL ダンプからデータベースを復元します(参照: Dumped data for backups)。Weblate の設定ファイル(
backups/settings.py、参照: Dumped data for backups)を正しい場所にコピーしてください。When using Docker container, the settings file is already included in the container and you should restore the original environment variables. The
environment.ymlfile might help you with this (see Dumped data for backups).復元したデーター ディレクトリ全体を、
DATA_DIRに設定した場所にコピーします。When using Docker container place the data into the data volume, see Docker container volumes.
Please make sure the files have correct ownership and permissions, see ファイル システムのアクセス権.
Borg セッションの例:
$ borg list /tmp/xxx
Enter passphrase for key /tmp/xxx:
2019-09-26T14:56:08                  Thu, 2019-09-26 14:56:08 [de0e0f13643635d5090e9896bdaceb92a023050749ad3f3350e788f1a65576a5]
$ borg extract /tmp/xxx::2019-09-26T14:56:08
Enter passphrase for key /tmp/xxx:
手動バックアップ
保存する内容に応じて、Weblate がそれぞれの場所に保存するデータを種類ごとにバックアップします。
ヒント
If you are doing the manual backups, you might want to
silence Weblate's warning about a lack of backups by adding weblate.I028 to
SILENCED_SYSTEM_CHECKS in settings.py or
WEBLATE_SILENCED_SYSTEM_CHECKS for Docker.
SILENCED_SYSTEM_CHECKS.append("weblate.I028")
データベース
実際の保存場所は、データベースの設定によって異なります。
ヒント
データベースは最も重要なストレージです。データベースの定期的なバックアップを設定してください。データベースがなくなると、すべての翻訳が消失します。
データベース自身でバックアップ
推奨する方法は、pg_dump や mysqldump などのデータベースに搭載しているツールを使用して、データベースのダンプを保存することです。これは通常 Django のバックアップよりも性能が良く、テーブルをすべてのデーターと共に完全に復元します。
You can restore this backup in a newer Weblate release, it will perform all the
necessary migrations when running in migrate. Please consult
Weblate のアップグレード on more detailed info on how to upgrade between versions.
Django データベースバックアップ
Alternatively, you can back up your database using Django's dumpdata
command. That way the backup is database agnostic and can be used in case you
want to change the database backend.
Prior to restoring the database you need to be running exactly the same Weblate
version the backup was made on. This is necessary as the database structure does
change between releases and you would end up corrupting the data in some way.
After installing the same version, run all database migrations using
migrate.
Afterwards some entries will already be created in the database and you will have them in the database backup as well. The recommended approach is to delete such entries manually using the management shell (see Invoking management commands):
weblate shell
>>> from weblate.auth.models import User
>>> User.objects.get(username='anonymous').delete()
ファイル
If you have enough backup space, simply back up the whole DATA_DIR. This
is a safe bet even if it includes some files you don't want.
The following sections describe what you should back up and what you
can skip in detail.
Dumped data for backups
バージョン 4.7 で変更: The environment dump was added as environment.yml to help in
restoring in the Docker environments.
Stored in DATA_DIR /backups.
Weblate dumps various data here, and you can include these files for more complete backups. The files are updated daily (requires a running Celery beats server, see Celery を使用するバックグラウンド タスク). Currently, this includes:
Weblate settings as
settings.py(there is also expanded version insettings-expanded.py).PostgreSQL database backup as
database.sql.Environment dump as
environment.yml.
The database backups are saved as plain text by default, but they can also be compressed
or entirely skipped using DATABASE_BACKUP.
To restore the database backup load it using dabase tools, for example:
psql --file=database.sql weblate
Version control repositories
Stored in DATA_DIR /vcs.
The version control repositories contain a copy of your upstream repositories with Weblate changes. If you have コミット時にプッシュする enabled for all your translation components, all Weblate changes are included upstream. No need to back up the repositories on the Weblate side as they can be cloned again from the upstream location(s) with no data loss.
SSH and GPG keys
Stored in DATA_DIR /ssh and DATA_DIR /home.
If you are using SSH or GPG keys generated by Weblate, you should back up these locations. Otherwise you will lose the private keys and you will have to regenerate new ones.
User uploaded files
Stored in DATA_DIR /media.
ユーザーがアップロードしたすべてのファイルのバックアップが必要です(例: Visual context for strings)。
Celery tasks
The Celery task queue might contain some info, but is usually not needed for a backup. At most you will lose updates not yet been processed to translation memory. It is recommended to perform the fulltext or repository update upon restoration anyhow, so there is no problem in losing these.
Command-line for manual backup
Using a cron job, you can set up a Bash command to be executed on a daily basis, for example:
$ XZ_OPT="-9" tar -Jcf ~/backup/weblate-backup-$(date -u +%Y-%m-%d_%H%M%S).xz backups vcs ssh home media fonts secret
The string between the quotes after XZ_OPT allows you to choose your xz options, for instance the amount of memory used for compression; see https://linux.die.net/man/1/xz
You can adjust the list of folders and files to your needs. To avoid saving the translation memory (in backups folder), you can use:
$ XZ_OPT="-9" tar -Jcf ~/backup/weblate-backup-$(date -u +%Y-%m-%d_%H%M%S).xz backups/database.sql backups/settings.py vcs ssh home media fonts secret
Restoring manual backup
Restore all data you have backed up.
Update all repositories using
updategit.weblate updategit --all
Moving a Weblate installation
Relocate your installation to a different system by following the backing up and restoration instructions above.