Integración de control de versiones
Weblate currently supports Git (with extended support for Solicitudes de incorporación de GitHub, Solicitudes de fusión de GitLab, Solicitudes de incorporación de Gitea, Gerrit, Subversion, Solicitud de incorporación a BitBucket Cloud, Solicitudes de incorporación al Centro de Datos Bitbucket, and Solicitud de incorporación Azure DevOps) and Mercurial as version control back-ends.
Accessing repositories
The VCS repository you want to use has to be accessible to Weblate. With a
publicly available repository you just need to enter the correct URL (for
example https://github.com/WeblateOrg/weblate.git), but for private
repositories or for push URLs the setup is more complex and requires
authentication.
Accessing repositories from Hosted Weblate
Nota
This section applies only to Hosted Weblate (hosted.weblate.org). If you are running your own self-hosted Weblate instance, please see the next section instead.
Para Weblate Hosted, hay un usuario dedicado al envío registrado en GitHub, Bitbucket, Codeberg y GitLab (con el nombre de usuario weblate, correo-e hosted@weblate.org, y un nombre o descripción de perfil Weblate push user).
Consejo
There can be more Weblate users on the platforms, designated for other Weblate instances.
Searching by e-mail hosted@weblate.org is recommended to find the correct
user for Hosted Weblate.
You need to add this user as a collaborator and give it appropriate permissions to your repository (read-only is okay for cloning, write is required for pushing). Depending on the service and your organization’s settings, this happens immediately, or requires confirmation on the Weblate side.
The weblate user on GitHub accepts invitations automatically within five minutes. Manual processing might be needed on the other services, so please be patient.
Once the weblate user is added to your repository, you can configure
Repositorio de código fuente and URL de envío al repositorio using the SSH protocol (for example
git@github.com:WeblateOrg/weblate.git).
Accessing repositories on code hosting sites (GitHub, GitLab, Bitbucket, Azure DevOps, …)
Nota
This section applies to self-hosted Weblate instances. If you are using Hosted Weblate (hosted.weblate.org), see Accessing repositories from Hosted Weblate instead.
For self-hosted Weblate, accessing repositories on code hosting sites is typically done by creating a dedicated user who is associated with a Weblate SSH key (see Clave SSH de Weblate). This way you associate Weblate SSH key with a single user (platforms frequently enforce single use of a SSH key) and grant this user access to the repository. You can then use SSH URL to access the repository (see Repositorios SSH).
Repositorios SSH
The most frequently used method to access private repositories is based on SSH. Authorize the public Weblate SSH key (see Clave SSH de Weblate) to access the upstream repository this way.
Advertencia
On GitHub, each key can only be used once, see Repositorios en GitHub and Accessing repositories from Hosted Weblate.
Weblate also stores the host key fingerprint upon first connection, and fails to connect to the host should it be changed later (see Verifying SSH host keys).
En caso de que necesite efectuar ajustes, hágalos desde la interfaz administrativa de Weblate:
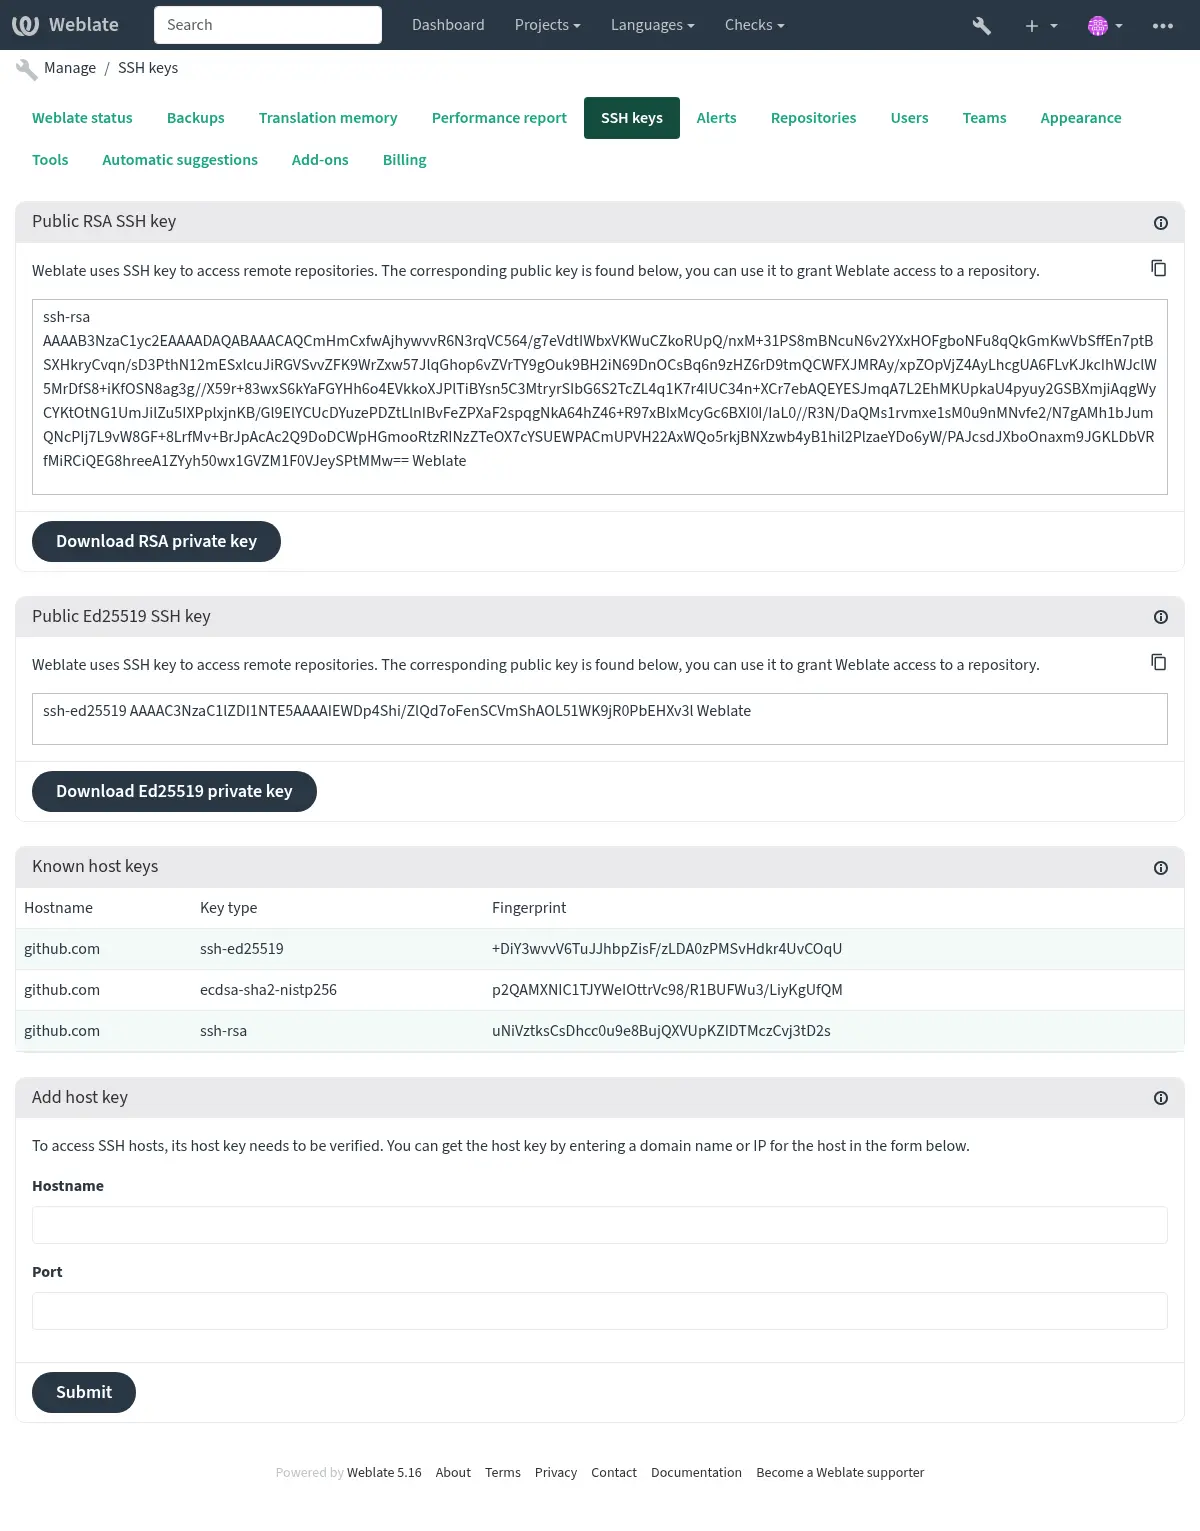
Clave SSH de Weblate
Distinto en la versión 4.17: Weblate now generates both RSA and Ed25519 SSH keys. Using Ed25519 is recommended for new setups.
The Weblate public key is visible to all users browsing the About page.
Admins can generate or display the public key currently used by Weblate in the connection (from SSH keys) on the admin interface landing page.
Nota
The corresponding private SSH key can not currently have a password, so ensure it is well protected.
Consejo
Make a backup of the generated private Weblate SSH key.
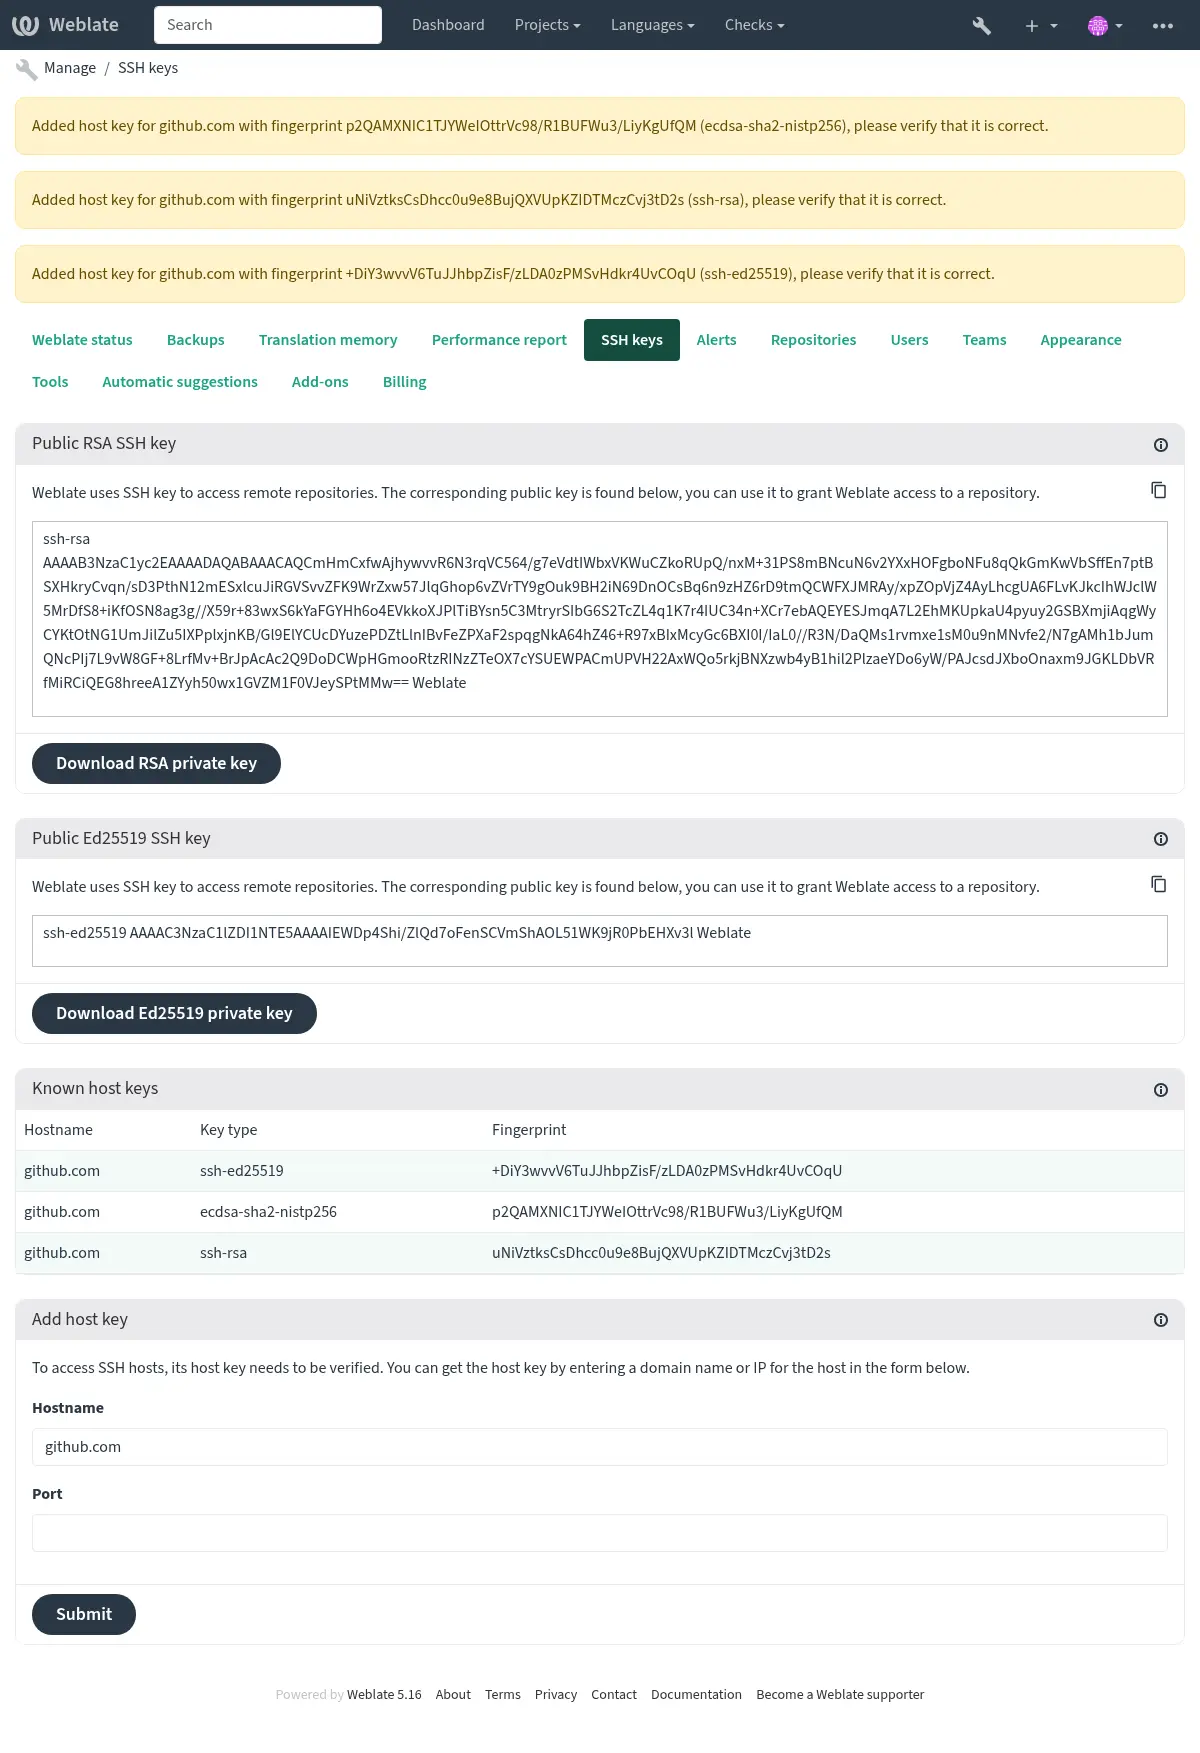
Verifying SSH host keys
Weblate automatically stores the SSH host keys on first access and remembers them for further use.
In case you want to verify the key fingerprint before connecting to the
repository, add the SSH host keys of the servers you are going to access in
Add host key, from the same section of the admin interface. Enter
the hostname you are going to access (e.g. gitlab.com), and press
Submit. Verify its fingerprint matches the server you added.
The added keys with fingerprints are shown in the confirmation message:
Connecting to legacy SSH servers
Recent OpenSSH releases (for example the one used in Weblate Docker container) disable RSA signatures using the SHA-1 hash algorithm by default. This change has been made as the SHA-1 hash algorithm is cryptographically broken, and it is possible to create chosen-prefix hash collisions for <USD$50K.
For most users, this change should be invisible and there is no need to replace ssh-rsa keys. OpenSSH has supported RFC8332 RSA/SHA-256/512 signatures since release 7.2 and existing ssh-rsa keys will automatically use the stronger algorithm where possible.
La incompatibilidad es más como cuando conecta a implementaciones de SSH más antiguas que no haber sido mejorados o no son seguidas de cerca las mejoras en el protocolo SSH. La conexión de SSH para tal servidor fallará cuando:
no matching host key type found. Their offer: ssh-rsa
For these cases, it may be necessary to selectively re-enable RSA/SHA1 to allow
connection and/or user authentication via the HostkeyAlgorithms and
PubkeyAcceptedAlgorithms options. For example, the following stanza in
DATA_DIR/ssh/config will enable RSA/SHA1 for host and user
authentication for a single destination host:
Host legacy-host
   HostkeyAlgorithms +ssh-rsa
   PubkeyAcceptedAlgorithms +ssh-rsa
We recommend enabling RSA/SHA1 only as a stopgap measure until legacy implementations can be upgraded or reconfigured with another key type (such as ECDSA or Ed25519).
Repositorios en GitHub
There are two main approaches to accessing GitHub repositories with Weblate:
Option 1: HTTPS with Personal Access Token (simpler for getting started)
Use HTTPS authentication with a personal access token and your GitHub account. This works for both read-only access (cloning) and read-write access (pushing changes or creating pull requests).
To use this approach:
Create a personal access token as described in Creating an access token for command-line use.
Include the token in your repository URL:
https://username:token@github.com/owner/repo.git
This is suitable when you’re starting with Weblate or working with a single repository.
Option 2: SSH with Dedicated User (recommended for multiple repositories)
For setups with multiple repositories, it is recommended to create a dedicated user for Weblate. This avoids GitHub’s limitation that each SSH key can only be used once per platform.
To use this approach:
Create a dedicated GitHub user account (e.g.,
weblate-bot)Add Weblate’s public SSH key to this user (see Clave SSH de Weblate)
Grant this user access to all repositories you want to translate
Use SSH URLs for your repositories:
git@github.com:owner/repo.git
This approach is also used for Hosted Weblate, which has a dedicated weblate user for that purpose.
Nota
When using Solicitudes de incorporación de GitHub for pull requests, the Rama a la que enviar configuration affects the behavior: if not set, the project is forked and changes are pushed through a fork. If set, changes are pushed to the upstream repository and the chosen branch.
GitLab repositories
Access via SSH is possible (see Repositorios SSH), but in case you need to access more than one repository, you will hit a GitLab limitation on allowed SSH key usage (since each key can be used only once).
In case the Rama a la que enviar is not set, the project is forked and changes pushed through a fork. In case it is set, changes are pushed to the upstream repository and chosen branch.
Using personal or project access tokens is possible as well. The token needs write_repository scope to be able to push changes to the repository. The project access token requires Developer role for pushing.
The URL needs to contain an username, for personal access token it is the
actual username (
https://user:personal_access_token@gitlab.com/example/example.git) for
project access tokens it can be non-blank value
(https://example:project_access_token@gitlab.com/example/example.git).
Nota
The rules for using project access tokens has changed between GitLab releases, the non-blank value is the current requirement, but older versions had different expectations (project name, bot user name). Check GitLab documentation matching your version if unsure.
URL internos de Weblate
Compartir una configuración de repositorio entre diferentes componentes por referenciar a su sitio como weblate://project/component dentro de otro componente (enlazado). De esta manera, el componente enlazado utiliza la configuración del repositorio VCS del componente (referenciado ) principal.
Advertencia
Removing main component also removes linked components.
Weblate automatically adjusts the repository URL when creating a component if it finds a component with a matching repository setup. You can override this in the last step of the component configuration.
Reasons to use this:
Ahorra espacio en disco en el servidor, ya que el repositorio se almacena solo una vez.
Hace que las actualizaciones sean más rápidas, solo se actualiza un repositorio.
There is just single exported repository with Weblate translations (see Exportador de Git).
Some add-ons can operate on multiple components sharing one repository, for example Concentrar consolidaciones de Git.
Repositorios HTTPS
Ver también
Para acceder a repositorios HTTPS protegidos, incluya el apodo y la contraseña en el URL. No se preocupe, Weblate quitará estos datos al mostrar el URL a los usuarios (incluso si se les permite ver el URL del repositorio).
For example the GitHub URL with authentication added might look like:
https://user:your_access_token@github.com/WeblateOrg/weblate.git.
In case you don’t provide credentials in the URL and the repository requires it, Git will fail with an error:
fatal: could not read Username for 'https://github.com': terminal prompts disabled
Distinto en la versión 5.10.2: Weblate usa autenticación proactiva con Git 2.46.0 y versiones posteriores cuando se proporcionan credenciales HTTP.
This makes it possible to access Azure DevOps repositories and makes access to authenticated repositories faster.
Nota
Si su apodo o contraseña contiene caracteres especiales, éstos deben codificarse en URL, por ejemplo https://user%40example.com:%24password%23@bitbucket.org/....
Using proxy
If you need to access HTTP/HTTPS VCS repositories using a proxy server, configure the VCS to use it.
This can be done using the http_proxy, https_proxy, and all_proxy
environment variables, (as described in the cURL documentation)
or by enforcing it in the VCS configuration, for example:
git config --global http.proxy http://user:password@proxy.example.com:80
Nota
The proxy configuration needs to be done under user running Weblate (see
also Permisos del sistema de archivos) and with HOME=$DATA_DIR/home (see
DATA_DIR), otherwise Git executed by Weblate will not use it.
Ver también
Git
Consejo
Weblate necesita Git 2.28 o posterior.
Ver también
See Accessing repositories for info on how to access different kinds of repositories.
Git con envío forzado
This behaves exactly like Git itself, the only difference being that it always force pushes. This is intended only in the case of using a separate repository for translations.
Advertencia
Utilice con precaución, ya que esto conduce fácilmente a las consignas perdidas en su repositorio en desarrollo.
Customizing Git configuration
Weblate invokes all VCS commands with HOME=$DATA_DIR/home (see
DATA_DIR), therefore editing the user configuration needs to be done
in DATA_DIR/home/.git.
Solicitudes de incorporación de GitHub
This adds a thin layer atop Git using the GitHub API to allow pushing translation changes as pull requests, instead of pushing directly to the repository.
Git pushes changes directly to a repository, while Solicitudes de incorporación de GitHub creates pull requests. The latter is not needed for merely accessing Git repositories.
You need to configure API credentials (GITHUB_CREDENTIALS) in the
Weblate settings to make this work. Once configured, you will see a
GitHub option when selecting Sistema de control de versiones.
Solicitudes de fusión de GitLab
This just adds a thin layer atop Git using the GitLab API to allow pushing translation changes as merge requests instead of pushing directly to the repository.
There is no need to use this to access Git repositories, ordinary Git works the same, the only difference is how pushing to a repository is handled. With Git changes are pushed directly to the repository, while Solicitudes de fusión de GitLab creates merge request.
You need to configure API credentials (GITLAB_CREDENTIALS) in the
Weblate settings to make this work. Once configured, you will see a
GitLab option when selecting Sistema de control de versiones.
Solicitudes de incorporación de Gitea
Added in version 4.12.
This just adds a thin layer atop Git using the Gitea API to allow pushing translation changes as pull requests instead of pushing directly to the repository.
There is no need to use this to access Git repositories, ordinary Git works the same, the only difference is how pushing to a repository is handled. With Git changes are pushed directly to the repository, while Solicitudes de incorporación de Gitea creates pull requests.
You need to configure API credentials (GITEA_CREDENTIALS) in the
Weblate settings to make this work. Once configured, you will see a
Gitea option when selecting Sistema de control de versiones.
Solicitudes de incorporación al Centro de Datos Bitbucket
Added in version 4.16.
This just adds a thin layer atop Git using the Bitbucket Data Center API to allow pushing translation changes as pull requests instead of pushing directly to the repository.
Advertencia
Esto no mantiene el API de Bitbucket Cloud.
There is no need to use this to access Git repositories, ordinary Git works the same, the only difference is how pushing to a repository is handled. With Git changes are pushed directly to the repository, while Solicitudes de incorporación al Centro de Datos Bitbucket creates pull request.
Necesita las credenciales API para configurar (BITBUCKETSERVER_CREDENTIALS) en los ajustes de Weblate para hacer este trabajo. Una vez que se configure, verá una opción de Bitbucket Data Center cuando seleccione Sistema de control de versiones.
Solicitud de incorporación a BitBucket Cloud
Added in version 5.8.
This just adds a thin layer atop Git using the Bitbucket Cloud API to allow pushing translation changes as pull requests instead of pushing directly to the repository.
Advertencia
Esto es diferente desde el API de Bitbucket Data Center.
There is no need to use this to access Git repositories, ordinary Git works the same, the only difference is how pushing to a repository is handled. With Git changes are pushed directly to the repository, while Solicitud de incorporación a BitBucket Cloud creates pull request.
You need to configure API credentials (BITBUCKETCLOUD_CREDENTIALS) in the
Weblate settings to make this work. Once configured, you will see a
Bitbucket Cloud option when selecting Sistema de control de versiones.
Solicitudes de fusión de Pagure
Added in version 4.3.2.
This just adds a thin layer atop Git using the Pagure API to allow pushing translation changes as merge requests instead of pushing directly to the repository.
There is no need to use this to access Git repositories, ordinary Git works the same, the only difference is how pushing to a repository is handled. With Git changes are pushed directly to the repository, while Solicitudes de fusión de Pagure creates merge request.
You need to configure API credentials (PAGURE_CREDENTIALS) in the
Weblate settings to make this work. Once configured, you will see a
Pagure option when selecting Sistema de control de versiones.
Gerrit
Adds a thin layer atop Git using the git-review tool to allow pushing translation changes as Gerrit review requests, instead of pushing them directly to the repository.
La documentación de Gerrit tiene los detalles sobre la configuración necesaria para la puesta en marcha de dichos repositorios.
Solicitud de incorporación Azure DevOps
This adds a thin layer atop Git using the Azure DevOps API to allow pushing translation changes as pull requests, instead of pushing directly to the repository.
Git pushes changes directly to a repository, while Solicitud de incorporación Azure DevOps creates pull requests. The latter is not needed for merely accessing Git repositories.
You need to configure API credentials (AZURE_DEVOPS_CREDENTIALS) in the
Weblate settings to make this work. Once configured, you will see a
Azure DevOps option when selecting Sistema de control de versiones.
Mercurial
Mercurial es otro sistema de control de versiones que puede utilizar directamente en Weblate.
Nota
Debería funcionar con cualquier versión de Mercurial, pero a veces hay cambios incompatibles en la interfaz de línea de órdenes que quebrantan la integración con Weblate.
Ver también
See Accessing repositories for info on how to access different kinds of repositories.
Subversion
Weblate emplea git-svn para interactuar con los repositorios subversion. Es un script de Perl que permite a subversión ser utilizada por un cliente Git, permitiendo a los usuarios mantener un clon completo del repositorio interno y consignan localmente.
Nota
Weblate tries to detect Subversion repository layout automatically - it supports both direct URLs for branch or repositories with standard layout (branches/, tags/ and trunk/). More info about this is to be found in the git-svn documentation. If your repository does not have a standard layout and you encounter errors, try including the branch name in the repository URL and leaving branch empty.
Datos de acceso de Subversion
Weblate expects you to have accepted the certificate up-front (and your
credentials if needed). It will look to insert them into the DATA_DIR
directory. Accept the certificate by using svn once with the $HOME
environment variable set to the DATA_DIR:
# Use DATA_DIR as configured in Weblate settings.py, it is /app/data in the Docker
HOME=${DATA_DIR}/home svn co https://svn.example.com/example
Ver también
Archivos locales
Consejo
Por lo tanto, esto utiliza Git. Requiere instalado el Git y concederle cambiar a utilizar el Git nativo con histórico completo de sus traducciones.
Weblate can also operate without a remote VCS. The initial translations are imported by uploading them. Later you can replace individual files by file upload, or add translation strings directly from Weblate (currently available only for monolingual translations).
En el segundo plano Weblate crea un repositorio Git para ti y todos los cambios son seguidos dentro. En caso que más tarde decida utilizar un VCS para almacenar las traducciones, ya tiene un repositorio dentro de Weblate que pude basar su integración.