Module Weblate opționale
Mai multe module opționale sunt disponibile pentru configurația dumneavoastră.
Exportator Git
Vă oferă acces numai pentru citire la depozitul Git subiacent folosind HTTP(S).
Instalare
Adăugați
weblate.gitexportla aplicațiile instalate însettings.py:INSTALLED_APPS += ("weblate.gitexport",)
Exportați depozitele existente prin migrarea bazei de date după instalare:
weblate migrate
Sugestie
Git exporter is turned on in our official Docker image. To turn it of, use:
WEBLATE_REMOVE_APPS=weblate.gitexport
Utilizare
Modulul se conectează automat la Weblate și setează URL-ul depozitului exportat în Configurația componentei. Depozitele sunt accesibile sub partea /git/ a URL-ului Weblate, de exemplu https://example.org/git/weblate/main/.
Depozitele pentru proiectele disponibile public pot fi clonate fără autentificare:
git clone 'https://example.org/git/weblate/main/'
Accesul pentru a parcurge depozitele cu acces restricționat (cu Private access control sau când REQUIRE_LOGIN este activat) necesită un token API care poate fi obținut în user profile:
git clone 'https://user:KEY@example.org/git/weblate/main/'
Notă
Weblate serves the Git repository itself, but it does not serve Git LFS
objects. For repositories using Git LFS, clone from the upstream repository
and add Weblate as another remote. If you only need Git-tracked files, you
can clone from Weblate with GIT_LFS_SKIP_SMUDGE=1 to skip downloading
Git LFS objects.
Sugestie
În mod implicit, membrii grupului Users și utilizatorii anonimi au acces la depozitele pentru proiectele publice prin intermediul rolurilor Access repository și Power user.
Facturare
Aceasta este utilizată la Hosted Weblate pentru a defini planurile de facturare, pentru a urmări facturile și limitele de utilizare.
Instalare
1. Add weblate.billing to installed apps in
settings.py:
INSTALLED_APPS += ("weblate.billing",)
Rulați migrarea bazei de date pentru a instala opțional structuri de baze de date suplimentare pentru modul:
weblate migrate
Billing plan creation and assignment
You first need to create a billing plan to activate billing. Navigate to the Administration section (represented by the wrench icon) and open the Tools screen. From there, proceed to the Django admin interface.
In the Django admin interface, locate the BILLING section and add a billing plan. For instance, you can add a Free plan with no cost.
If you wish to assign a billing plan to an existing project, this can also be done within the Django admin interface using the Customer billings option.
Lastly, the Django admin interface provides an Invoice option for logging your customer payments.
Utilizare
După instalare, puteți controla facturarea în interfața de administrare. Utilizatorii cu facturarea activată vor avea o nouă filă Billing în Profil utilizator.
Modulul de facturare permite în plus administratorilor de proiecte să creeze noi proiecte și componente fără a fi superutilizatori (a se vedea Adăugarea de proiecte și componente de traducere). Acest lucru este posibil atunci când sunt îndeplinite următoarele condiții:
Facturarea este în limitele configurate (orice suprautilizare duce la blocarea creării proiectului/componentei) și plătită (dacă prețul său este diferit de zero)
Utilizatorul este administrator al unui proiect existent cu facturare sau utilizatorul este proprietar al facturării (aceasta din urmă este necesară la crearea unei noi facturări pentru ca utilizatorii să poată importa proiecte noi).
La crearea proiectului, utilizatorul are posibilitatea de a alege ce factură trebuie să fie facturată pentru proiect, în cazul în care are acces la mai multe dintre ele.
Legal module
Acesta este utilizat pe Hosted Weblate pentru a furniza documentele legale necesare. Acesta este furnizat cu documente în alb și se așteaptă să completați următoarele modele în documente:
legal/documents/tos.htmlDocumentul privind condițiile de serviciu
legal/documents/privacy.htmlDocumentul privind politica de confidențialitate
legal/documents/summary.htmlScurtă prezentare generală a condițiilor de utilizare și a politicii de confidențialitate
On changing the terms of service documents, please adjust
LEGAL_TOS_DATE so that users are forced to agree with the updated
documents.
Notă
Legal documents for the Hosted Weblate service operated by Weblate s.r.o. are available in this Git repository: <https://github.com/WeblateOrg/wllegal/tree/main/wllegal/templates/legal/documents>.
The bundled terms of service and related legal documents are specific to that service and are not intended for general use. They might still come in handy as a starting point if adjusted to meet your needs.
Instalare
1. Add weblate.legal to installed apps in
settings.py:
INSTALLED_APPS += ("weblate.legal",)

# Optional:

# Social auth pipeline to confirm TOS upon registration/subsequent sign in
SOCIAL_AUTH_PIPELINE += ("weblate.legal.pipeline.tos_confirm",)

# Middleware to enforce TOS confirmation of signed in users
MIDDLEWARE += [
    "weblate.legal.middleware.RequireTOSMiddleware",
]
Rulați migrarea bazei de date pentru a instala opțional structuri de baze de date suplimentare pentru modul:
weblate migrate
Modificați documentele juridice din dosarul
weblate/legal/templates/legal/pentru a corespunde serviciului dumneavoastră.
Sugestie
In Docker deployments, enable the legal module using
WEBLATE_LEGAL_INTEGRATION instead of editing
settings.py. Use tos-confirm to enable the legal module and
terms of service confirmation enforcement, or wllegal to additionally
load the hosted legal document templates used by services operated by
Weblate s.r.o. These templates are not intended for general use. To provide
your own templates in Docker, place them in
/app/data/python/customize/templates/legal/documents, see
Înlocuirea logo-ului și a altor fișiere statice.
Utilizare
După instalare și editare, documentele juridice sunt afișate în Weblate UI.
Avataruri
Avatarurile sunt descărcate și stocate în memoria cache pe server pentru a reduce scurgerile de informații către site-urile care le oferă în mod implicit. Suportul încorporat pentru preluarea avatarurilor de la adresele de e-mail configurate în acest scop poate fi dezactivat cu ENABLE_AVATARS.
Weblate suportă în prezent:
Localizare CDN
The CDN de localizare JavaScript and Translation files CDN add-ons
write files to LOCALIZE_CDN_PATH; Weblate does not serve them.
Configure the web server or CDN serving LOCALIZE_CDN_URL as a
public, read-only static file host.
Treat every published CDN file as public. The add-on specific UUID in the URL is not an access-control mechanism. Do not enable CDN add-ons for components that contain private strings, unreleased product text, customer data, internal URLs, API examples, repository paths, translator comments, or file-format metadata that should not be exposed.
The Translation files CDN add-on publishes raw translation files in formats supported by Weblate. Some formats can be interpreted by browsers or other clients as HTML, SVG, XML, JavaScript, YAML, or application-specific configuration. Serve the CDN from a dedicated domain that is separate from Weblate and from the application consuming the translations. Do not share authentication cookies with the CDN domain.
Recommended server configuration:
Serve only the directory configured by
LOCALIZE_CDN_PATH; do not expose Weblate repositories, backups, media, configuration, or the whole data directory.Disable directory listing.
Use HTTPS and make the CDN host read-only from the web server.
Send X-Content-Type-Options with
nosniff.Configure conservative MIME types. Serve unknown translation formats as text/plain or application/octet-stream; only serve
weblate.jsas JavaScript.For raw translation formats that are not intended to be rendered in a browser, consider adding Content-Disposition with
attachment.Configure
Access-Control-Allow-Originonly for sites that need browser access to the files.Set cache lifetimes that match your update expectations, and purge CDN caches when stale translations must disappear quickly.
The following nginx snippet serves only the configured CDN directory and applies conservative defaults for raw translation files:
#
# nginx configuration for the Weblate localization CDN
#
# You will want to change:
#
# - server_name to match the host configured in LOCALIZE_CDN_URL
# - root to match LOCALIZE_CDN_PATH
# - Access-Control-Allow-Origin to the sites that need browser access
# - TLS configuration if HTTPS is not terminated before nginx
#
server {
    listen 80;
    server_name cdn.example.com;

    # LOCALIZE_CDN_PATH
    root /home/weblate/data/l10n-cdn;

    autoindex off;
    disable_symlinks on;

    location = / {
        return 404;
    }

    # The JavaScript localization add-on publishes this loader.
    location ~ "^/[0-9a-f]{32}/weblate\.js$" {
        try_files $uri =404;

        types {
            application/javascript js;
        }
        default_type application/javascript;

        add_header X-Content-Type-Options nosniff always;
        # add_header Access-Control-Allow-Origin "https://www.example.com" always;

        expires 1h;
    }

    # Other CDN files are translation files. Serve them conservatively so raw
    # formats are not interpreted as active browser content.
    location / {
        try_files $uri =404;

        types {
        }
        default_type text/plain;

        add_header X-Content-Type-Options nosniff always;
        add_header Content-Disposition "attachment" always;
        # add_header Access-Control-Allow-Origin "https://www.example.com" always;

        expires 1h;
    }
}
Semnarea comenzilor Git cu GnuPG
Toate angajamentele pot fi semnate de cheia GnuPG a instanței Weblate.
Turn on
WEBLATE_GPG_IDENTITY. (Weblate will generate a GnuPG key when needed and will use it to sign all translation commits.)Această funcție necesită instalarea GnuPG 2.1 sau o versiune mai nouă.
Cheia poate fi găsită în
DATA_DIR, iar cheia publică este afișată pe pagina „Despre”: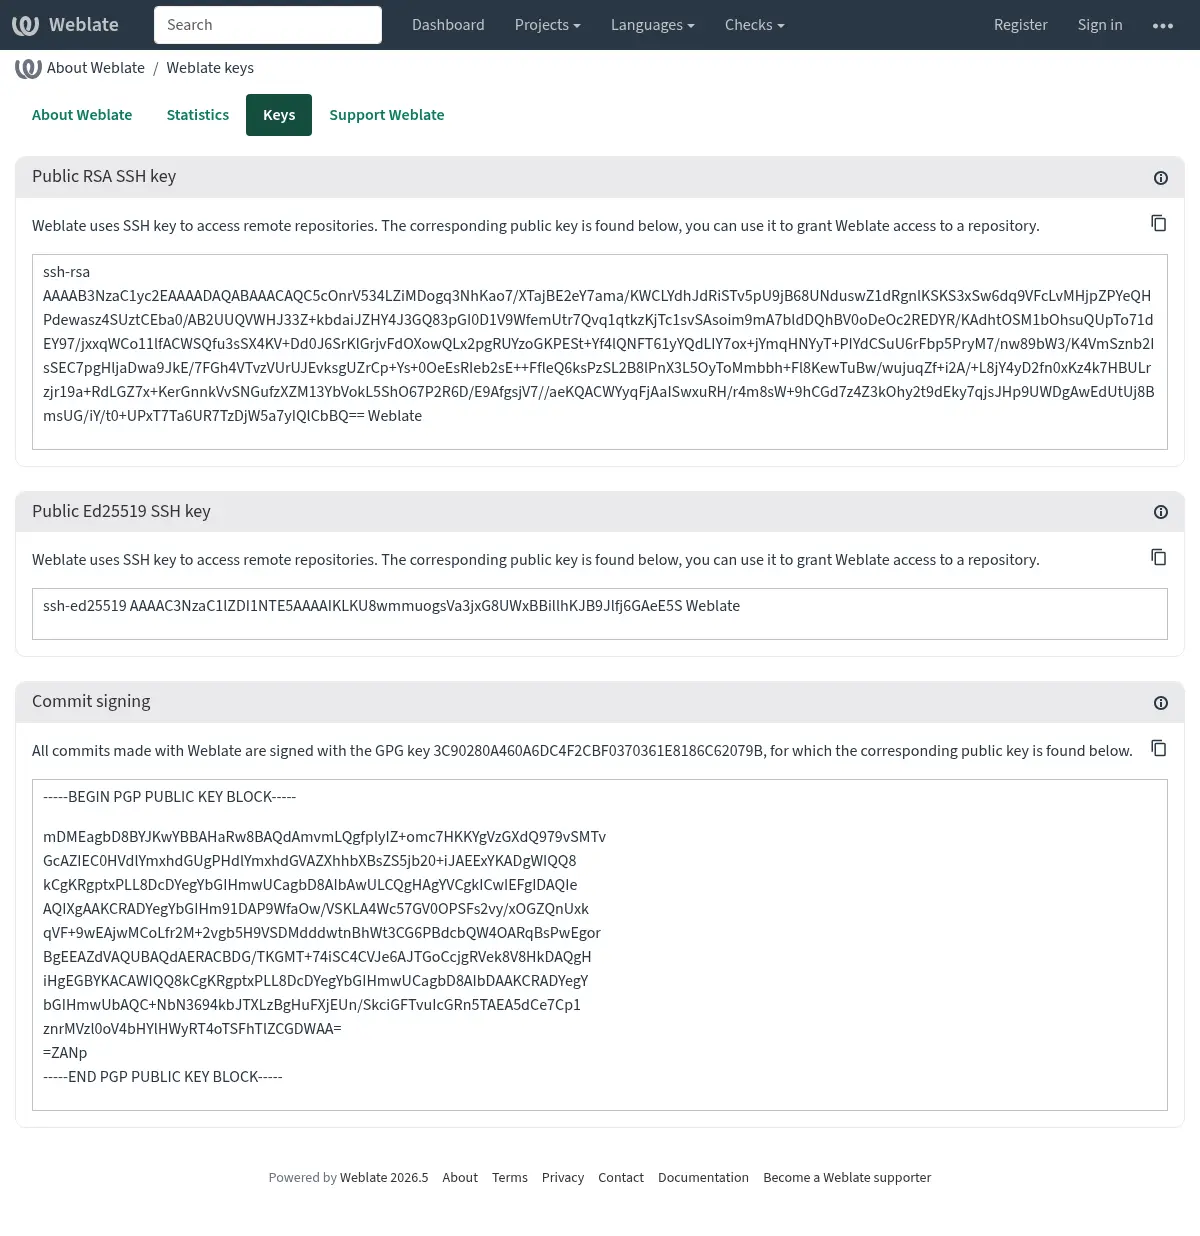
Alternatively you can also import existing keys into Weblate, just set
HOME=$DATA_DIR/homewhen invoking gpg.
Sugestie
The key material is cached by Weblate for a long period. In case you let
Weblate generate a key with WEBLATE_GPG_IDENTITY and then import
key with the same identity to use an existing key, purging redis cache is
recommended to see the effect of such change.
Notă
When sharing DATA_DIR between multiple hosts, please follow instructions
at https://wiki.gnupg.org/NFS to make GnuPG signing work reliably.
Vezi și
Limitarea ratei
Schimbat în versiunea 4.6: The rate limiting no longer applies to signed in superusers.
Mai multe operații din Weblate sunt limitate de tarif. Sunt permise cel mult RATELIMIT_ATTEMPTS încercări în RATELIMIT_WINDOW secunde. Utilizatorul este apoi blocat pentru RATELIMIT_LOCKOUT. Există, de asemenea, setări specifice domeniilor, de exemplu RATELIMIT_CONTACT_ATTEMPTS sau RATELIMIT_TRANSLATE_ATTEMPTS. Tabelul de mai jos este o listă completă a domeniilor disponibile.
Următoarele operațiuni fac obiectul limitării ratei:
Nume |
Domeniu de aplicare |
Încercări permise |
Fereastra Ratelimit |
Perioada de blocare |
|---|---|---|---|---|
Înregistrare |
|
5 |
300 |
600 |
Trimiterea unui mesaj către administratori |
|
2 |
300 |
600 |
Password authentication on sign-in |
|
5 |
300 |
600 |
Second-factor authentication |
|
5 |
300 |
600 |
Căutare la nivelul întregului site |
|
6 |
60 |
60 |
Traducerea |
|
30 |
60 |
600 |
Adăugarea la glosar |
|
30 |
60 |
600 |
Începerea traducerii într-o limbă nouă |
|
2 |
300 |
600 |
Crearea unui nou proiect |
|
5 |
600 |
600 |
The rate limiting is based on sessions when user is signed in and on IP address if not.
Dacă un utilizator nu reușește să se conecteze AUTH_LOCK_ATTEMPTS de mai multe ori, autentificarea prin parolă va fi dezactivată pentru contul respectiv până când va trece prin procesul de resetare a parolei.
Setările pot fi, de asemenea, aplicate în containerul Docker prin adăugarea prefixului WEBLATE_ la numele setării, de exemplu RATELIMIT_ATTEMPTS devine WEBLATE_RATELIMIT_ATTEMPTS.
API are setări separate de limitare a ratei, a se vedea Limitarea ratei API.