Migrazione a Weblate
Are you using a different localization platform and considering switching to Weblate? This guide provides a quick, step-by-step process to help you migrate your translation project from platforms like Transifex, Crowdin, Lokalise, or similar services.
Weblate is designed around continuous localization with Git integration at its core, making it ideal for teams that want to keep translations close to their development workflow.
Vedi anche
Starting with internationalization for choosing the right internationalization framework
Integrating with Weblate per opzioni di integrazione dettagliate
Localizzazione continua for setting up automated workflows
Prerequisites
Before starting your migration, ensure you have:
On your localization platform:
Accesso per esportare i tuoi file di traduzione
List of translators and their roles/permissions
Understanding of your current workflow (review process, automation, etc.)
Per Weblate:
A Weblate instance (either Hosted Weblate or self-hosted)
Admin or project creation permissions on your Weblate instance
Prepara i tuoi file di traduzione
Esporta traduzioni dalla tua piattaforma attuale
Most localization platforms allow you to export all translations at once:
Transifex: utilizza il loro strumento CLI o scarica le traduzioni dall’interfaccia web
Crowdin: Export all translations as a ZIP file from project settings
Lokalise: Use the bulk export feature
Phrase: Download all locales from the project dashboard
Suggerimento
Keep your translation files in the format native to your internationalization framework (PO, XLIFF, JSON, etc.) rather than converting them. Weblate supports many formats.
Invia le traduzioni al tuo repository Git
Suggerimento
If you would rather not store translations in an external Git repository, you can skip this step and use the Upload translation files option when creating a component.
Se le tue traduzioni non sono già in Git:
Create a Git repository or use your existing project repository
Organize translation files following your project structure
Commit and push the files to your Git hosting service (GitHub, GitLab, Bitbucket, etc.)
git add locales/
git commit -m "Add translation files for Weblate migration"
git push origin main
Vedi anche
Localizzazione continua per una struttura ottimale del repository
Integrazione controllo versione for supported version control systems
Importa il tuo progetto in Weblate
Crea un nuovo progetto
Passa alla tua istanza Weblate.
Click Add new translation project in the + menu.
Fill in your project details:
Project name: Your application or project name
URL slug: Short identifier (e.g.,
myapp)Project website: Your project homepage (optional)

Vedi anche
Adding translation projects and components for detailed project creation instructions
Aggiungi un componente dal tuo repository Git
After creating the project, click Add new translation component
Seleziona Dal controllo della versione
Configura il tuo componente:
Component name: e.g., «Application strings», «Website», «Documentation»
Repository URL: Your Git repository URL (HTTPS or SSH)
Repository branch: Optional: Specify repository branch (Weblate automatically detects the default branch if not specified)
Weblate will automatically detect:
Formato del file di traduzione
Lingue disponibili
Lingua di origine
Esaminare e confermare le impostazioni rilevate
Nota
If your repository contains a Transifex .tx/config, Weblate parses
it using translation-finder and offers matching component configurations
during discovery. This only covers file-related configuration, such as file
masks and source files. Other project settings from the previous platform,
including workflows, permissions, and language aliases, still need to be
configured manually in Weblate.
Language aliases are usually not needed because Weblate already recognizes and normalizes common language-code variants while parsing translation files. See Parsing language codes; configure Alias lingua only if your repository uses codes Weblate cannot map as intended.

Suggerimento
For repositories with multiple translation components (e.g., separate files for backend, frontend, documentation), create a separate Weblate component for each.
You can speed this up using From existing component for shared repositories or Scoperta dei componenti to automatically create them.
Vedi anche
Component configuration per tutte le opzioni di configurazione
Bilingual and monolingual formats for understanding monolingual vs. bilingual formats
Configura il tuo flusso di lavoro
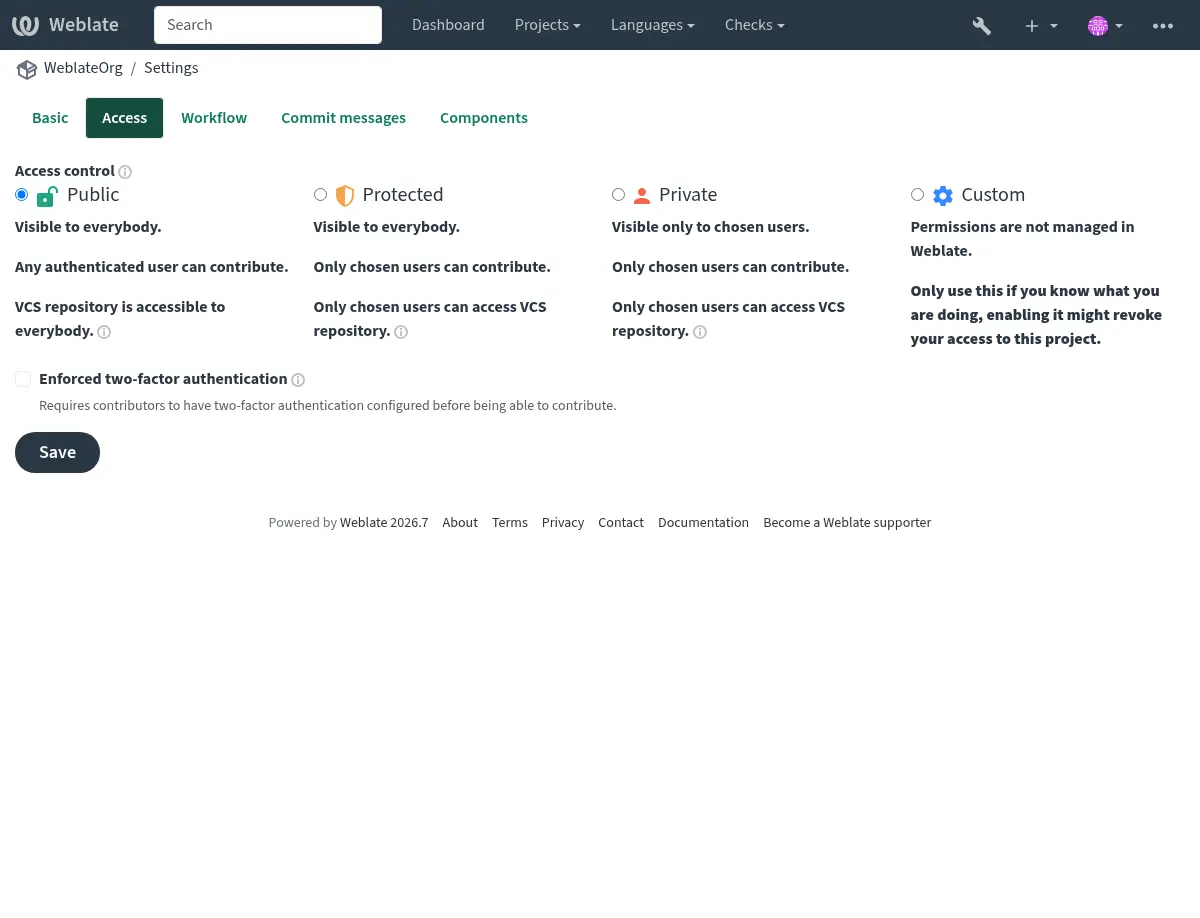
Configura il controllo degli accessi
Choose your project’s visibility and access level:
Go to your project settings: Operations → Settings → Access tab
Select the appropriate access control:
Public: Open-source projects, anyone can contribute
Protected: Visible to all, but only invited users can translate
Private: Only invited users can view and translate
Vedi anche
Gestione controllo accessi per progetto for detailed access control configuration
Configura la localizzazione continua
Enable automatic updates and commits:
Configura l’integrazione del repository:
Pull changes: Set up a webhook so Weblate updates when your source code changes
Push changes: Configure Pushing changes from Weblate so translations are committed back to your repository
Abilita le azioni automatiche nelle impostazioni del componente:
Push on commit: Automatically push translations to your repository
Commit interval: Set how often pending translations are committed (e.g., every 24 hours)
Vedi anche
Localizzazione continua per l’automazione completa del flusso di lavoro
Configura controlli di qualità e flussi di lavoro
Personalizza i controlli qualità della traduzione:
Enable checks: Review Quality checks and enable any opt-in quality checks you need.
Set up review workflow: Enable Abilita revisioni if you want an approval process.
Add enforced checks: Configure which quality checks should block translations.
Facoltativo: abilita i componenti aggiuntivi
Weblate offers Add-on to automate common tasks:
Aggiorna i file PO per adeguarli al file POT (msgmerge): Automatically update PO files from POT templates
Pulisci i file di traduzione: Remove unused translation strings
Unisci commit Git: Squash commits before pushing to your repository
Scoperta dei componenti: rileva automaticamente nuovi file di traduzione
Vedi anche
Add-on for all available add-ons
Testare e verificare
Before announcing the migration to your translators:
Test the workflow:
Fai una traduzione di prova
Verifica che appaia nel tuo repository Git
Prova a trasferire le modifiche dal tuo repository a Weblate
Importa eventuali memorie di traduzione esistenti (opzionale):
Utilizza Memoria traduzione per importare le traduzioni precedenti
This helps with consistency and speeds up translation
Configura notifiche:
Imposta Notifiche per gli eventi di traduzione
Configura il repository Agganci di notifica per il tuo servizio di hosting Git
Vedi anche
Memoria traduzione for translation memory management
Invita e gestisci gli utenti
Invita traduttori
Per progetti Protetti e Privati:
Passa a Operazioni → Utenti nel tuo progetto
Usa Add user per invitare i traduttori
Assign them to appropriate teams:
Traduttori: possono tradurre stringhe
Revisori: possono rivedere e approvare le traduzioni
Managers: Can manage project settings
For Public projects, users can start contributing immediately after signing up.
Suggerimento
Send your translators a welcome message with:
Link al tuo progetto su Weblate
Overview of any project-specific terminology or style guides
Informazioni sul processo di revisione
Vedi anche
Gestione controllo accessi per progetto for team management
Controllo accessi for advanced permission configuration
Prossimi passi
After completing the migration:
Announce to translators: Let your translation team know about the migration with clear instructions
Monitor initial usage: Watch for any issues during the first few days
Gather feedback: Ask translators about their experience compared to the previous platform
Optimize workflow: Adjust settings based on your team’s needs
Remove previous platform: Once the migration is completed, remember to revoke access granted to the previous platform.
Suggerimento
During migration, you can run both platforms in parallel for a transition period to ensure everything works as expected before fully switching over.
Risorse aggiuntive
Integrating with Weblate - Modelli di integrazione dettagliati
Translation workflows - Different workflow configurations
Localizzazione continua - Automated continuous localization
API REST di Weblate - API for automation and integrations
Translation progress reporting - Setting up translation progress reports
Frequently Asked Questions - Frequently asked questions
Suggerimento
Join the Weblate community if you need help during your migration. The community is active and helpful!