開始為 Weblate 貢獻代碼
要理解 Weblate 原始碼,請瀏覽 Weblate 原始碼、 Weblate 前端 和 Weblate 內部。
Starting with the codebase
要讓您自己熟悉 Weblate 代碼庫,那麼請查看標記為 good first issue 的那些 bug。
You are welcome to start working on these issues without asking. Just announce that in the issue, so that it's clear that somebody is working on that issue.
本地執行 Weblate
The most comfortable approach to get started with Weblate development is to follow 從原始碼中安裝. It will get you a Python environment with editable Weblate sources.
複製 Weblate 原始碼:
git clone https://github.com/WeblateOrg/weblate.git
cd weblate
Install Weblate and all dependencies useful for development:
uv sync --all-extras --dev
Start a development server:
uv run weblate runserver
取決於配置,您也許想啟動 Celery workers:
uv run ./weblate/examples/celery start
To run tests (see Weblate 本地測試 for more details):
. scripts/test-database.sh
uv run pytest
也參考
在 Docker 中本地執行 Weblate
If you have Docker and the docker-compose-plugin installed, you need an additional tool
called jq which you can install through your favorite package manager. Then, you can
spin up the development environment by simply running:
./rundev.sh
它將新增 Docker 影響並啟動它。 Weblate 執行在 <http://127.0.0.1:8080/> 上,並且您可以以 admin 為使用者名稱, admin 為密碼來登入。新的安裝是空的,所以您會想要以 新增翻譯專案和組件 來繼續。
Weblate is configured to use maildev container as a e-mail server. The delivered e-mails can be seen at <http://127.0.0.1:1080/>.
The Dockerfile and docker-compose.yml for this are located in the
dev-docker directory. For easier access to the database during development,
the container running PostgreSQL is exposed on port 5433.
The script also accepts some parameters, to execute tests, run it with the
test parameter and then specify any test parameters,
for example running only tests in the weblate.machine module:
./rundev.sh test --exitfirst weblate/machine
備註
小心在執行測試前您的 Docker 容易活動並執行。您可以通過執行 docker ps 指令來檢查。
To display the logs:
./rundev.sh logs
為了停止背景容器,執行:
./rundev.sh stop
執行沒有任何參數的指令碼將重建 Docker 容器並重啟動它。
警告
This container is not suitable for production use. Security is sacrificed to make the development easier.
Bootstrapping your devel instance
You might want to use import_demo to create demo translations and
createadmin to make an admin user.
If you have 帳單 installed as well, you can use
billing_demo to create a demo billing project.
使用 PyCharm 為 Weblate 編寫代碼
PyCharm 是 Python 的著名 IDE,這裡有一些幫助您在其中建立您的 Weblate 專案的指導原則。
考慮到您剛剛將 GitHub 儲存庫複製到一個資料夾中,只需使用 PyCharm 開啟它。一旦 IDE 開啟,第一步要做的是指定您想要使用的直譯器:

Select the .venv environment created by uv sync --all-extras --dev
to match the command-line development setup. You can also let PyCharm create a
Python environment for you, but the uv-managed environment is preferred:
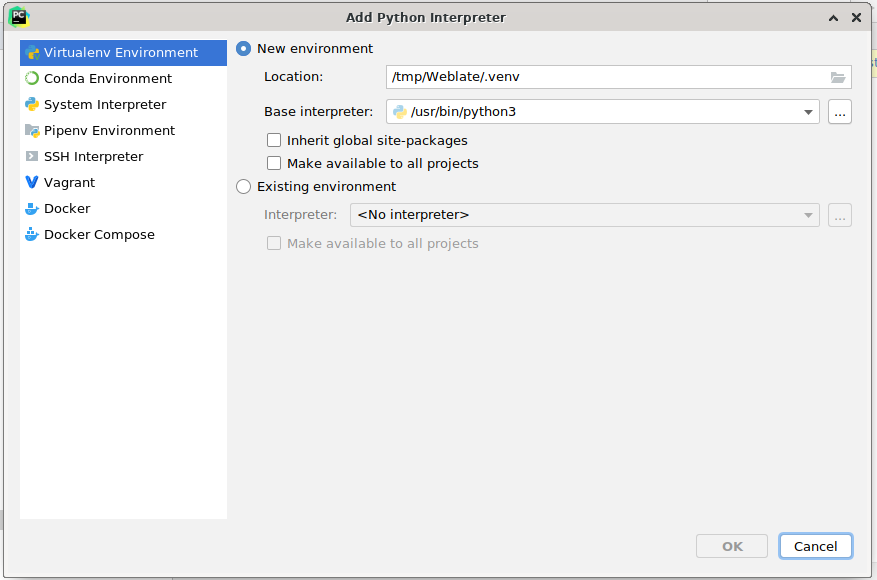
Don't forget to install the dependencies once the interpreter is set. When
using the preferred uv-managed environment, run uv sync --all-extras --dev
from the console.
第二步是設定正確的資訊來在 PyCharm 中原生使用 Django:理念是能夠立刻觸發 IDE 中的單元測試。為此,您需要指定該 Django 專案的根路徑及其設定路徑:
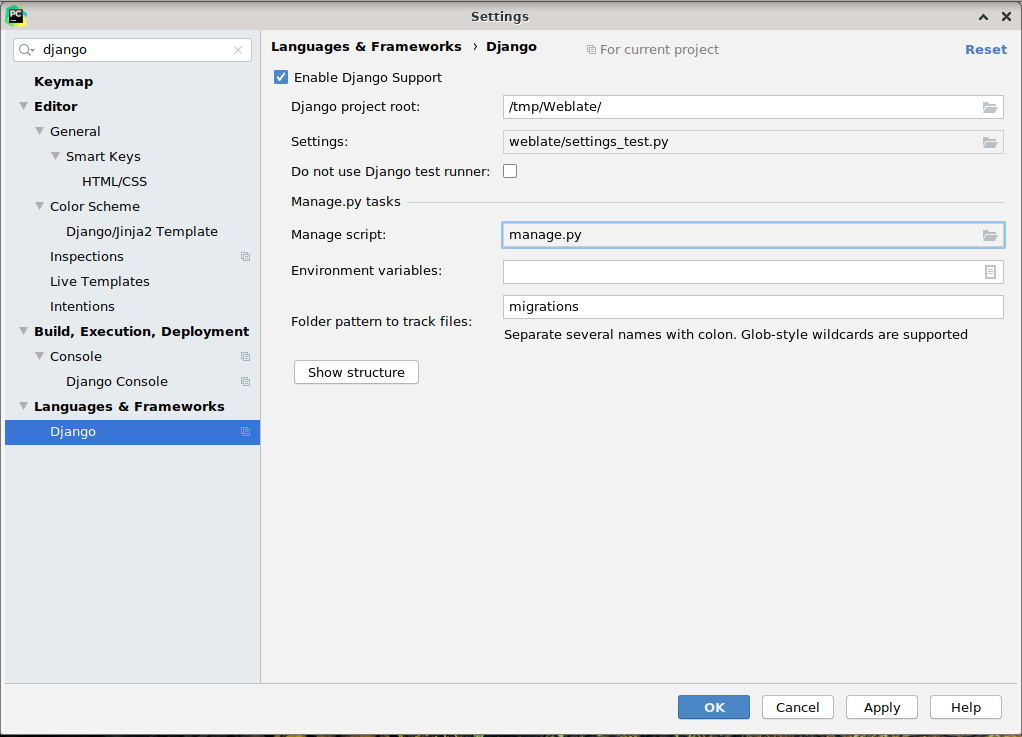
Be careful, the Django project root is the actual root of the repository, not the Weblate
sub-directory. About the settings, you could use the weblate/settings_test.py from the
repository, but you could create your own setting and set it there.
最後一步是執行伺服器,並將中斷點放置在代碼中而能夠除錯它。這通過新增新的 Django Server 配置來完成:
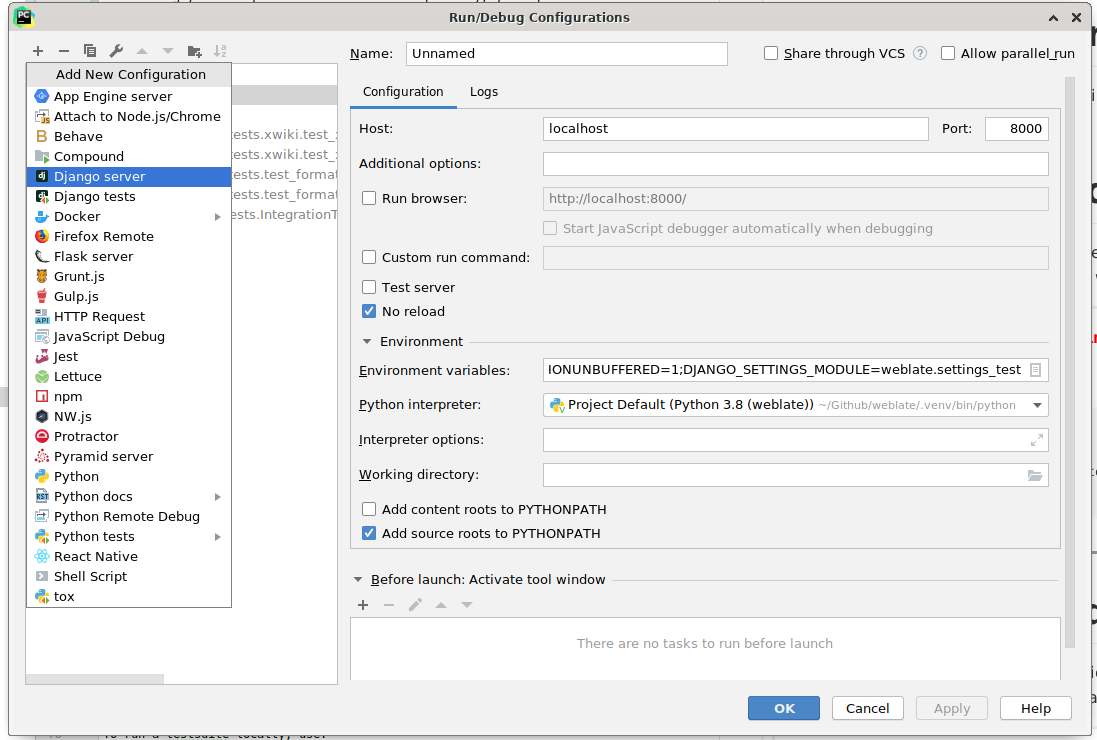
提示
小心被稱為 No reload 的屬性:如果您修改文件,它會阻止伺服器被實時重新載入。這允許保留現有的除錯器中斷點,而它們通常會在重新載入伺服器時被丟棄。