Kódhozzájárulás kezdése a Weblate-hez

Ismerkedjen meg a Weblate forráskódjával a következő dokumentációs részeken keresztül: Weblate forráskód, Weblate felhasználói felület és A Weblate belső működése.

Ismerkedés a kódbázissal

Kezdésként próbálja ki a good first issue címkével ellátott hibákat, hogy megismerje a Weblate kódbázisát.

Nyugodtan elkezdhet dolgozni ezeken a hibajegyeken anélkül, hogy engedélyt kérne. Az adott hibajegynél jelezze, hogy foglalkozik vele, így egyértelmű lesz, hogy már dolgozik rajta.

Weblate futtatása helyileg

The most comfortable approach to get started with Weblate development is to follow Telepítés forráskódból. It will get you a Python environment with editable Weblate sources.

  1. Klónozza a Weblate forráskódját:

    git clone https://github.com/WeblateOrg/weblate.git
    cd weblate
    
  2. Install Weblate and all dependencies useful for development:

    uv sync --all-extras --dev
    
  3. Indítsa el a fejlesztői szervert:

    uv run weblate runserver
    
  4. A beállításától függően el kell indítani a Celery munkafolyamatokat is:

    uv run ./weblate/examples/celery start
    
  5. To run tests (see Weblate helyi tesztelése for more details):

    . scripts/test-database.sh
    uv run pytest
    

Development container for tests and lint

The development container prepares Python dependencies, PostgreSQL, Valkey, compiled translations, and static files for running tests and lint checks. It supports ordinary clones and linked Git worktrees. Each checkout has its own containers, network, database, virtual environment, and caches, with no published host ports in the default test profile. The optional application profile runs Weblate and workers for local QA with separate storage and dynamically allocated localhost ports.

Install Docker with the Compose plugin, Git, and Python 3.12 or newer on the host. For the command-line workflow, also install Node.js 20 or newer and the Dev Container CLI:

npm install --global @devcontainers/cli@0.89.0
./scripts/devcontainer up
./scripts/devcontainer doctor
./scripts/devcontainer exec -- uv run pytest weblate/lang/tests.py
./scripts/devcontainer exec -- uv run prek run --all-files

Alternatively, open the checkout in Visual Studio Code with its Dev Containers extension and select Dev Containers: Reopen in Container. Both workflows use .devcontainer/devcontainer.json and wait for bootstrap to finish. The CLI must be installed separately for the default backend of scripts/devcontainer. To use Docker Compose directly without Node.js or the Dev Container CLI, pass --backend compose before the command:

./scripts/devcontainer --backend compose up
./scripts/devcontainer --backend compose exec -- uv run pytest weblate/lang/tests.py

Both backends share the same test environment for a checkout. The Compose backend runs bootstrap on each up invocation. CI checks both backends on ARM Linux runners, including concurrent application QA in separate worktrees.

Bootstrap uses the frozen dependency lock and builds lxml and xmlsec from source, matching CI. Initial setup requires network access to download images and dependencies; lint hooks download their environments on first use. After changing dependencies, rerun:

./scripts/devcontainer bootstrap

Pytest creates and migrates its test database on first use and reuses it on subsequent runs. To recreate it after incompatible migration changes, pass --create-db to pytest. Existing host virtual environments and local weblate/settings.py are not used by the container.

For a separate task, create a worktree and start its environment:

git worktree add ../weblate-task -b task/example
cd ../weblate-task
./scripts/devcontainer up

The environment identifier is derived from the checkout’s absolute path, so changing branches preserves the environment. Stop or destroy the environment before moving or deleting its checkout. Linked worktrees also mount the shared Git metadata directory at its original path; Git operations therefore affect the same repository as host Git operations. Other worktrees» sources are not mounted. Unset COMPOSE_PROJECT_NAME when using this workflow, and remove its assignments from .env files in the checkout, .devcontainer, and the directory from which you launch the tools. Initialization rejects these assignments because they can override the checkout-specific project name.

To stop containers while retaining their data, or explicitly delete their containers and volumes:

./scripts/devcontainer stop
./scripts/devcontainer destroy --yes

These commands only manage the current checkout’s test environment. They do not remove its source files or the application environment started by rundev.sh. Tests run through ./rundev.sh test share this test environment, so stopping it affects both test launchers. Closing the IDE stops the entire checkout’s Compose project, including application QA, while retaining its data. Launcher stop commands affect only their selected profile. Use --all before stop, logs, or destroy to manage both profiles in the checkout.

If setup fails, use ./scripts/devcontainer doctor to inspect the source paths, service connections, dependency consistency, and test assets. Service readiness checks have a timeout. Containers remain available for inspection; their logs can be read with docker compose:

docker compose -f .devcontainer/compose.yaml -f .devcontainer/compose.local.json logs

The generated .devcontainer/compose.local.json is ignored by Git and contains checkout-specific paths. Keep credentials and host configuration out of this file.

The shared development image includes native Chromium and its matching driver from the XtraDeb Ubuntu repository on ARM and amd64. These system packages are not version-pinned. To fetch browser updates, rebuild without the Docker build cache and recreate the test container:

./scripts/devcontainer --backend compose compose -- build --no-cache developer
./scripts/devcontainer --backend compose restart

To verify browser startup, page loading, and JavaScript execution, or run the existing Selenium suite with a required browser:

./scripts/devcontainer doctor --browser
./scripts/devcontainer browser-test
./rundev.sh browser-test -k test_login_form_accessibility
./rundev.sh browser-test --target weblate/trans/tests/test_selenium.py::SeleniumTests::test_js_unit_tests

browser-test prepares the isolated test environment, runs browser diagnostics, and sets CI_SELENIUM=1 so unavailable WebDriver fails instead of skipping. It prints pytest’s test totals and skip reasons, preserving legitimate skips and pytest’s exit status. Additional arguments are passed to pytest; repeat --target to select specific test paths or node IDs instead of the default Selenium module. doctor --browser checks the test profile through either launcher and reports installed browser and driver versions.

The image sets WEBLATE_TEST_CHROME_BINARY and WEBLATE_TEST_CHROMEDRIVER to the installed executable paths. These developer-only variables are shared by the diagnostic and Selenium tests, avoiding automatic browser downloads. Outside the image, leaving them unset preserves Selenium’s default browser discovery. Use your own browser with the application profile’s URL for exploratory QA.

Linux and WSL2 with a checkout in the Linux filesystem are the primary targets. macOS Docker Desktop and Codespaces use the same configuration, but are not covered by the Linux CI smoke test. Native Windows paths and remote Docker daemons are not supported by the host-path mounts.

Weblate futtatása helyileg Dockerben

Install Docker with the Compose plugin, Git, and Python 3.12 or newer on the host. Start the development application with:

./rundev.sh

This is equivalent to ./scripts/devcontainer --profile app up. Both commands use the same launcher and Compose project as the test environment, without requiring Node.js or the Dev Container CLI for the application profile.

The launcher builds the development image, starts Weblate with supervised web and Celery workers, and prints the application and Maildev mailbox URLs when Weblate is ready. Sign in as admin with password admin. The installation starts empty; continue with Fordítási projektek és összetevők hozzáadása.

Docker assigns free HTTP ports bound to 127.0.0.1. Each worktree has its own application database, Valkey instance, data, virtual environment, home, and caches, separate from the test profile. SMTP, PostgreSQL, and Valkey ports are not published. Weblate uses the discovered application URL for generated links and authentication origins. To display the current URLs again:

./rundev.sh urls
./rundev.sh urls --json

To exercise real background workers through complete application journeys:

./rundev.sh application-test

This is also available as ./scripts/devcontainer application-test. It starts the application profile and uses its administrator API token to import a small component archive, save a translation, request a background commit, and inspect the committed Git file. It then checks the exported ZIP, eventual translation statistics in the API and rendered application page, translation memory, and a translation notification delivered to Maildev. Export generation itself is synchronous; its contents must reflect the completed background work.

A separate transaction check queues a real task before its fixture row is committed, waits for a retry, and verifies successful redelivery after commit. The suite requires non-eager Celery and the application’s Valkey broker and Maildev. Polls have deadlines, worker task failures include their tracebacks, and failures print the application service logs. CI runs these journeys in both the Docker development job and concurrent isolated worktrees.

Each invocation creates a uniquely named celery-qa- project and notification recipient with an unusable password. These fixtures remain available for inspection, including after failure; the suite does not reset existing data. Remove these projects and users through the application when finished, or destroy --yes the disposable application environment.

Ports can change after containers are recreated or restarted. Use ./rundev.sh restart to restart and rediscover them; direct Docker restarts cannot initialize the application domain. Ordinary startup reuses unchanged containers. Application containers do not restart automatically after Docker restarts. When the image changes Python minor versions, startup recreates the application virtual environment and reinstalls dependencies. Application data is retained.

To access the application database from inside its container:

./rundev.sh exec -- weblate dbshell

The application service definitions are in dev-docker/docker-compose.yml and are included by the shared Compose configuration. Use the launchers to initialize paths and ports. For other Compose operations, use ./rundev.sh compose -- COMMAND (or existing shortcuts such as ./rundev.sh ps). Project-wide Compose commands can affect both profiles.

Existing development environments are not migrated automatically. Before updating from the old launcher, stop its containers with its ./rundev.sh stop command. If already updated, identify the old containers using docker ps and stop them explicitly. The new launcher leaves their databases, volumes, and dev-docker/data/ untouched and starts with fresh application data.

To execute tests, run the script with the test parameter and pytest arguments, for example running only tests in the weblate.machine module:

./rundev.sh test --exitfirst weblate/machine

The command automatically starts and bootstraps the development container using Docker Compose, without requiring the Dev Container CLI. It runs independently of the application and workers, with separate databases, virtual environments, and caches. Each invocation refreshes dependencies and test assets before running pytest.

To display application logs:

./rundev.sh logs

To stop only the application profile, retaining its data:

./rundev.sh stop

Use ./scripts/devcontainer stop to stop only tests. To stop or destroy both profiles, including their volumes when destroying:

./rundev.sh --all stop
./rundev.sh --all destroy --yes

Without --all, destroy --yes removes only the selected profile’s containers and volumes. Other worktrees remain running.

Figyelem

This container is not suitable for production use. Security is sacrificed to make the development easier.

Fejlesztői példány inicializálása

Érdemes lehet a import_demo parancsot használni demó fordítások létrehozásához, illetve a createadmin parancsot egy admin felhasználó létrehozásához.

If you have Számlázás installed as well, you can use billing_demo to create a demo billing project.

Weblate fejlesztése PyCharm használatával

A PyCharm egy ismert IDE (integrált fejlesztőkörnyezet) Python fejlesztéshez – az alábbi útmutató segít a Weblate projekt beállításában.

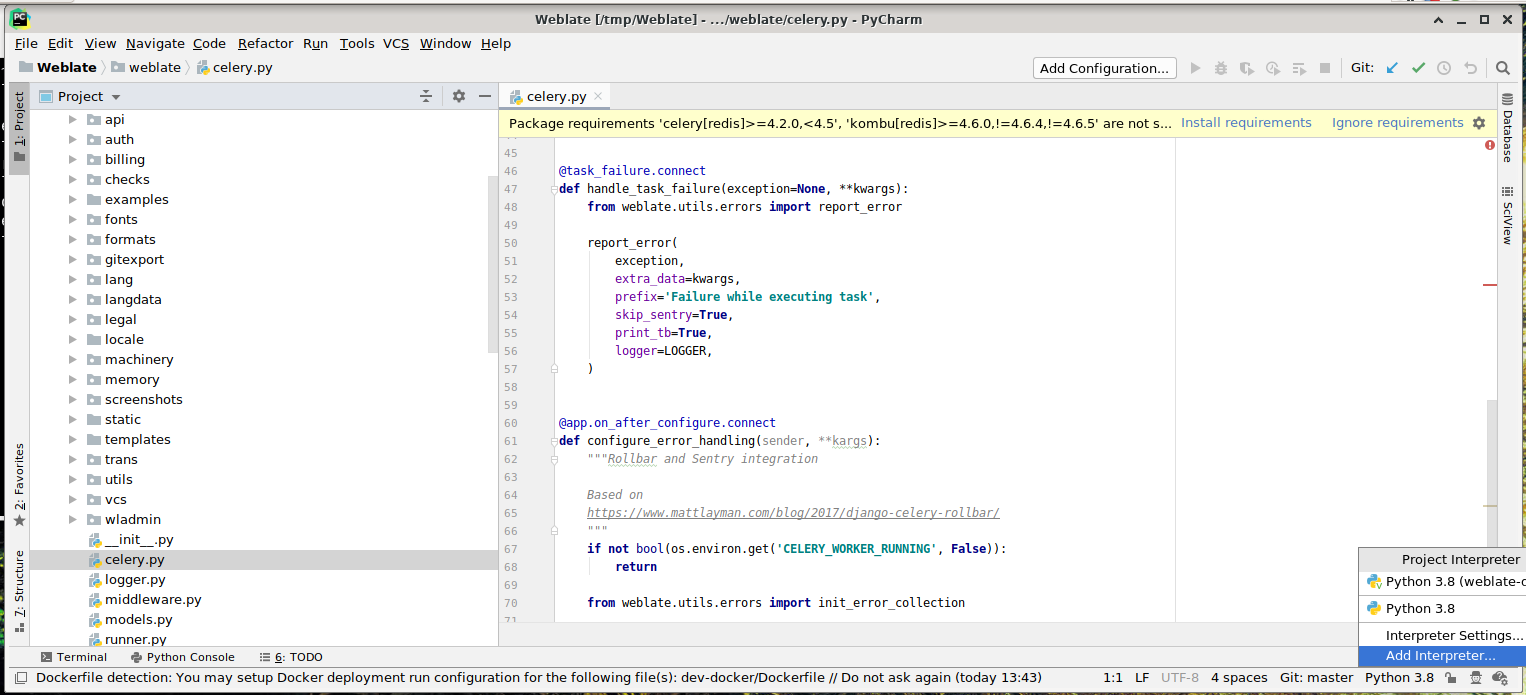
Miután a GitHub tárolót egy mappába klónozta, egyszerűen nyissa meg azt a PyCharmban. Amint megnyílik az IDE, az első lépés a használandó értelmező (interpreter) megadása:
../_images/pycharm-1.png

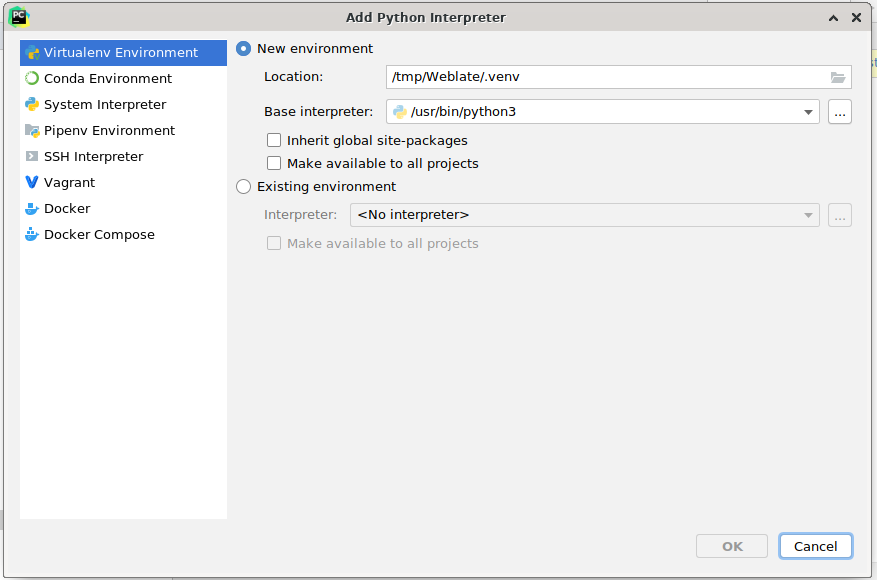
Select the .venv environment created by uv sync --all-extras --dev to match the command-line development setup. You can also let PyCharm create a Python environment for you, but the uv-managed environment is preferred:
../_images/pycharm-2.png

Don’t forget to install the dependencies once the interpreter is set. When using the preferred uv-managed environment, run uv sync --all-extras --dev from the console.

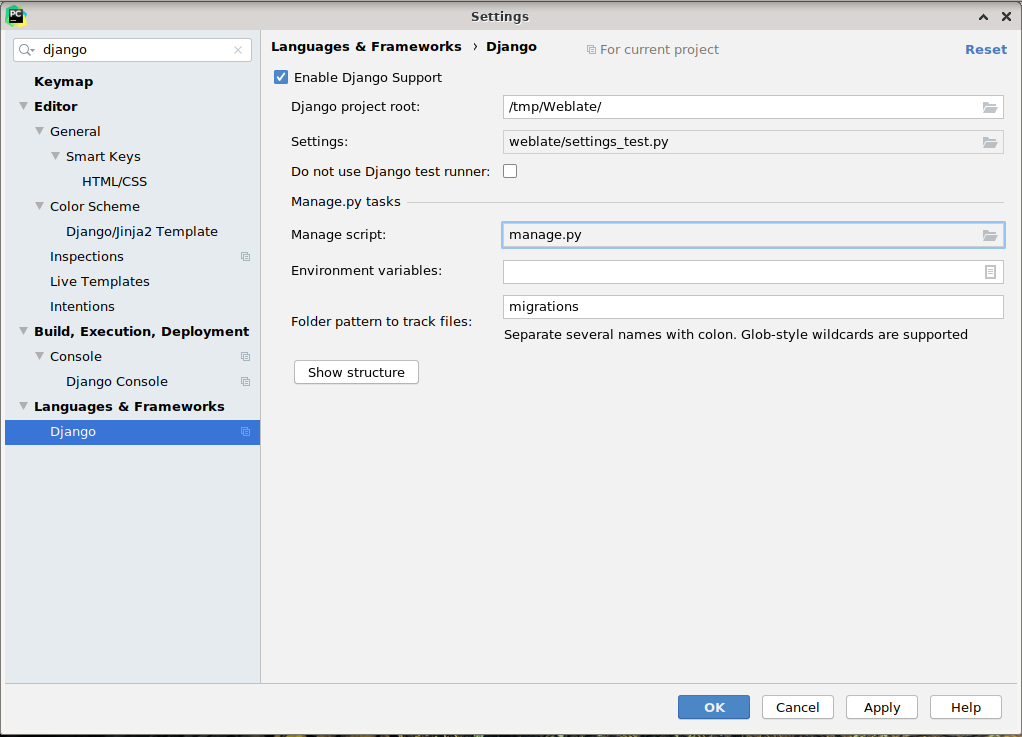
A második lépés a szükséges Django beállítások megadása, hogy az IDE natívan támogassa azt – így közvetlenül elindíthatja az egységteszteket. Ehhez meg kell adnia a Django projekt gyökérútvonalát és a beállításfájl elérési útját:
../_images/pycharm-3.png

Figyelem: a Django projekt gyökérkönyvtára maga a tároló gyökere, nem a Weblate almappája. A beállításokhoz használhatja a tárolóban található weblate/settings_test.py fájlt, de akár létre is hozhat saját konfigurációt.

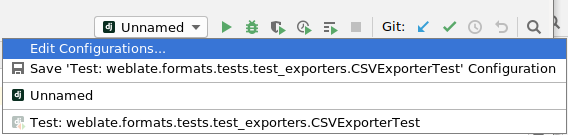
Az utolsó lépés a szerver futtatása és töréspontok (breakpointok) elhelyezése a kódban, hogy hibakeresésre is alkalmas legyen. Ehhez hozzon létre egy új Django Server konfigurációt:
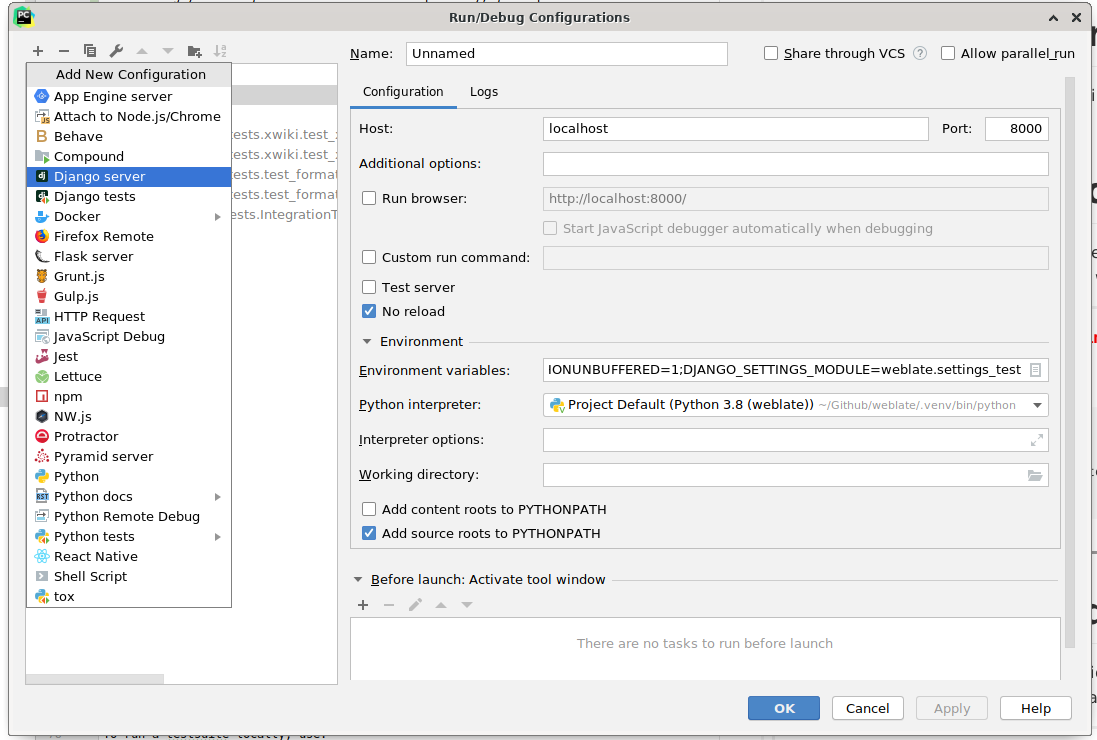
../_images/pycharm-4.png ../_images/pycharm-5.png

Tipp

Figyeljen a No reload tulajdonságra: ez megakadályozza, hogy a szerver automatikusan újratöltődjön fájlmódosítás után, így a meglévő töréspontok aktívak maradnak, és nem vesznek el újratöltéskor.