Code-hosting integrations
Weblate integrates with code-hosting sites in several separate places: repository access, incoming notifications, and pushing translations back. The exact setup depends on whether you use Hosted Weblate or run your own Weblate instance, and on whether Weblate should push directly or create pull or merge requests.
Use this page as a provider-oriented checklist. The individual setting pages remain the canonical reference for setting syntax.
Setup overview
Grant Weblate access to the repository.
For GitHub repositories on Hosted Weblate, use the Hosted Weblate app from Weblate’s Connect GitHub account flow. The App gives Hosted Weblate repository access without inviting the hosted weblate user.
For other Hosted Weblate repositories, and for direct SSH pushes outside the GitHub App workflow, add the hosted weblate user where it is available, see Acessando repositórios do Hosted Weblate.
For self-hosted Weblate, create a dedicated code-hosting user and grant access using Weblate’s SSH key or an HTTPS token, see Accessing repositories on code-hosting sites (GitHub, GitLab, Bitbucket, Azure DevOps, …).
Configure Repositório do código-fonte so Weblate can clone the repository.
Configure incoming notifications so Weblate pulls changes soon after a push. The repository webhook or app must point to the matching Weblate hook URL, and the project must have Habilitar ganchos enabled.
Decide how Weblate should push translations back:
Use Git or Mercurial and URL de envio do repositório to push directly.
Use a provider-specific VCS backend, such as GitHub or GitLab, to create pull or merge requests. These backends need API credentials in the Weblate settings.
Optionally set Ramo do push when Weblate should push to a branch in the upstream repository instead of using a fork where supported.
Fazendo push das alterações do Weblate
Each translation component can have a push URL set up (see URL de envio do repositório), and in that case Weblate will be able to push changes to the remote repository. Weblate can also be configured to automatically push changes on every commit; this is enabled by default, see Enviar ao fazer commit.
If you do not want changes to be pushed automatically, you can push manually
under Repository maintenance or using the API via
wlc push.
In case you do not want direct pushes by Weblate, there is support for Pull requests do GitHub, Merge requests do GitLab, Pull requests do Gitea, Merge requests do Pagure, Pull requests do Azure DevOps, or Gerrit review requests reviews. You can activate these by choosing GitHub, GitLab, Gitea, Gerrit, Azure DevOps, or Pagure as Sistema de controle de versão in Configuração de componente.
Overall, following options are available with Git, Mercurial, GitHub, GitLab, Gitea, Pagure, Azure DevOps, Gerrit, Bitbucket Data Center and Bitbucket Cloud:
Configuração desejada |
|||
|---|---|---|---|
Sem push |
vazio |
vazio |
|
Push diretamente |
URL de SSH |
vazio |
|
Fazer push para ramo separado |
URL de SSH |
Nome do ramo |
|
Sem push |
vazio |
vazio |
|
Push diretamente |
URL de SSH |
vazio |
|
Pull request de GitHub do fork |
vazio |
vazio |
|
Pull request de GitHub do ramo |
URL de SSH [1] |
Nome do ramo |
|
Merge request de GitLab do fork |
vazio |
vazio |
|
Merge request de GitLab do ramo |
URL de SSH [1] |
Nome do ramo |
|
Merge request de Gitea do fork |
vazio |
vazio |
|
Merge request de Gitea do ramo |
URL de SSH [1] |
Nome do ramo |
|
Merge request de Pagure do fork |
vazio |
vazio |
|
Merge request de Pagure do ramo |
URL de SSH [1] |
Nome do ramo |
|
Pull request de Azure DevOps do fork |
vazio |
vazio |
|
Pull request de Azure DevOps do ramo |
URL de SSH [1] |
Nome do ramo |
|
Gerrit review |
URL de SSH |
Target branch name (optional) |
|
Pull request de Bitbucket Server do fork |
vazio |
vazio |
|
Pull request de Bitbucket Data Center do ramo |
URL de SSH [1] |
Nome do ramo |
|
Pull request de Bitbucket Cloud do fork |
vazio |
vazio |
|
Pull request de Bitbucket Cloud do ramo |
URL de SSH [1] |
Nome do ramo |
GitHub
GitHub repository access
Hosted Weblate GitHub App
On Hosted Weblate, the recommended setup is to connect the Hosted Weblate app from the Weblate workspace where your project lives. Use the Connect GitHub account flow, install the App on the GitHub user or organization that owns your repositories, grant it access to the repositories you want to translate, and import components from the connected GitHub account.
The App-backed workflow uses GitHub installation access tokens for cloning, pushing translation branches, creating pull requests, and receiving incoming notifications. You do not need to invite the Hosted Weblate weblate GitHub user or configure a separate repository webhook for components imported this way.
Use the Hosted Weblate weblate GitHub user only when you intentionally configure direct SSH pushes outside the GitHub App workflow, see Acessando repositórios do Hosted Weblate.
HTTPS with personal access token
For a single private repository, HTTPS access with an access token is usually the simplest setup when the provider supports Git over HTTPS. Use the provider-required username and token in Repositório do código-fonte.
Configure URL de envio do repositório only when Weblate should push changes directly or when the chosen workflow requires a push URL, see Fazendo push das alterações do Weblate.
The token needs read access for cloning and write access for pushing. Provider-specific VCS backends that create pull or merge requests might require separate API credentials.
To use this approach:
Crie um token de acesso pessoal conforme descrito em Criando um token de acesso para uso na linha de comando.
Include the token in your repository URL:
https://username:token@github.com/owner/repo.git.
This is suitable when you are starting with Weblate or working with a single repository.
SSH with a dedicated user
For setups with multiple repositories, use SSH access with a dedicated code
hosting user for Weblate. Add Weblate’s public SSH key to that user, grant the
user access to the repositories, and use SSH URLs in Repositório do código-fonte,
for example git@example.com:group/project.git.
Configure URL de envio do repositório only when Weblate should push changes directly or when the chosen workflow requires a push URL, see Fazendo push das alterações do Weblate.
This also avoids provider restrictions on SSH key reuse. Some code hosting sites allow a public SSH key to be added only once, or only to a single user or deploy key entry. Keeping Weblate’s SSH key on a dedicated user lets that user be granted access to multiple repositories without reusing the key in several places.
This keeps personal, project, or API access tokens out of repository URLs. Provider API credentials are still needed when using a provider-specific VCS backend to create pull or merge requests; those credentials are configured separately from the Git repository URL.
For GitHub, create a dedicated user, for example weblate-bot, and use
GitHub SSH URLs for your repositories, for example
git@github.com:owner/repo.git.
On Hosted Weblate, use this SSH-user workflow only for direct SSH pushes outside the recommended Hosted Weblate app workflow.
Nota
When using GitHub for pull requests, the Ramo do push configuration affects the behavior: if not set, the project is forked and changes are pushed through a fork. If set, changes are pushed to the upstream repository and the chosen branch.
GitHub notifications
O Weblate vem com suporte nativo ao GitHub.
If you are using Hosted Weblate, use the Hosted Weblate app from Weblate’s Connect GitHub account flow. It uses GitHub App webhooks, so you do not need to configure a separate Webhook in GitHub. Components imported from the connected GitHub account also use the App for repository access and pull requests, without inviting the Hosted Weblate weblate GitHub user.
The Hosted Weblate legacy app is kept for existing webhook-only setups. Use it only when you need the legacy app to deliver GitHub notifications to Hosted Weblate.
For self-hosted Weblate, register the GitHub App using the in-app registration flow described below. Weblate generates the App manifest, GitHub returns the credentials, and they are stored in the database - there is no settings-based configuration.
Registering the GitHub App from Weblate
The fastest way to add the GitHub App is to let Weblate generate a GitHub App manifest with the correct permissions, events, and webhook URL pre-filled:
Sign in to Weblate with an account that has management access.
Open Manage → Code-hosting connections → Register Weblate GitHub App.
Fill in the form. The GitHub host defaults to
github.com; change it to your GitHub Enterprise hostname if needed. Leave Organization blank to register the App under your personal account, or enter an organization slug to register it under that org.Click Continue to GitHub and confirm on GitHub’s Create GitHub App page (you can still rename the App there).
GitHub redirects back to Weblate, which exchanges the temporary code for the App ID, private key, webhook secret, and slug and stores them in the database. The Connect GitHub account button is available immediately afterwards.
The manifest requests the permissions and event subscriptions Weblate needs
(Contents and Pull requests read/write, Metadata read-only,
Organization administration read-only, Workflows read/write, and the
Installation, Meta and Push events), and sets the callback, setup
and per-app webhook URLs automatically, so no manual GitHub App
configuration is required. GitHub delivers the Installation and
Installation repositories events to all GitHub Apps by default.
GitHub only offers accounts where the signed-in GitHub user can install or request the app. If an organization is not shown during the install flow, check the user’s organization role and the organization’s GitHub App installation restrictions. On GitHub.com, public apps can be installed on other accounts; private apps can only be installed on the account that owns the app.
Connecting a workspace
Connected GitHub accounts are bound to a Weblate workspace. A user with project administration rights for any project in a workspace can connect a GitHub account on that workspace. After connecting, every project in the workspace can import components from repositories the GitHub App installation has access to. For organization accounts, Weblate verifies that the install-time GitHub user can administer the organization installation.
Projects that are not in a workspace cannot connect a GitHub account through the GitHub App.
Components imported through the GitHub App flow use the dedicated GitHub (via Weblate GitHub app) VCS backend. The component settings UI keeps the repository URL read-only to prevent the App-issued credentials from being redirected to an unrelated repository.
App webhook URL
Each registered Weblate GitHub App has its own webhook URL containing an opaque token that uniquely identifies a single registered App:
https://weblate.example.com/hooks/integrations/<webhook_token>/
If you are not using a GitHub App, add the Weblate webhook in the repository settings (Webhooks) to receive notifications on every push to a GitHub repository, as shown on the image below:
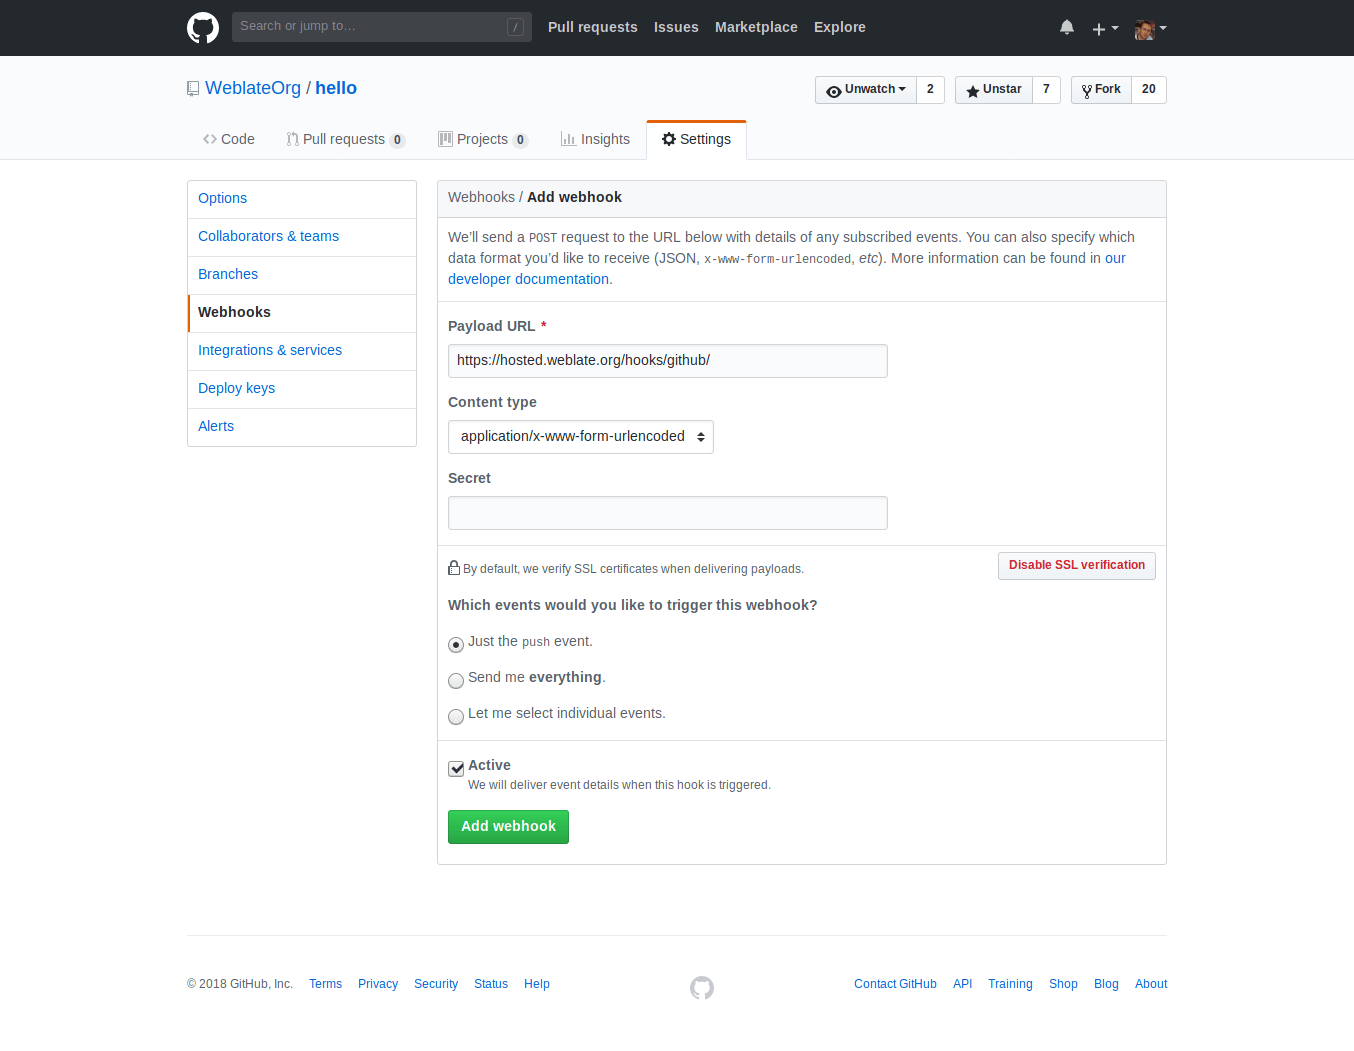
A Payload URL consiste na sua URL do Weblate anexada por /hooks/github/, por exemplo, para o serviço Hosted Weblate, é https://hosted.weblate.org/hooks/github/.
You can leave other values at default settings. Weblate can handle both content types and consumes just the push event.
Pull requests do GitHub
Isto adiciona uma camada fina sobre o Git utilizando a API do GitHub para permitir fazer push de alterações de tradução como pull requests, ao invés de fazer push diretamente para o repositório.
Git pushes changes directly to a repository, while the GitHub backend creates pull requests. The latter is not needed for merely accessing Git repositories.
To create pull requests, select GitHub as
Sistema de controle de versão and configure GITHUB_CREDENTIALS. For
GitHub.com, use
api.github.com as the API host. The token must allow Weblate to read and
write repository contents and create pull requests. If Weblate should fork
private repositories, the token might also need administration access.
GitLab
GitLab repository access
HTTPS with personal or project access token
For a single private repository, HTTPS access with an access token is usually the simplest setup when the provider supports Git over HTTPS. Use the provider-required username and token in Repositório do código-fonte.
Configure URL de envio do repositório only when Weblate should push changes directly or when the chosen workflow requires a push URL, see Fazendo push das alterações do Weblate.
The token needs read access for cloning and write access for pushing. Provider-specific VCS backends that create pull or merge requests might require separate API credentials.
For GitLab, the token needs write_repository scope to be able to push changes to the repository. The project access token requires Developer role for pushing.
The URL needs to contain a username. For a personal access token, it is the
actual username:
https://user:personal_access_token@gitlab.com/example/example.git.
For project access tokens it can be a non-blank value:
https://example:project_access_token@gitlab.com/example/example.git.
Nota
The rules for using project access tokens have changed between GitLab releases, the non-blank value is the current requirement, but older versions had different expectations (project name, bot user name). Check GitLab documentation matching your version if unsure.
SSH with a dedicated user
For setups with multiple repositories, use SSH access with a dedicated code
hosting user for Weblate. Add Weblate’s public SSH key to that user, grant the
user access to the repositories, and use SSH URLs in Repositório do código-fonte,
for example git@example.com:group/project.git.
Configure URL de envio do repositório only when Weblate should push changes directly or when the chosen workflow requires a push URL, see Fazendo push das alterações do Weblate.
This also avoids provider restrictions on SSH key reuse. Some code hosting sites allow a public SSH key to be added only once, or only to a single user or deploy key entry. Keeping Weblate’s SSH key on a dedicated user lets that user be granted access to multiple repositories without reusing the key in several places.
This keeps personal, project, or API access tokens out of repository URLs. Provider API credentials are still needed when using a provider-specific VCS backend to create pull or merge requests; those credentials are configured separately from the Git repository URL.
For GitLab, create a dedicated user and use GitLab SSH URLs, for example
git@gitlab.com:group/project.git.
For Hosted Weblate repositories on GitLab, add the hosted weblate user with the required repository permissions, see Acessando repositórios do Hosted Weblate.
GitLab notifications
Weblate has support for GitLab hooks. Add a project webhook with destination
to /hooks/gitlab/ URL on your Weblate installation, for example
https://hosted.weblate.org/hooks/gitlab/.
Soluções de problemas
Check GitLab webhook request history if webhooks are delivered.
The response payload contains information about matched components.
Merge requests do GitLab
This adds a thin layer atop Git using the GitLab API to allow pushing translation changes as merge requests instead of pushing directly to the repository.
There is no need to use this to access Git repositories, ordinary Git works the same, the only difference is how pushing to a repository is handled. With Git changes are pushed directly to the repository, while the GitLab backend creates a merge request.
To create merge requests, select GitLab as
Sistema de controle de versão and configure GITLAB_CREDENTIALS.
The Ramo do push configuration affects where Weblate pushes changes before opening the merge request. If it is not set, the project is forked and changes are pushed through a fork. If it is set, changes are pushed to the upstream repository and chosen branch.
Gitea, Forgejo, and Codeberg
Gitea, Forgejo, and Codeberg repository access
HTTPS with an access token
For a single private repository, HTTPS access with an access token is usually the simplest setup when the provider supports Git over HTTPS. Use the provider-required username and token in Repositório do código-fonte.
Configure URL de envio do repositório only when Weblate should push changes directly or when the chosen workflow requires a push URL, see Fazendo push das alterações do Weblate.
The token needs read access for cloning and write access for pushing. Provider-specific VCS backends that create pull or merge requests might require separate API credentials.
SSH with a dedicated user
For setups with multiple repositories, use SSH access with a dedicated code
hosting user for Weblate. Add Weblate’s public SSH key to that user, grant the
user access to the repositories, and use SSH URLs in Repositório do código-fonte,
for example git@example.com:group/project.git.
Configure URL de envio do repositório only when Weblate should push changes directly or when the chosen workflow requires a push URL, see Fazendo push das alterações do Weblate.
This also avoids provider restrictions on SSH key reuse. Some code hosting sites allow a public SSH key to be added only once, or only to a single user or deploy key entry. Keeping Weblate’s SSH key on a dedicated user lets that user be granted access to multiple repositories without reusing the key in several places.
This keeps personal, project, or API access tokens out of repository URLs. Provider API credentials are still needed when using a provider-specific VCS backend to create pull or merge requests; those credentials are configured separately from the Git repository URL.
For Hosted Weblate repositories on Codeberg, add the hosted weblate user with the required repository permissions, see Acessando repositórios do Hosted Weblate.
Gitea notifications
Weblate has support for Gitea webhooks. Add a Gitea Webhook for
Push events event with destination to /hooks/gitea/ URL on your
Weblate installation, for example https://hosted.weblate.org/hooks/gitea/.
This can be done in Webhooks under repository Settings.
Forgejo notifications
Weblate has support for Forgejo webhooks. Add a Forgejo Webhook
for Push events event with destination to /hooks/forgejo/ URL
on your Weblate installation, for example
https://hosted.weblate.org/hooks/forgejo/. This can be done in
Webhooks under repository Settings.
Pull requests do Gitea
Adicionado na versão 4.12.
This adds a thin layer atop Git using the Gitea API to allow pushing translation changes as pull requests instead of pushing directly to the repository.
There is no need to use this to access Git repositories, ordinary Git works the same, the only difference is how pushing to a repository is handled. With Git changes are pushed directly to the repository, while the Gitea backend creates pull requests.
To create pull requests, select Gitea as
Sistema de controle de versão and configure GITEA_CREDENTIALS.
Bitbucket
Bitbucket repository access
HTTPS with an access token
For a single private repository, HTTPS access with an access token is usually the simplest setup when the provider supports Git over HTTPS. Use the provider-required username and token in Repositório do código-fonte.
Configure URL de envio do repositório only when Weblate should push changes directly or when the chosen workflow requires a push URL, see Fazendo push das alterações do Weblate.
The token needs read access for cloning and write access for pushing. Provider-specific VCS backends that create pull or merge requests might require separate API credentials.
SSH with a dedicated user
For setups with multiple repositories, use SSH access with a dedicated code
hosting user for Weblate. Add Weblate’s public SSH key to that user, grant the
user access to the repositories, and use SSH URLs in Repositório do código-fonte,
for example git@example.com:group/project.git.
Configure URL de envio do repositório only when Weblate should push changes directly or when the chosen workflow requires a push URL, see Fazendo push das alterações do Weblate.
This also avoids provider restrictions on SSH key reuse. Some code hosting sites allow a public SSH key to be added only once, or only to a single user or deploy key entry. Keeping Weblate’s SSH key on a dedicated user lets that user be granted access to multiple repositories without reusing the key in several places.
This keeps personal, project, or API access tokens out of repository URLs. Provider API credentials are still needed when using a provider-specific VCS backend to create pull or merge requests; those credentials are configured separately from the Git repository URL.
For Hosted Weblate repositories on Bitbucket, add the hosted weblate user with the required repository permissions, see Acessando repositórios do Hosted Weblate.
To push directly, use Git or Mercurial with URL de envio do repositório.
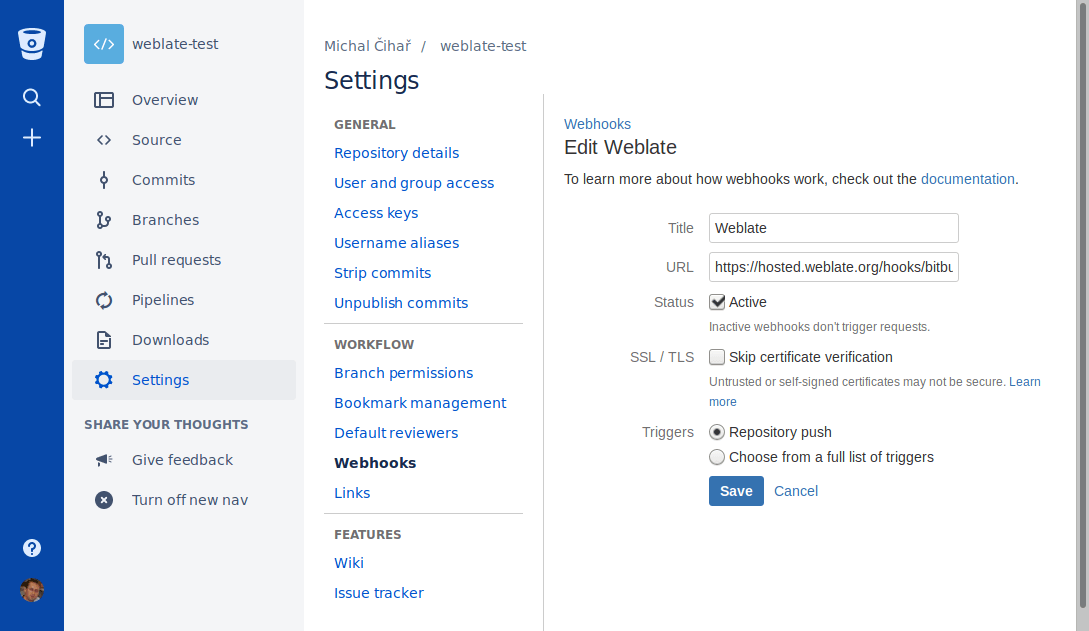
Bitbucket notifications
Weblate has support for Bitbucket webhooks. Add a webhook which triggers upon
repository push, with destination to /hooks/bitbucket/ URL on your Weblate
installation, for example https://hosted.weblate.org/hooks/bitbucket/.
Pull requests do Bitbucket Data Center
Adicionado na versão 4.16.
This adds a thin layer atop Git using the Bitbucket Data Center API to allow pushing translation changes as pull requests instead of pushing directly to the repository.
Aviso
Isto não é compatível com a API do Bitbucket Cloud.
There is no need to use this to access Git repositories, ordinary Git works the same, the only difference is how pushing to a repository is handled. With Git changes are pushed directly to the repository, while the Bitbucket Data Center backend creates a pull request.
To create pull requests, select Bitbucket Data Center as
Sistema de controle de versão and configure BITBUCKETSERVER_CREDENTIALS.
Pull requests do Bitbucket Cloud
Adicionado na versão 5.8.
This adds a thin layer atop Git using the Bitbucket Cloud API to allow pushing translation changes as pull requests instead of pushing directly to the repository.
Aviso
Isso é diferente da API do Bitbucket Data Center.
There is no need to use this to access Git repositories, ordinary Git works the same, the only difference is how pushing to a repository is handled. With Git changes are pushed directly to the repository, while the Bitbucket Cloud backend creates a pull request.
To create pull requests, select Bitbucket Cloud as
Sistema de controle de versão and configure BITBUCKETCLOUD_CREDENTIALS.
Azure DevOps
Azure Repos repository access
HTTPS with an access token
For a single private repository, HTTPS access with an access token is usually the simplest setup when the provider supports Git over HTTPS. Use the provider-required username and token in Repositório do código-fonte.
Configure URL de envio do repositório only when Weblate should push changes directly or when the chosen workflow requires a push URL, see Fazendo push das alterações do Weblate.
The token needs read access for cloning and write access for pushing. Provider-specific VCS backends that create pull or merge requests might require separate API credentials.
Use the HTTPS clone URL shown by Azure Repos for the repository.
SSH with a dedicated user
For setups with multiple repositories, use SSH access with a dedicated code
hosting user for Weblate. Add Weblate’s public SSH key to that user, grant the
user access to the repositories, and use SSH URLs in Repositório do código-fonte,
for example git@example.com:group/project.git.
Configure URL de envio do repositório only when Weblate should push changes directly or when the chosen workflow requires a push URL, see Fazendo push das alterações do Weblate.
This also avoids provider restrictions on SSH key reuse. Some code hosting sites allow a public SSH key to be added only once, or only to a single user or deploy key entry. Keeping Weblate’s SSH key on a dedicated user lets that user be granted access to multiple repositories without reusing the key in several places.
This keeps personal, project, or API access tokens out of repository URLs. Provider API credentials are still needed when using a provider-specific VCS backend to create pull or merge requests; those credentials are configured separately from the Git repository URL.
Use the SSH URL shown by Azure Repos for the repository.
Azure Repos notifications
Weblate has support for Azure Repos webhooks. Add a webhook for
Code pushed event with destination to /hooks/azure/ URL on your
Weblate installation, for example https://hosted.weblate.org/hooks/azure/.
This can be done in Service hooks under Project
settings.
Pull requests do Azure DevOps
Isto adiciona uma camada fina sobre o Git utilizando a API do Azure DevOps para permitir fazer push de alterações de tradução como pull requests, ao invés de fazer push diretamente para o repositório.
Git pushes changes directly to a repository, while the Azure DevOps backend creates pull requests. The latter is not needed for merely accessing Git repositories.
To create pull requests, select Azure DevOps as
Sistema de controle de versão and configure AZURE_DEVOPS_CREDENTIALS.
Pagure
Pagure repository access
HTTPS with an access token
For a single private repository, HTTPS access with an access token is usually the simplest setup when the provider supports Git over HTTPS. Use the provider-required username and token in Repositório do código-fonte.
Configure URL de envio do repositório only when Weblate should push changes directly or when the chosen workflow requires a push URL, see Fazendo push das alterações do Weblate.
The token needs read access for cloning and write access for pushing. Provider-specific VCS backends that create pull or merge requests might require separate API credentials.
SSH with a dedicated user
For setups with multiple repositories, use SSH access with a dedicated code
hosting user for Weblate. Add Weblate’s public SSH key to that user, grant the
user access to the repositories, and use SSH URLs in Repositório do código-fonte,
for example git@example.com:group/project.git.
Configure URL de envio do repositório only when Weblate should push changes directly or when the chosen workflow requires a push URL, see Fazendo push das alterações do Weblate.
This also avoids provider restrictions on SSH key reuse. Some code hosting sites allow a public SSH key to be added only once, or only to a single user or deploy key entry. Keeping Weblate’s SSH key on a dedicated user lets that user be granted access to multiple repositories without reusing the key in several places.
This keeps personal, project, or API access tokens out of repository URLs. Provider API credentials are still needed when using a provider-specific VCS backend to create pull or merge requests; those credentials are configured separately from the Git repository URL.
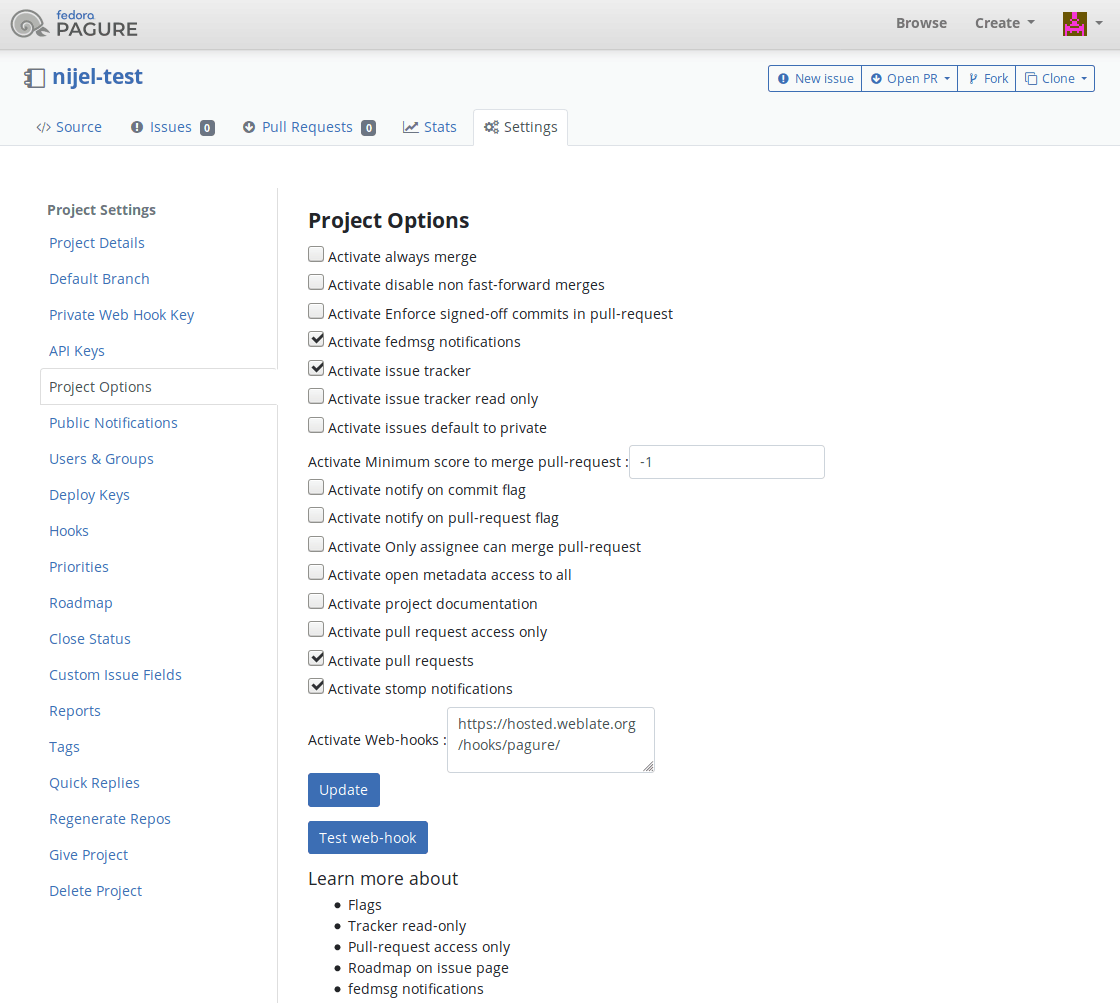
Pagure notifications
Weblate has support for Pagure hooks. Add a webhook with destination to
/hooks/pagure/ URL on your Weblate installation, for example
https://hosted.weblate.org/hooks/pagure/. This can be done in
Activate Web-hooks under Project options:
Merge requests do Pagure
Adicionado na versão 4.3.2.
This adds a thin layer atop Git using the Pagure API to allow pushing translation changes as merge requests instead of pushing directly to the repository.
There is no need to use this to access Git repositories, ordinary Git works the same, the only difference is how pushing to a repository is handled. With Git changes are pushed directly to the repository, while the Pagure backend creates a merge request.
To create merge requests, select Pagure as
Sistema de controle de versão and configure PAGURE_CREDENTIALS.
Other workflows
Gitee repository access
HTTPS with an access token
For a single private repository, HTTPS access with an access token is usually the simplest setup when the provider supports Git over HTTPS. Use the provider-required username and token in Repositório do código-fonte.
Configure URL de envio do repositório only when Weblate should push changes directly or when the chosen workflow requires a push URL, see Fazendo push das alterações do Weblate.
The token needs read access for cloning and write access for pushing. Provider-specific VCS backends that create pull or merge requests might require separate API credentials.
SSH with a dedicated user
For setups with multiple repositories, use SSH access with a dedicated code
hosting user for Weblate. Add Weblate’s public SSH key to that user, grant the
user access to the repositories, and use SSH URLs in Repositório do código-fonte,
for example git@example.com:group/project.git.
Configure URL de envio do repositório only when Weblate should push changes directly or when the chosen workflow requires a push URL, see Fazendo push das alterações do Weblate.
This also avoids provider restrictions on SSH key reuse. Some code hosting sites allow a public SSH key to be added only once, or only to a single user or deploy key entry. Keeping Weblate’s SSH key on a dedicated user lets that user be granted access to multiple repositories without reusing the key in several places.
This keeps personal, project, or API access tokens out of repository URLs. Provider API credentials are still needed when using a provider-specific VCS backend to create pull or merge requests; those credentials are configured separately from the Git repository URL.
Gitee notifications
Weblate has support for Gitee webhooks. Add a WebHook for
Push event with destination to /hooks/gitee/ URL on your
Weblate installation, for example https://hosted.weblate.org/hooks/gitee/.
This can be done in WebHooks under repository
Management.
Gerrit review requests
Gerrit support adds a thin layer atop Git using the git-review tool to allow pushing translation changes as Gerrit review requests, instead of pushing them directly to the repository.
The optional Ramo do push setting selects the target branch for
the Gerrit review. Leave it empty to use Ramo do repositório. Use the short
branch name, such as main; Weblate and git-review push the review to
refs/for/<branch> automatically. Gerrit push options can be appended after
% in either setting, for example main%topic=l10n. Gerrit interprets
these options as the configured Weblate Gerrit account and applies its own
permissions.
The Gerrit documentation has the details on the configuration necessary to set up such repositories. There is no separate code-hosting credential setting for this backend.
Docker credentials
For Docker installations, code-hosting API credentials can also be provided through environment variables, see Code-hosting sites credentials.