Code hosting integrations
Weblate integrates with code hosting sites in several separate places: repository access, incoming notifications, and pushing translations back. The exact setup depends on whether you use Hosted Weblate or run your own Weblate instance, and on whether Weblate should push directly or create pull requests.
Use this page as a provider-oriented checklist. The individual setting pages remain the canonical reference for setting syntax.
Setup overview
Grant Weblate access to the repository.
For Hosted Weblate, add the hosted weblate user where it is available, see Acessando repositórios do Hosted Weblate.
For self-hosted Weblate, create a dedicated code hosting user and grant access using Weblate’s SSH key or an HTTPS token, see Aceder repositórios em sites de hospedagem de código (GitHub, GitLab, Bitbucket, Azure DevOps, …).
Configure Repositório do código-fonte so Weblate can clone the repository.
Configure incoming notifications so Weblate pulls changes soon after a push. The repository webhook or app must point to the matching Weblate hook URL, and the project must have Ativar hooks enabled.
Decide how Weblate should push translations back:
Use Git or Mercurial and URL de submissão do repositório to push directly.
Use a provider-specific VCS backend, such as GitHub or GitLab, to create pull or merge requests. These backends need API credentials in the Weblate settings.
Optionally set Ramo do push when Weblate should push to a branch in the upstream repository instead of using a fork where supported.
Fazendo push das alterações do Weblate
Each translation component can have a push URL set up (see URL de submissão do repositório), and in that case Weblate will be able to push changes to the remote repository. Weblate can also be configured to automatically push changes on every commit; this is enabled by default, see Enviar ao submeter.
If you do not want changes to be pushed automatically, you can push manually
under Repository maintenance or using the API via
wlc push.
In case you do not want direct pushes by Weblate, there is support for Pull requests do GitHub, Merge requests do GitLab, Pull requests do Gitea, Merge requests do Pagure, Pull requests do Azure DevOps, or Gerrit review requests reviews. You can activate these by choosing GitHub, GitLab, Gitea, Gerrit, Azure DevOps, or Pagure as Sistema de controlo de versões in Configuração de componente.
Overall, following options are available with Git, Mercurial, GitHub, GitLab, Gitea, Pagure, Azure DevOps, Gerrit, Bitbucket Data Center and Bitbucket Cloud:
Configuração desejada |
|||
|---|---|---|---|
Sem push |
vazio |
vazio |
|
Push diretamente |
URL de SSH |
vazio |
|
Empurrar para um ramo separado |
URL de SSH |
Nome do ramo |
|
Sem push |
vazio |
vazio |
|
Push diretamente |
URL de SSH |
vazio |
|
Pull request de GitHub do fork |
vazio |
vazio |
|
Pull request de GitHub do ramo |
URL de SSH [1] |
Nome do ramo |
|
Merge request de GitLab do fork |
vazio |
vazio |
|
Merge request de GitLab do ramo |
URL de SSH [1] |
Nome do ramo |
|
Merge request de Gitea do fork |
vazio |
vazio |
|
Merge request de Gitea do ramo |
URL de SSH [1] |
Nome do ramo |
|
Merge request de Pagure do fork |
vazio |
vazio |
|
Merge request de Pagure do ramo |
URL de SSH [1] |
Nome do ramo |
|
Solicitação pull do Azure DevOps a partir do fork |
vazio |
vazio |
|
Solicitação pull do Azure DevOps a partir do branch |
URL de SSH [1] |
Nome do ramo |
|
Gerrit review |
URL de SSH |
Target branch name (optional) |
|
Pull request de Bitbucket Server do fork |
vazio |
vazio |
|
Pull request de Bitbucket Data Center do ramo |
URL de SSH [1] |
Nome do ramo |
|
Pull request de Bitbucket Cloud do fork |
vazio |
vazio |
|
Pull request de Bitbucket Cloud do ramo |
URL de SSH [1] |
Nome do ramo |
GitHub
GitHub repository access
There are two main approaches to accessing GitHub repositories with Weblate:
Option 1: HTTPS with personal access token
Use HTTPS authentication with a personal access token and your GitHub account. This works for both read-only access and read-write access.
To use this approach:
Create a personal access token as described in Creating an access token for command-line use.
Include the token in your repository URL:
https://username:token@github.com/owner/repo.git.
This is suitable when you are starting with Weblate or working with a single repository.
Option 2: SSH with a dedicated user
For setups with multiple repositories, create a dedicated user for Weblate. This avoids GitHub’s limitation that each SSH key can only be used once per platform.
To use this approach:
Create a dedicated GitHub user account, for example
weblate-bot.Add Weblate’s public SSH key to this user, see Chave SSH do Weblate.
Grant this user access to all repositories you want to translate.
Use SSH URLs for your repositories:
git@github.com:owner/repo.git.
This approach is also used for Hosted Weblate, which has a dedicated weblate user for that purpose.
Nota
When using GitHub for pull requests, the Ramo do push configuration affects the behavior: if not set, the project is forked and changes are pushed through a fork. If set, changes are pushed to the upstream repository and the chosen branch.
GitHub notifications
O Weblate vem com suporte nativo ao GitHub.
If you are using Hosted Weblate, the recommended approach is to install the Weblate app. The app delivers GitHub notifications to Hosted Weblate, so you do not need to configure a separate Webhook in GitHub. However, it does not by itself grant Hosted Weblate write access to the repository. To push changes back, you still need to add the Hosted Weblate weblate GitHub user as a collaborator with write access, see Acessando repositórios do Hosted Weblate.
If you are not using the app, add the Weblate webhook in the repository settings (Webhooks) to receive notifications on every push to a GitHub repository, as shown on the image below:
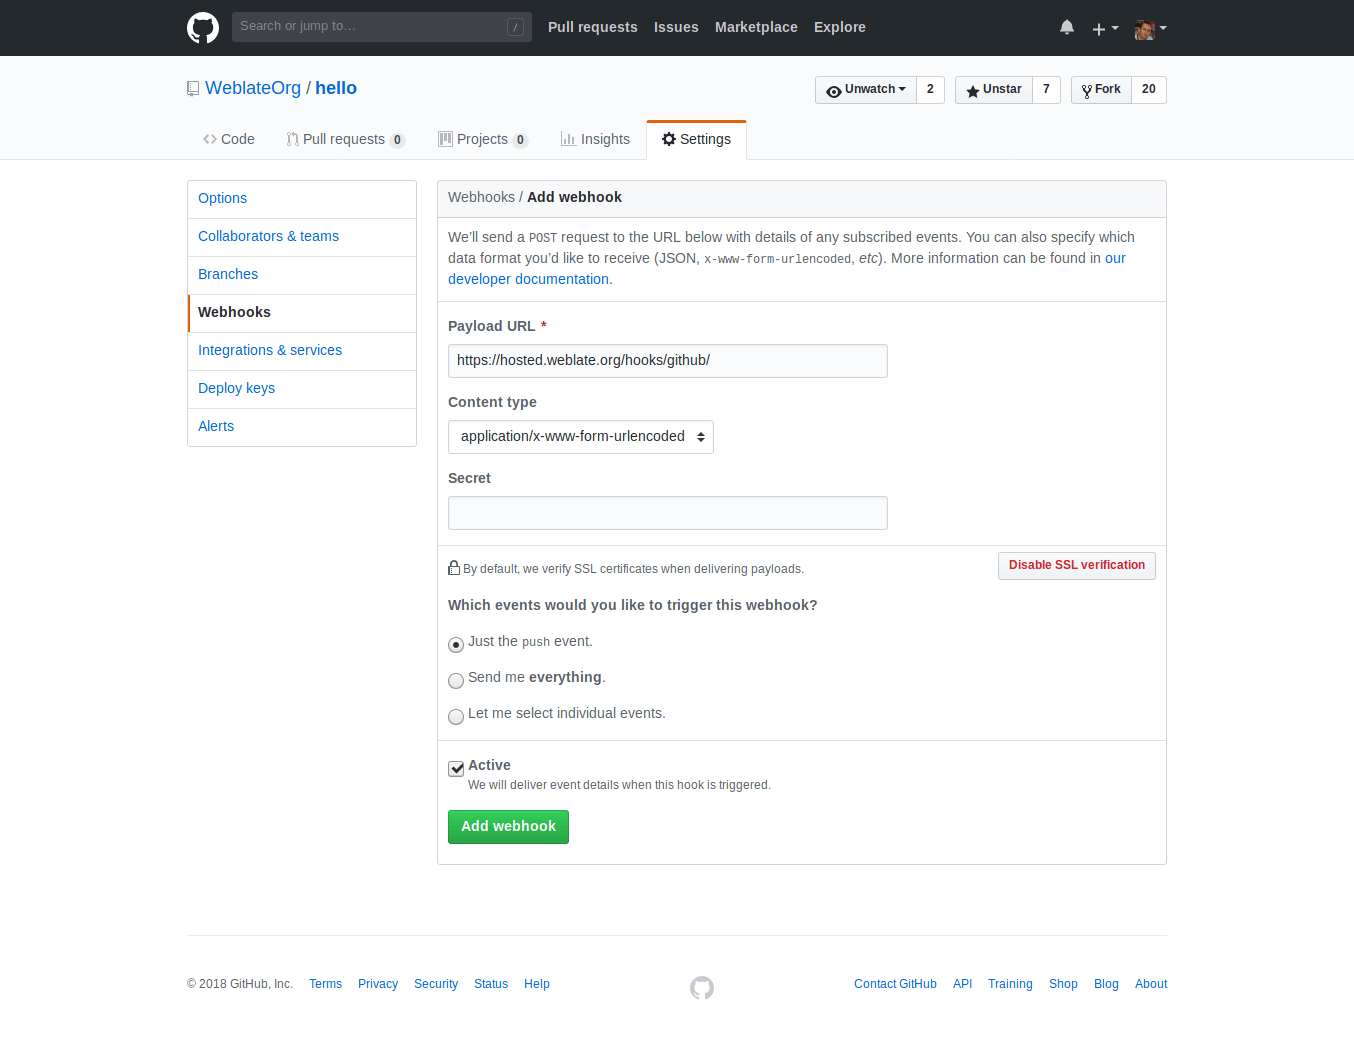
A Payload URL consiste na sua URL do Weblate anexada por /hooks/github/, por exemplo, para o serviço Hosted Weblate, é https://hosted.weblate.org/hooks/github/.
You can leave other values at default settings. Weblate can handle both content types and consumes just the push event.
Pull requests do GitHub
Isto adiciona uma camada fina sobre o Git a utilizar a API do GitHub para permitir fazer push de alterações de tradução como pull requests, ao invés de fazer push diretamente para o repositório.
Git pushes changes directly to a repository, while the GitHub backend creates pull requests. The latter is not needed for merely accessing Git repositories.
To create pull requests, select GitHub as
Sistema de controlo de versões and configure GITHUB_CREDENTIALS. For
GitHub.com, use
api.github.com as the API host. The token must allow Weblate to read and
write repository contents and create pull requests. If Weblate should fork
private repositories, the token might also need administration access.
GitLab
GitLab repository access
Access via SSH is possible, see Repositórios SSH, but if you need to access more than one repository, you will hit a GitLab limitation on allowed SSH key usage because each key can be used only once.
Caso o Ramo do push não seja definido, é criado um fork do projeto e feito um push das alterações através do fork. Caso seja definido, os pushes são feitos para o repositório upstream e para o ramo escolhido.
Using personal or project access tokens is possible as well. The token needs write_repository scope to be able to push changes to the repository. The project access token requires Developer role for pushing.
The URL needs to contain a username. For a personal access token, it is the
actual username:
https://user:personal_access_token@gitlab.com/example/example.git.
For project access tokens it can be a non-blank value:
https://example:project_access_token@gitlab.com/example/example.git.
Nota
The rules for using project access tokens have changed between GitLab releases, the non-blank value is the current requirement, but older versions had different expectations (project name, bot user name). Check GitLab documentation matching your version if unsure.
GitLab notifications
Weblate has support for GitLab hooks. Add a project webhook with destination
to /hooks/gitlab/ URL on your Weblate installation, for example
https://hosted.weblate.org/hooks/gitlab/.
Soluções de problemas
Check GitLab webhook request history if webhooks are delivered.
The response payload contains information about matched components.
Merge requests do GitLab
This adds a thin layer atop Git using the GitLab API to allow pushing translation changes as merge requests instead of pushing directly to the repository.
There is no need to use this to access Git repositories, ordinary Git works the same, the only difference is how pushing to a repository is handled. With Git changes are pushed directly to the repository, while the GitLab backend creates a merge request.
To create merge requests, select GitLab as
Sistema de controlo de versões and configure GITLAB_CREDENTIALS.
Gitea, Forgejo, and Codeberg
For Hosted Weblate repositories on Codeberg, add the hosted weblate user where write access is needed, see Acessando repositórios do Hosted Weblate.
Gitea notifications
Weblate has support for Gitea webhooks. Add a Gitea Webhook for
Push events event with destination to /hooks/gitea/ URL on your
Weblate installation, for example https://hosted.weblate.org/hooks/gitea/.
This can be done in Webhooks under repository Settings.
Forgejo notifications
Weblate has support for Forgejo webhooks. Add a Forgejo Webhook
for Push events event with destination to /hooks/forgejo/ URL
on your Weblate installation, for example
https://hosted.weblate.org/hooks/forgejo/. This can be done in
Webhooks under repository Settings.
Pull requests do Gitea
Added in version 4.12.
This adds a thin layer atop Git using the Gitea API to allow pushing translation changes as pull requests instead of pushing directly to the repository.
There is no need to use this to access Git repositories, ordinary Git works the same, the only difference is how pushing to a repository is handled. With Git changes are pushed directly to the repository, while the Gitea backend creates pull requests.
To create pull requests, select Gitea as
Sistema de controlo de versões and configure GITEA_CREDENTIALS.
Bitbucket
Hosted Weblate has a dedicated weblate user for Bitbucket access, see Acessando repositórios do Hosted Weblate.
To push directly, use Git or Mercurial with URL de submissão do repositório.
Bitbucket notifications
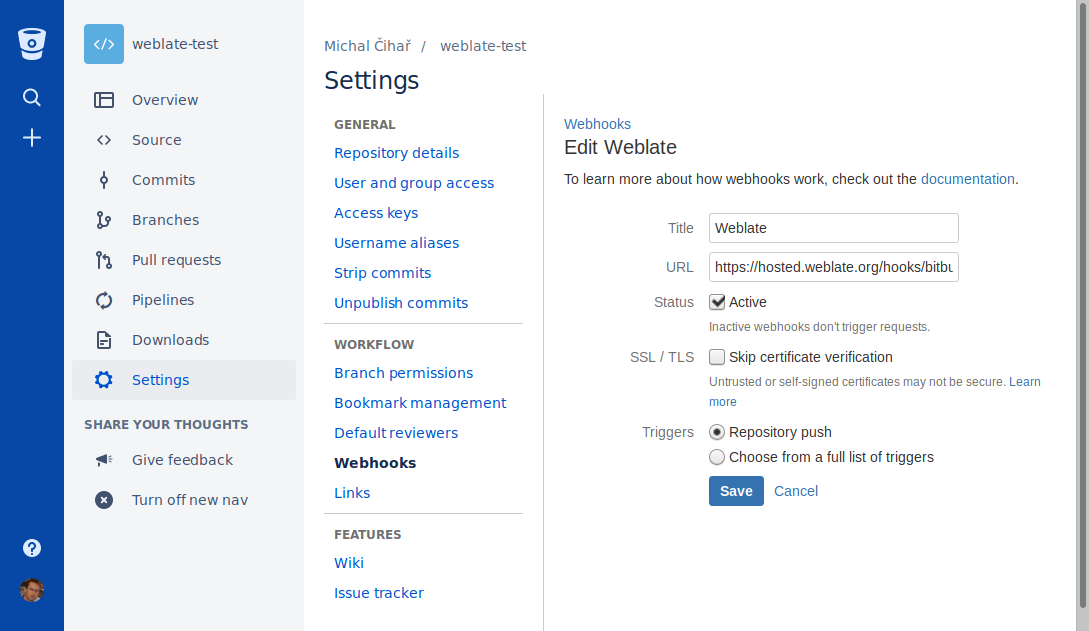
Weblate has support for Bitbucket webhooks. Add a webhook which triggers upon
repository push, with destination to /hooks/bitbucket/ URL on your Weblate
installation, for example https://hosted.weblate.org/hooks/bitbucket/.
Pull requests do Bitbucket Data Center
Added in version 4.16.
This adds a thin layer atop Git using the Bitbucket Data Center API to allow pushing translation changes as pull requests instead of pushing directly to the repository.
Aviso
Isto não é compatível com a API do Bitbucket Cloud.
There is no need to use this to access Git repositories, ordinary Git works the same, the only difference is how pushing to a repository is handled. With Git changes are pushed directly to the repository, while the Bitbucket Data Center backend creates a pull request.
To create pull requests, select Bitbucket Data Center as
Sistema de controlo de versões and configure BITBUCKETSERVER_CREDENTIALS.
Pull requests do Bitbucket Cloud
Added in version 5.8.
This adds a thin layer atop Git using the Bitbucket Cloud API to allow pushing translation changes as pull requests instead of pushing directly to the repository.
Aviso
Isto é diferente da API do Bitbucket Data Center.
There is no need to use this to access Git repositories, ordinary Git works the same, the only difference is how pushing to a repository is handled. With Git changes are pushed directly to the repository, while the Bitbucket Cloud backend creates a pull request.
To create pull requests, select Bitbucket Cloud as
Sistema de controlo de versões and configure BITBUCKETCLOUD_CREDENTIALS.
Azure DevOps
Azure Repos notifications
Weblate has support for Azure Repos webhooks. Add a webhook for
Code pushed event with destination to /hooks/azure/ URL on your
Weblate installation, for example https://hosted.weblate.org/hooks/azure/.
This can be done in Service hooks under Project
settings.
Pull requests do Azure DevOps
Isto adiciona uma camada fina sobre o Git pela API do Azure DevOps para permitir fazer push de alterações de tradução como pull requests, ao invés de fazer push diretamente para o repositório.
Git pushes changes directly to a repository, while the Azure DevOps backend creates pull requests. The latter is not needed for merely accessing Git repositories.
To create pull requests, select Azure DevOps as
Sistema de controlo de versões and configure AZURE_DEVOPS_CREDENTIALS.
Pagure
Pagure notifications
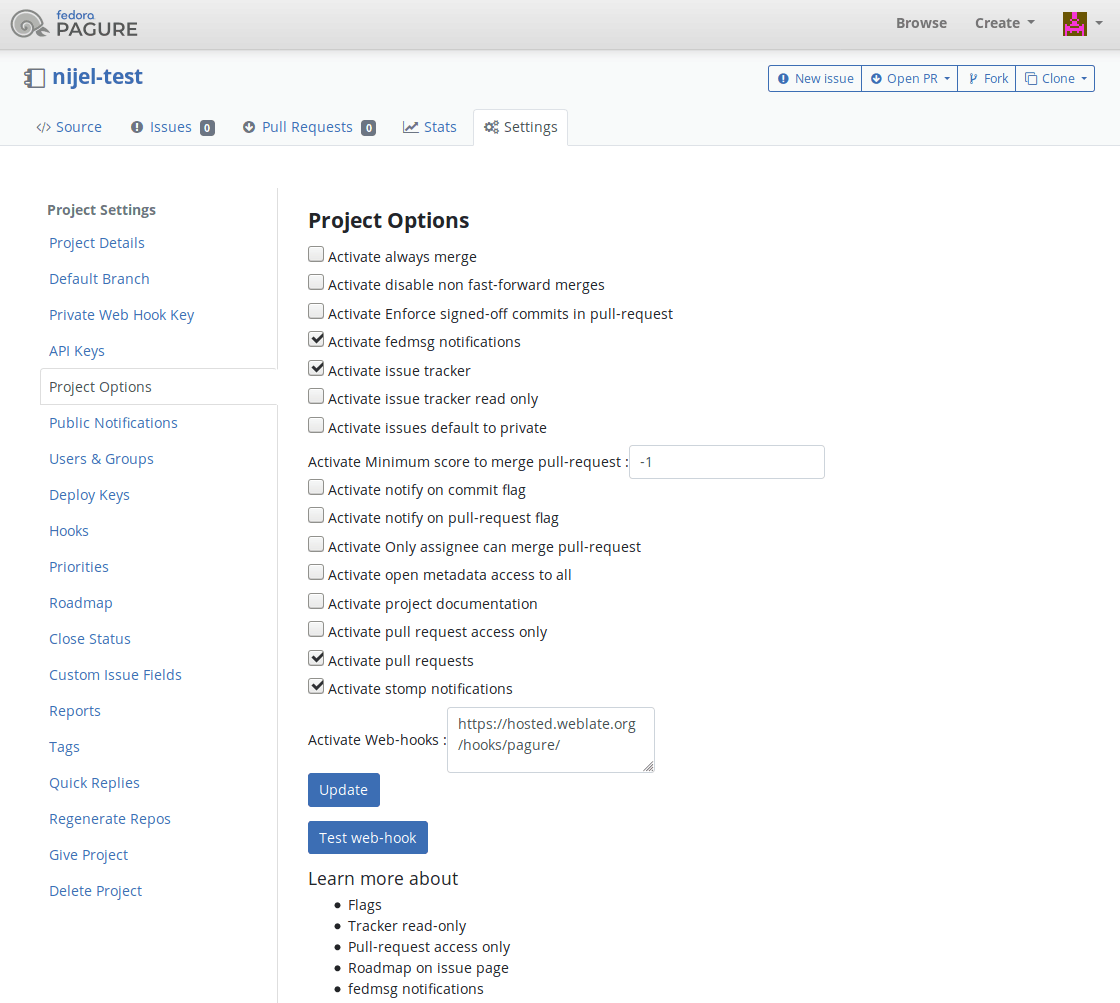
Weblate has support for Pagure hooks. Add a webhook with destination to
/hooks/pagure/ URL on your Weblate installation, for example
https://hosted.weblate.org/hooks/pagure/. This can be done in
Activate Web-hooks under Project options:
Merge requests do Pagure
Added in version 4.3.2.
This adds a thin layer atop Git using the Pagure API to allow pushing translation changes as merge requests instead of pushing directly to the repository.
There is no need to use this to access Git repositories, ordinary Git works the same, the only difference is how pushing to a repository is handled. With Git changes are pushed directly to the repository, while the Pagure backend creates a merge request.
To create merge requests, select Pagure as
Sistema de controlo de versões and configure PAGURE_CREDENTIALS.
Other workflows
Gitee notifications
Weblate has support for Gitee webhooks. Add a WebHook for
Push event with destination to /hooks/gitee/ URL on your
Weblate installation, for example https://hosted.weblate.org/hooks/gitee/.
This can be done in WebHooks under repository
Management.
Gerrit review requests
Gerrit support adds a thin layer atop Git using the git-review tool to allow pushing translation changes as Gerrit review requests, instead of pushing them directly to the repository.
The optional Ramo do push setting selects the target branch for
the Gerrit review. Leave it empty to use Ramo do repositório. Use the short
branch name, such as main; Weblate and git-review push the review to
refs/for/<branch> automatically. Do not include Gerrit push options such as
%submit or %l=Code-Review+2 in the branch name.
The Gerrit documentation has the details on the configuration necessary to set up such repositories. There is no separate code hosting credential setting for this backend.
Docker credentials
For Docker installations, code hosting API credentials can also be provided through environment variables, see Credenciais de sites de hospedagem de código.