Intégration avec le système de contrôle de versions
Weblate currently supports Git (with extended support for Requêtes de fusion GitHub, Requêtes de fusion GitLab, Tirages Gitea demandés, Gerrit review requests, Subversion, Requêtes de pull de Bitbucket Cloud, Tirages demandés du Bitbucket Data Center, and Poussées Azure DevOps demandées) and Mercurial as version control back-ends.
For provider-specific setup steps that combine repository access, incoming notifications, and pushing translations back, see Code-hosting integrations.
Accès aux dépôts
Le dépôt VCS que vous voulez utiliser doit être accessible à Weblate. Avec un dépôt accessible publiquement il vous suffit de saisir l’URL correcte (par exemple https://github.com/WeblateOrg/weblate.git), mais pour les dépôts privés ou pour les URLs de push, le paramètrage est plus complexe et nécessite une authentification.
Accès aux dépôts à partir de Hosted Weblate
Note
This section applies only to Hosted Weblate (hosted.weblate.org). If you are running your own self-hosted Weblate instance, please see the next section instead.
For GitHub repositories on Hosted Weblate, use the Hosted Weblate app from Weblate’s Connect GitHub account flow whenever possible. The App grants repository access, receives incoming notifications, pushes translation branches, and creates pull requests without inviting the Hosted Weblate weblate user. See GitHub repository access for the full setup.
For direct SSH access outside the GitHub App workflow, and for Bitbucket,
Codeberg, and GitLab repositories, Hosted Weblate has a dedicated push user
(with the username weblate, e-mail hosted@weblate.org, and a
name or profile description Weblate push user).
Indication
Il peut y avoir plus d’utilisateurs Weblate sur les plateformes, associés à d’autres instances Weblate. Pour trouver le bon utilisateur de Hosted Weblate il est recommandé de chercher en fonction de l’adresse courriel hosted@weblate.org.
Vous devez ajouter cet utilisateur en tant que collaborateur et lui donner les droits appropriés sur votre dépôt (la lecture seule convient pour recopier mais les droits en écriture sont nécessaires pour pouvoir pousser sur le dépôt). En fonction du service et des paramètres de votre organisation, cela peut être immédiat ou nécessiter une confirmation du côté Weblate.
The weblate user on GitHub accepts invitations automatically within five minutes when you intentionally use direct SSH access there. Manual processing might be needed on the other services, so please be patient.
For this direct SSH-user setup, once the weblate user is added to
your repository, you can configure Dépôt du code source and
URL pour l’envoi du dépôt using the SSH protocol, for example
git@example.com:group/project.git.
Accessing repositories on code-hosting sites (GitHub, GitLab, Bitbucket, Azure DevOps, …)
Note
This section applies to self-hosted Weblate instances. If you are using Hosted Weblate (hosted.weblate.org), see Accès aux dépôts à partir de Hosted Weblate instead.
For self-hosted Weblate, a single private repository is often easiest to set up using an HTTPS repository URL with an access token, see Code-hosting integrations.
For multiple repositories, create a dedicated code-hosting user associated with a Weblate SSH key (see Clé SSH Weblate). This way you associate Weblate SSH key with a single user, because platforms frequently enforce single use of an SSH key. Grant this user access to the repositories, and use SSH URLs to access them (see Dépôts SSH).
Dépôts SSH
One common method to access private repositories is based on SSH. Authorize the public Weblate SSH key (see Clé SSH Weblate) to access the upstream repository this way.
Avertissement
On GitHub, each key can only be used once, see GitHub repository access and Accès aux dépôts à partir de Hosted Weblate.
Weblate enregistre aussi l’empreinte de la clé hôte lors de la première connexion, et refuse les connexions à l’hôte si elle est modifiée par la suite (voir Vérification des clés SSH de l’hôte).
Si une correction est nécessaire, voici ce que vous devez faire à partir de l’interface administrateur Weblate :
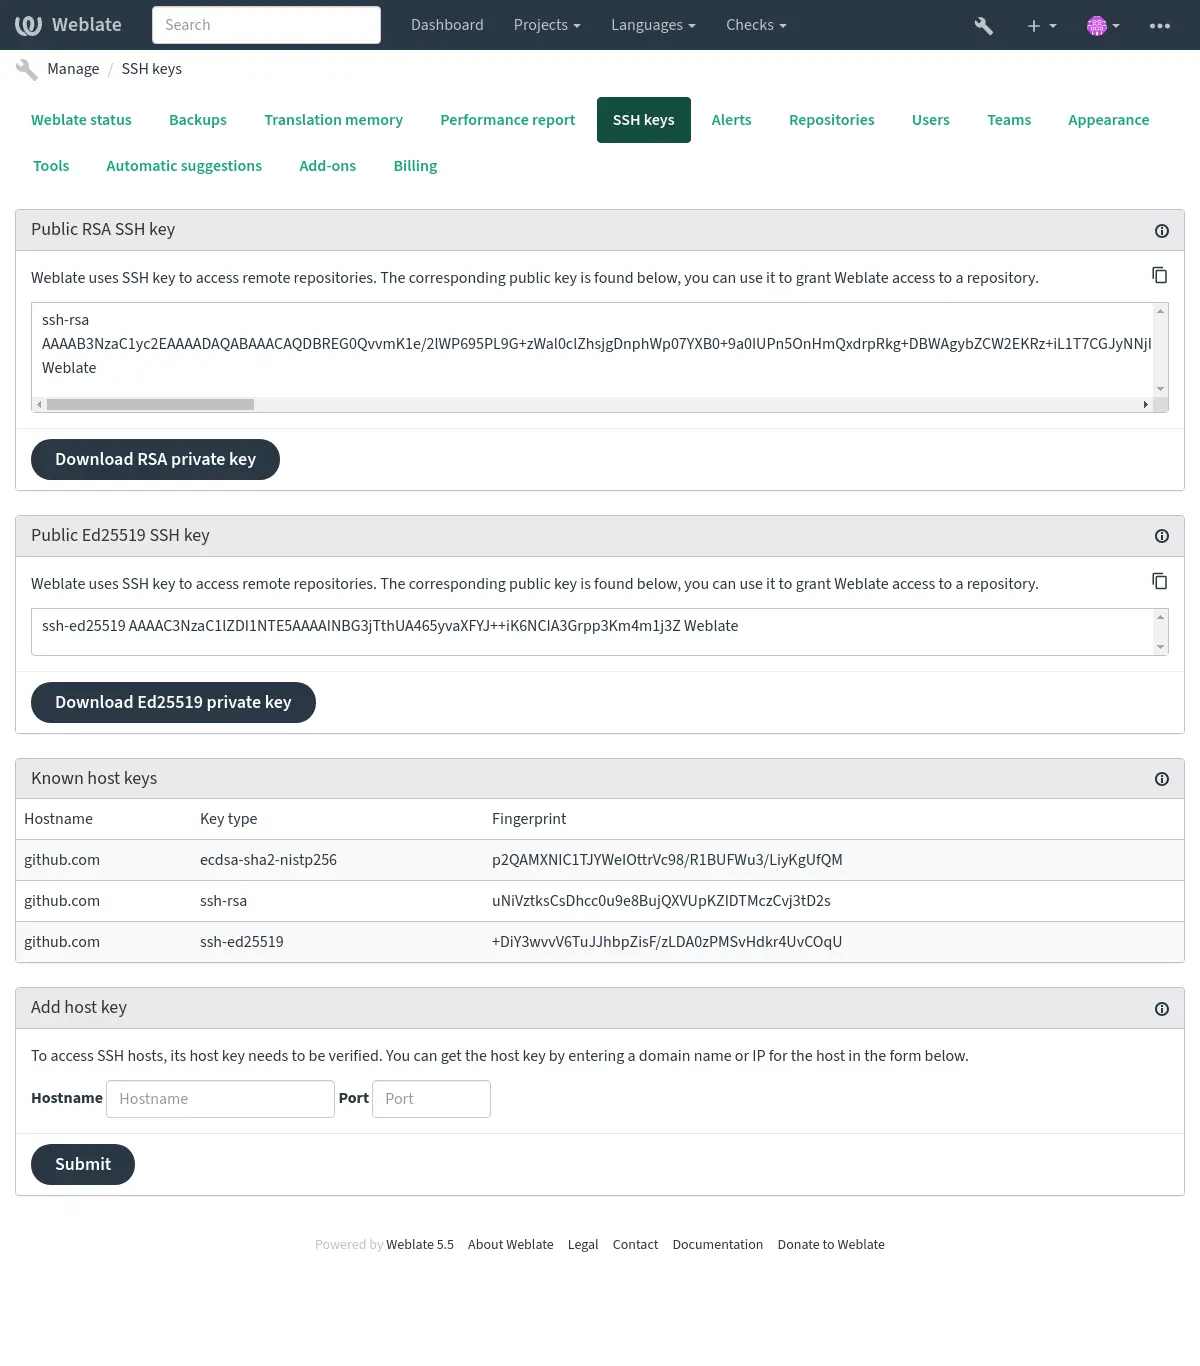
Clé SSH Weblate
Modifié dans la version 4.17: Weblate génère dorénavant les clés SSH RSA et Ed25519. Il est recommandé d’utiliser Ed25519 pour les nouvelles configurations.
La clé publique Weblate est visible pour tous les utilisateurs en affichant la page A propos.
Les administrateurs peuvent générer ou afficher la clé publique utilisée actuellement par Weblate pour la connexion (de clé SSH) sur la page de l’interface administrateur.
Note
La clé privée SSH correspondante ne peut pas avoir actuellement de mot de passe donc assurez-vous qu’elle soit bien protégée.
Indication
Faites une sauvegarde des clés SSH privées générées de Weblate.
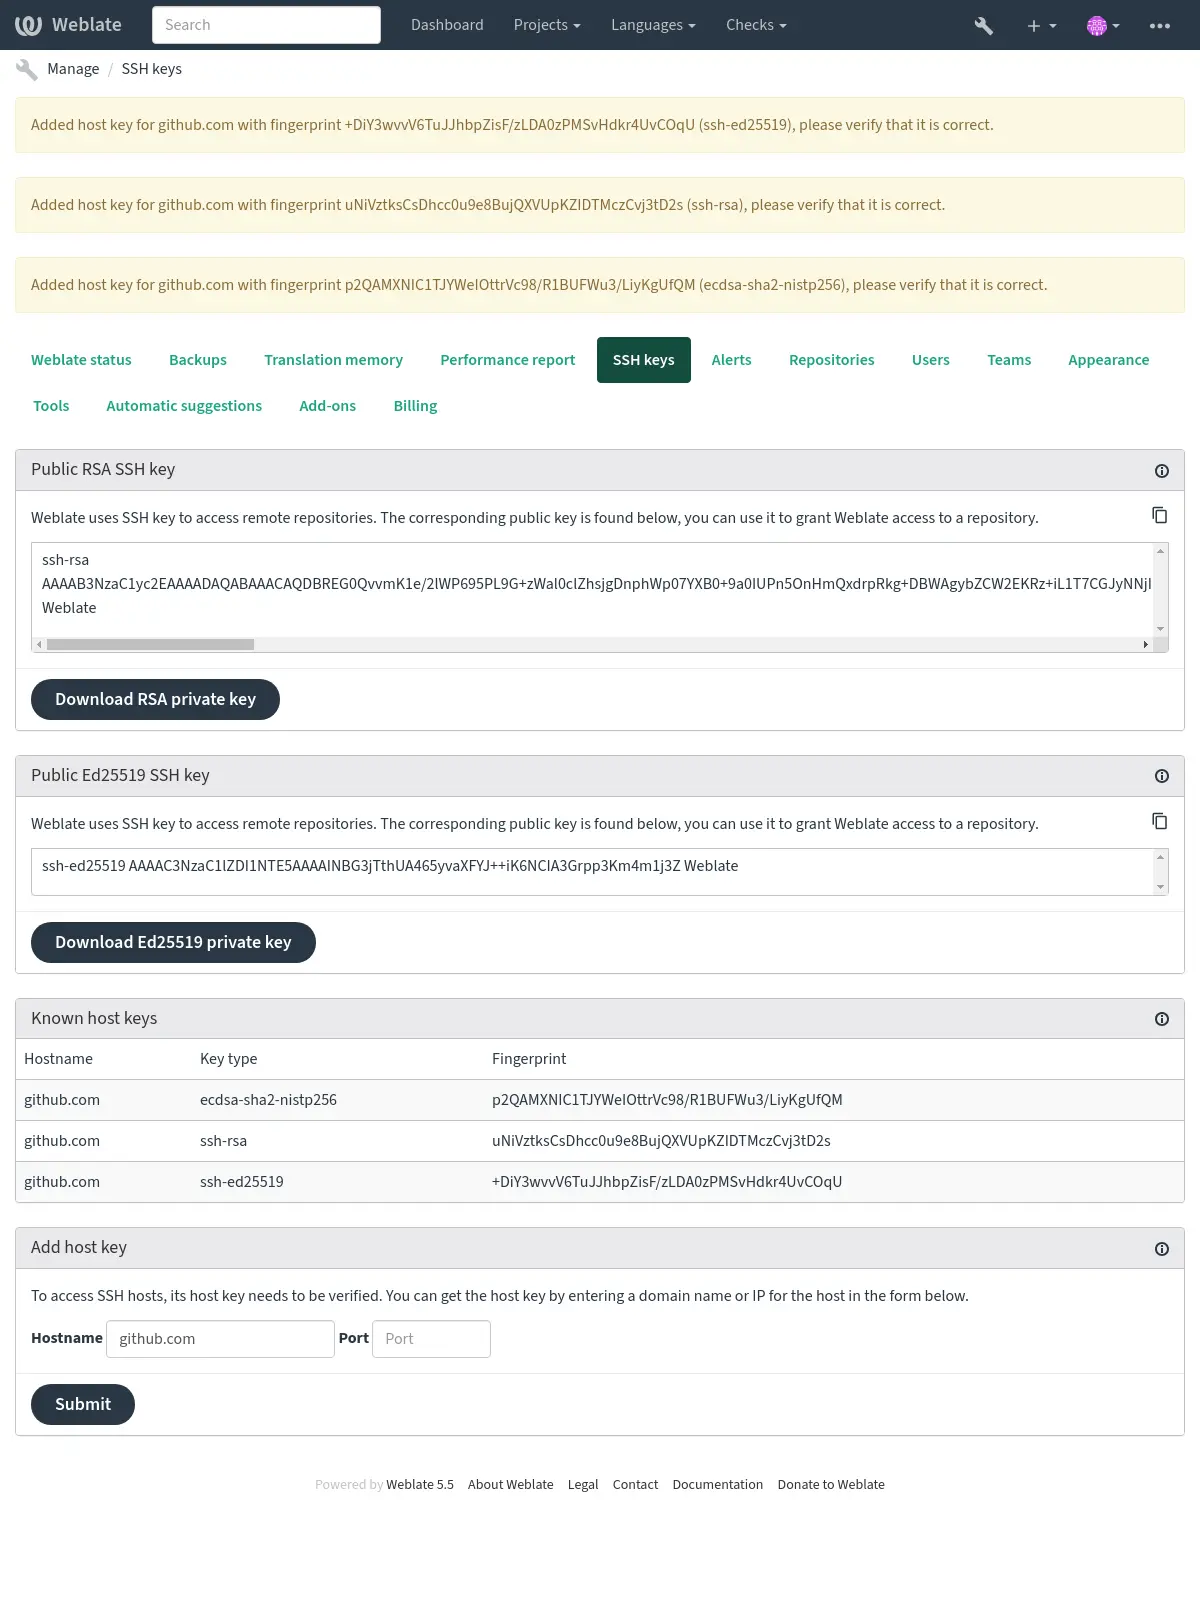
Vérification des clés SSH de l’hôte
Les clés SSH de l’hôte sont automatiquement stockées par Weblate lors du premier acccès et il s’en souvient donc pour les utilisations suivantes.
Dans le cas où vous souhaitez vérifier la signature principale de la clé avant de vous connecter au ajoutez les clés SSH dde l’hôte dépôt, n case you want to verify the key fingerprint before connecting to the repository, add the SSH host keys of the servers you are going to access in Add host key, from the same section of the admin interface. Enter the hostname you are going to access (e.g. gitlab.com), and press Submit. Vérifiez que sa signature principale correspond au serveur que vous avez ajouté.
Les clés ajoutées avec des signatures principales sont affichées dans le message de confirmation :
Se connecter aux anciens serveurs SSH
Les versions récentes de OpenSSH (pa exemple celle utilisée dans le conteneur Weblate Docker) désactivent les signatures RSA qui utilisent l’algorithme de hachage SHA-1 par défaut. Cette modification a été faite car l’algorithme de hachage SHA-1 peut être craqué cryptographiquement, et il est possible de créer des collisions de préfixe de hachage choisis pour moins de 50K USD.
Pour la plupart des utilisateurs, cette modification devrait être invisible et il n’est pas nécessaire de remplacer les clés ssh-rsa. OpenSSH prend en charge les signatures RFC8332 RSA/SHA-256/512 depuis la version 7.2 et les clés ssh-rsa existantes utiliseront automatiquement l’algorithme le plus puissant lorsque cela sera possible.
L’incompatibilité est plus probable avec la connexion à des implémentations de SSH plus anciennes et qui n’ont pas été mises à niveau ou qui n’ont pas suivi de près les améliorations du protocole SSH. La connexion SSH à un tel serveur échouera avec :
no matching host key type found. Their offer: ssh-rsa
Pour ces cas il peut être nécessaire de réactiver sélectivement RSA/SHA1 pour autoriser la connexion et (ou) l’authentification de l’utilisateur via les options HostkeyAlgorithms et PubkeyAcceptedAlgorithms. Par exemple la phrase suivante dans DATA_DIR/ssh/config va activer RSA/SHA1 pour l’hôte et l’authentification de l’utilisateur pour un hôte de destination unique :
Host legacy-host
   HostkeyAlgorithms +ssh-rsa
   PubkeyAcceptedAlgorithms +ssh-rsa
Nous recommandons d’activer RSA/SHA1 seulement comme mesure paliative jusqu’à ce que les anciennes implémentations puissent être mises à jour ou reconfigurées avec un autre type de clé (tel que ECDSA ou Ed25519).
Dépôts GitHub
Detailed GitHub repository access is covered in GitHub repository access.
Dépôts GitLab
Detailed GitLab repository access is covered in GitLab repository access.
URLs internes de Weblate
Partager une configuration du dépôt entre différents composants en se référant à son emplacement tel que weblate://project/component dans les autres composants (liés). De cette manière, ils utilisent les paramètres du dépôt VCS du composant principal (référencé).
Avertissement
La suppression du composant principal entraîne la suppression des composants liés.
Weblate ajuste automatiquement l’URL du dépôt lors de la création d’un composant s’il trouve un composant avec une configuration de dépôt correspondante. Vous pouvez la remplacer dans la dernière étape de la configuration.
Raisons de l’utiliser :
Économise de l’espace disque sur le serveur, le dépôt n’est stocké qu’une seule fois.
Rend les mises à jour plus rapides, un seul dépôt est mis à jour.
Il n’y a qu’un seul dépôt exporté avec les traductions Weblate (voir Exportateur Git).
Certains greffons peuvent fonctionner sur plusieurs composants partageant un référentiel, par exemple Squasher les commits Git.
Dépôts HTTPS
Voir aussi
Pour accéder à des dépôts protégés en HTTPS, ajoutez le nom d’utilisateur et le mot de passe dans l’URL. Ne vous inquiétez pas, Weblate supprimera ces informations lorsque l’URL sera montrée aux utilisateurs (s’ils sont autorisés à voir l’URL du dépôt).
Par exemple, l’ajout de l’authentification dans l’URL de GitHub peut ressembler à : https://user:your_access_token@github.com/WeblateOrg/weblate.git.
Si vous ne fournissez pas les informations personnelles dans l’URL et que le dépôt en a besoin, Git échouera avec l’erreur :
fatal: could not read Username for 'https://github.com': terminal prompts disabled
Modifié dans la version 5.10.2: Weblate uses proactive authentication with Git 2.46.0 and newer when HTTP credentials are supplied.
Ceci rend possible l’accès aux dépots Azure DevOps et accélère l’accès aux dépôts authentifiés.
Note
Si votre nom d’utilisateur ou votre mot de passe contient des caractères spéciaux, ceux-ci doivent être codés en URL, par exemple https://user%40example.com:%24password%23@bitbucket.org/….
Utilisation d’un proxy
Si vous devez accéder aux dépôts VCS par HTTP ou HTTPS en utilisant un serveur proxy, configurez le VCS pour qu’il puisse l’utiliser.
Ceci peut être fait en utilisant les variables d’environnement http_proxy, https_proxy, et all_proxy (tel que décrit dans la documentation cURL) ou en les forçant dans la configuration VCS, par exemple :
git config --global http.proxy http://user:password@proxy.example.com:80
Note
La configuration du proxy doit être faite avec un utilisateur qui exécute Weblate (voir aussi Permissions du système de fichiers) et avec HOME=$DATA_DIR/home (voir DATA_DIR), sinon Git executé par Weblate ne l’utilisera pas.
Git
Indication
Weblate nécessite Git 2.28 ou plus récent.
Voir aussi
Voir Accès aux dépôts pour des informations sur la façon d’accéder aux différents types de dépôts.
Git avec poussée forcée
Cela se comporte exactement comme Git lui-même, la seule différence étant que les poussées sont toujours forcées. Ceci est prévu dans le cas uniquement où vous utilisez un dépôt séparé pour les traductions.
Avertissement
A utiliser avec précaution car vous pourriez perdre des validations dans le dépôt amont.
Personnalisation de la configuration Git
Weblate utilise toutes les commandes VCS avec HOME=$DATA_DIR/home (voir DATA_DIR), c’est pourquoi pour modifier la configuration de l’utilisateur il faut être dans DATA_DIR/home/.git.
Requêtes de fusion GitHub
La configuration détaillée des demandes de tirage GitHub figure dans Requêtes de fusion GitHub.
Requêtes de fusion GitLab
La configuration détaillée des demandes de fusion GitLab figure dans Requêtes de fusion GitLab.
Tirages Gitea demandés
La configuration détaillée des demandes de tirage Gitea figure dans Tirages Gitea demandés.
Tirages demandés du Bitbucket Data Center
La configuration détaillée des demandes de tirage Bitbucket Data Center figure dans Tirages demandés du Bitbucket Data Center.
Requêtes de pull de Bitbucket Cloud
La configuration détaillée des demandes de tirage Bitbucket Cloud figure dans Requêtes de pull de Bitbucket Cloud.
Requêtes de fusion Pagure
La configuration détaillée des demandes de fusion Pagure figure dans Requêtes de fusion Pagure.
Gerrit
La configuration détaillée des demandes de relecture Gerrit figure dans Gerrit review requests.
Poussées Azure DevOps demandées
La configuration détaillée des demandes de tirage Azure DevOps figure dans Poussées Azure DevOps demandées.
Mercurial
Mercurial et un autre VCS que vous pouvez directement utiliser dans Weblate.
Note
Cela devrait fonctionner avec n’importe quelle version de Mercurial, mais il existe quelques fois des modifications incompatibles de l’interface en mode ligne de commande qui cassent l’intégration de Weblate.
Voir aussi
Voir Accès aux dépôts pour des informations sur la façon d’accéder aux différents types de dépôts.
Subversion
Weblate utilise git-svn pour interagir avec les répertoires subversion . C’est un script Perl qui permet aux subversions d’être utilisés par un client Git, autorisant les utilisateurs à maintenir un clone complet du dépôt interne et à valider localement.
Note
Weblate essaie de trouver la structure du dépôt Subversion automatiquement - il supporte à la fois les URL directes pour les branches ou les dépôts avec la structure standard (branches/, balises/ et tronc/). Vous trouverez plus d’informations à ce sujet dans la documentation git-svn. Si votre dépôt n’a pas la structure standard et que vous rencontrez des erreurs, essayez d’inclure le nom de la branche dans l’URL du dépôt et de laisser la branche à vide.
Identifiants pour Subversion
Weblate suppose que vous avez accepté le certificat du serveur (et vos données de connexion si nécessaire). Il va les insérer dans le répertoire DATA_DIR. Acceptez le certificat en utilisant svn une fois avec la variable d’environnement HOME initialisée avec DATA_DIR:
# Use DATA_DIR as configured in Weblate settings.py, it is /app/data in the Docker
HOME=${DATA_DIR}/home svn co https://svn.example.com/example
Voir aussi
Fichiers locaux
Indication
Il repose sur Git. Ce qui nécessite que Git soit installé et vous permet de basculer sur l’utilisation de Git en natif avec l’historique complet de vos traductions.
Weblate peut également travailler sans VCS distant. Les traductions initiales sont importées par téléversement. Ensuite vous pouvez remplacer les fichiers individuels par des téléversements, ou ajouter les chaînes traduites directement à partir de Weblate (disponible actuellement que pour les traductions monolingues).
Weblate crée pour vous en arrière plan un dépôt Git et toutes les modifications sont tracées. Si ultérieurement vous décidez d’utiliser un VCS pour stocker les traductions, vous disposez déjà alors d’un dépôt sur lequel Weblate peut réaliser votre intégration.