設定說明
安裝 Weblate
根據您的設定和經驗,為您選擇適當的安裝方法:
使用 Docker 安裝,建議用於生產設定。
Virtualenv 安裝,建議用於生產設定:
從原始碼中安裝,建議用於開發。
架構概覽
- Web 伺服器
處理傳入 HTTP 請求,提供靜態檔案。
- Celery workers
使用 Celery 的背景工作 在此被執行。
取決於工作負載,您可能會想自訂 workers 的數量。
垂直縮放 Weblate 時使用專門節點。
- Application server
A WSGI or ASGI server serving web pages to users.
垂直縮放 Weblate 時使用專門節點。
- 資料庫
用於儲存所有內容的 PostgreSQL 資料庫伺服器,請參閱 適用於 Weblate 的資料庫設定。
對託管字詞數以億計的網站使用專門的資料庫節點。
- 資料儲存
Valkey 等 key/值的資料儲存或用於快取和任務佇列的 Redis 伺服器,見 使用 Celery 的背景工作。
垂直縮放 Weblate 時使用專門節點。
- 檔案系統
儲存 VCS 儲存庫和上傳的使用者資料的檔案系統儲存。這在所有處理程序間共享。
垂直縮放 Weblate 時使用網路儲存。
- 電子郵件伺服器
用於傳送電子郵件的 SMTP 伺服器,請參閱 設定外寄電子郵件。其可以為外部提供。
提示
使用 Docker 安裝 包含 PostgreSQL 與 Valkey,使安裝過程更輕鬆。
軟體需求
作業系統
Weblate 已知可在 Linux 、 FreeBSD 與 MacOS 上工作。其他類 Unix 系統大多應該也可以。
Windows 不支援 Weblate。但 Weblate 可能仍然可以工作,並且很樂意接受補丁。
也參考
架構概覽 描述了 Weblate 總體架構和必需的服務。
Python 相依套件
Weblate 是以 Python 編寫並支援 Python 3.12 或更新版本。您可以使用 pip 或從您的發行版套件安裝相依套件,完整清單在 requirements.txt 中可用。
最值得注意的相依套件:
- Django
- Celery
- Translate Toolkit
- translation-finder
- Python Social Auth
- Django REST 框架
選用相依套件指定器 |
Python 套件 |
Weblate 功能 |
|---|---|---|
|
||
|
ASGI server for Weblate |
|
|
||
|
||
|
||
|
||
|
||
|
||
|
PostgreSQL,請參閱 適用於 Weblate 的資料庫設定 |
|
|
||
|
||
|
整合 SAML 2 IDP 至 Weblate 中 |
|
|
||
|
Hosted Weblate 整合 |
|
|
WSGI server for Weblate |
|
|
當使用 pip 安裝時,您可以直接指定預想的功能:
uv pip install "weblate[Postgres,Amazon,SAML]"
或您可以安裝 Weblate 並包含所有可以選用的功能:
uv pip install "weblate[all]"
或您可以安裝 Weblate 並不包含任何選用用的功能:
uv pip install weblate
pip 安裝疑難排解
ffi_prep_closure(): bad user_data (it seems that the version of the libffi library seen at runtime is different from the 'ffi.h' file seen at compile-time)這是由於透過PyPI釋出的二進位制包與該發行版不相容造成的。為了解決這個問題,您需要在您的系統上重建該軟體套件:
uv pip install --force-reinstall --no-binary :all: cffi
error: ‘xmlSecKeyDataFormatEngine’ undeclared (first use in this function); did you mean ‘xmlSecKeyDataFormat’?此為 xmlsec 套件的已知問題,請參閱 https://github.com/xmlsec/python-xmlsec/issues/314。
lxml & xmlsec libxml2 library version mismatchlxml和xmlsec包必須基於同一個libxml2建置。您應該在本機建置它們以避免此問題:uv pip install --force-reinstall --no-binary xmlsec --no-binary lxml lxml xmlsec
其他系統需求
後面的相依套件必須安裝在系統上:
Gitgit-review(對於 Gerrit 支援選用)git-svn(對於 Subversion 支援選用)tesseract(只有在您的系統沒有 tesserocr 二進位制 wheels 檔案時才需要)
建置時期相依套件
為了建置一些 Python 相依套件,您可能需要安裝其依賴套件。這取決於您如何安裝它們,因此請參考單獨軟體套件的說明文件。如果您使用預編譯 Wheels 並使用 pip 安裝或使用散布版軟體套件時,您不會需要那些。
硬體需求
Weblate 應該可以在任何現代硬體上正常執行,以下是在單一主機(Weblate、資料庫和 Web 伺服器)上執行 Weblate 所需的最低設定:
3 GB 記憶體
2 個 CPU 核心
1 GB 儲存空間
備註
根據 Weblate 中管理的翻譯大小,安裝 Weblate 的實際需求差異很大。
記憶體使用
記憶體越多越好——用於所有層級的快取(檔案系統,資料庫和 Weblate)。如果有幾百個翻譯元件,那麼建議的最小記憶體為 4 GB。
提示
對於記憶體低於建議值的系統,建議使用 單行程 Celery 設定。
CPU 使用
大量並行使用者會提高需要的 CPU 核心數。
儲存空間使用
典型的資料庫儲存用量為大約 300 MB/每 100 萬託管字詞。
複製儲存庫所需的儲存空間會因情況而異,但 Weblate 會透過淺層複製來盡量降低所需空間。
節點
對中小網站(幾百萬託管字詞),所有的 Weblate 元件(見 架構概覽)可以執行在單一節點上。
當託管字詞數增長到數以億計時,建議使用專門的資料庫節點(見 適用於 Weblate 的資料庫設定)。
驗證釋出工件
發行封存檔可以使用隨 GitHub 發行資產一起發佈的簽章、證明和 SBOM 進行驗證。請參閱 驗證釋出工件。
檔案系統權限
Weblate 行程需要能夠讀寫它儲存資料的目錄 - DATA_DIR。該目錄下的所有檔案都應該由執行所有 Weblate 行程的使用者擁有和可寫入(通常是 WSGI 和 Celery,見 執行伺服器 and 使用 Celery 的背景工作)。
預設的設定放置在 Weblate 來源的相同樹下,然而您會想要將這些移動到更好的位置,如: /var/lib/weblate。
Weblate 試圖自動建立這些資料夾,但當沒有權限去執行時會失敗。
已設定的 CACHE_DIR 也必須可由 Weblate 處理程序寫入,並允許執行產生的輔助檔案。請勿使用 noexec 選項掛載 CACHE_DIR。
當執行 管理指令 時應該小心,它們應該由 Weblate 自己執行的相同使用者來執行,否則一些檔案的權限會是錯誤的。
在 Docker 容器中,/app/data 磁碟區中的所有檔案必須由容器內的 weblate 使用者(UID 1000)擁有。
也參考
適用於 Weblate 的資料庫設定
建議使用 PostgreSQL 資料庫伺服器來執行 Weblate。
支援 PostgreSQL 13 和更高版本。建議 PostgreSQL 15 或更新版本。
資料庫連線
在預設設定中,每個 Weblate 處理程序都會維持與資料庫的持續連線。持續連線可改善 Weblate 的回應速度,但資料庫伺服器可能需要更多資源。詳細資訊請參閱 CONN_MAX_AGE 及 Persistent connections。
Weblate 需要至少下列連線數:
Celery 處理程序的 \((4 \times \mathit{nCPUs}) + 2\)
WSGI workers 的 \(\mathit{nCPUs} + 1\)
這應用到 Docker 容器預設值及此文件中提供的範例設定,不過一旦您自訂 WSGI worker 數目或調整 Celery 並行數,相關數字就會變化。
考慮下列情況,資料庫連線數的實際限制需要更高:
管理指令 也需要它們的連線。
如果處理程序遭到終止(例如被 OOM killer 終止),既有連線可能會持續占用到逾時為止。
PostgreSQL
PostgreSQL 通常是基於 Django 的網站的最好選擇。它是實作 Django 資料庫層而使用的參考資料庫。
備註
Weblate 使用三字母的擴充名,在某些情況下需要單獨安裝。尋找 postgresql-contrib 或類似命名的包。
也參考
建立 PostgreSQL資料庫
在另一個單獨的資料庫中執行 Weblate,並將使用者帳號分開通常是個好方法:
# If PostgreSQL was not installed before, set the main password
sudo -u postgres psql postgres -c "\password postgres"

# Create a database user called "weblate"
sudo -u postgres createuser --superuser --pwprompt weblate

# Create the database "weblate" owned by "weblate"
sudo -u postgres createdb -E UTF8 -O weblate weblate
提示
如果不想 Weblate 在 PostgreSQL 中使用超級使用者,可以省略掉。在模式中必須作為 PostgreSQL 超級使用者,來手動執行一些移轉步驟的情況下, Weblate 將使用:
CREATE EXTENSION IF NOT EXISTS pg_trgm;
CREATE EXTENSION IF NOT EXISTS btree_gin;
CREATE EXTENSION IF NOT EXISTS btree_gist;
設定 Weblate 來使用 PostgreSQL
PostgreSQL 的 settings.py 片段:
DATABASES = {
    "default": {
        # Database engine
        "ENGINE": "django.db.backends.postgresql",
        # Database name
        "NAME": "weblate",
        # Database user
        "USER": "weblate",
        # Configures name of the PostgreSQL role to alter during the database migration
        # "ALTER_ROLE": "weblate",
        # Database password
        "PASSWORD": "password",
        # Set to empty string for localhost
        "HOST": "database.example.com",
        # Set to empty string for default
        "PORT": "",
        # Persistent connections
        "CONN_MAX_AGE": None,
        "CONN_HEALTH_CHECKS": True,
    }
}
資料庫移轉會對 Weblate 使用的資料庫角色執行 ALTER ROLE。多數情況下,角色名稱與使用者名稱相同;在較複雜的設定中,兩者可能不同,資料庫移轉時就會出現角色不存在的錯誤(psycopg2.errors.UndefinedObject: role "weblate@hostname" does not exist)。已知 Azure Database for PostgreSQL 會出現這種情況,但不僅限於該環境。請設定 ALTER_ROLE,指定 Weblate 在資料庫移轉時應修改的角色名稱。
也參考
其他設定
設定外寄電子郵件
Weblate 在各種情況下會發出電子郵件——用於啟動帳號,以及使用者設定的各種通知。對於這些需要存取 SMTP 伺服器。
電子郵件伺服器使用這些設定進行設定: EMAIL_HOST, EMAIL_HOST_PASSWORD, EMAIL_USE_TLS, EMAIL_USE_SSL, EMAIL_HOST_USER and EMAIL_PORT。從名稱就可以大概知道它們的含義,但是您可以在Django說明文件中找到更多資訊。
提示
如果您收到不受支援的身分驗證的錯誤(例如,SMTP AUTH extension not supported by server),這最可能因為使用不安全的連結並且伺服器拒絕以這種方式認證而導致。在這種情況下嘗試啟動 EMAIL_USE_TLS。
在反向代理後面執行
Weblate 中的幾個功能依賴於傳遞給 Weblate 的正確 HTTP 標頭。使用反向代理時,請確保所需資訊被正確傳遞。
要除錯該設定,可以看一看 效能報告 中的 HTTP environment。
- 用戶端 IP 位址
-
Weblate 從 WGSI 處理程式設定的
REMOTE_ADDR解析 IP 地址。這可能是空的(當對 WGSI 使用 socket 時)或者包括反向代理地址,因此 Weblate 需要帶客戶端 IP 地址的附加 HTTP 標頭。啟用
IP_BEHIND_REVERSE_PROXY對多數通常設定應該夠了,但您可能也需要調整IP_PROXY_HEADER和IP_PROXY_OFFSET(使用 Docker 容器內的WEBLATE_IP_PROXY_HEADER和WEBLATE_IP_PROXY_OFFSET)。提示
此設定預設無法啟用,因其會在沒有正確設定反向代理的安裝上允許 IP 地址偽造。
- 伺服器主機名稱
Host 標頭應該與
SITE_DOMAIN中的內容一致。在反向代理中可能需要其他設定(例如,在 Apache 使用ProxyPreserveHost On,或在 nginx 中使用proxy_set_header Host $host;)。提示
CSRF 驗證失敗錯誤常由 Host 標頭和設定的
SITE_DOMAIN不相符所導致。- 用戶端協定
未傳遞正確的協議可能導致 Weblate 最後陷入試圖升級客戶端到 HTTPS 的重定向迴圈中。確保反向代理正確地將它暴露為 X-Forwarded-Proto。
然後需要在
SECURE_PROXY_SSL_HEADER(settings.py) 或WEBLATE_SECURE_PROXY_SSL_HEADER(Docker 環境) 中設定這個標頭。重要
標頭值在設定中區分大小寫,因此
WEBLATE_SECURE_PROXY_SSL_HEADER=HTTP_X_FORWARDED_PROTO,https和WEBLATE_SECURE_PROXY_SSL_HEADER=HTTP_X_FORWARDED_PROTO,HTTPS不可互換。提示
如果瀏覽器顯示“太多重定向”錯誤,最有可能的原因是實際協議(HTTPS) 和 Weblate 觀察到的協議不相符。
在 5.13 版的變更: 預設設定中協議代理標頭由 gunicorn 自動處理,但其他 WSGI 伺服器有更安全的設定並明確要求設定這個。
自 Weblate 5.13 起,Docker 容器使用 granian,它現在要求明確設定
WEBLATE_SECURE_PROXY_SSL_HEADER。
HTTP 代理
Weblate 執行版本控制系統指令,這些指令接受來自環境的代理設定。建議在 settings.py 中定義代理設定:
import os

os.environ["http_proxy"] = "http://proxy.example.com:8080"
os.environ["HTTPS_PROXY"] = "http://proxy.example.com:8080"
也參考
調整設定
也參考
將 weblate/settings_example.py 複製到 weblate/settings.py,並且調整它與您的設定相符。您可能想要調整後面的選項:
ADMINS
網站管理者的清單,當發生故障時它們接收通知,例如合併失敗或 Django 錯誤的通知。
聯絡表單也會在這些情況下傳送電子郵件,除非您對
ADMINS_CONTACT進行了設定。
ALLOWED_HOSTS
需要設定這個,來列出您的網站支援服務的主機。例如:
ALLOWED_HOSTS = ["demo.weblate.org"]另外可以包括萬用字元:
ALLOWED_HOSTS = ["*"]
SESSION_ENGINE
設定如何儲存工作階段。在保持預設的資料庫後端引擎的情況下,應該安排 weblate clearsessions 從資料庫中刪除舊的工作階段。
如果使用 Valkey 或 Redis 作為快取(請參閱 設定快取),建議也使用它作為會話:
SESSION_ENGINE = "django.contrib.sessions.backends.cache"
DATABASES
資料庫伺服器的連線能力,請檢查 Django 的說明文件以瞭解更多詳細資訊。
DEBUG
DEFAULT_FROM_EMAIL
用於傳送電子郵件的電子郵件寄件人地址,例如註冊電子郵件。
SECRET_KEY
Django 用來簽署 Cookie 中部分資訊的金鑰。詳細資訊請參閱 Django金鑰。
也參考
SERVER_EMAIL
用作向管理員傳送電子郵件的傳送者地址的電子郵件,例如通知失敗的合併。
也參考
資料庫匯入初始資料
在設定準備好之後,可以執行 migrate 來建立資料庫結構。現在您將能夠使用管理介面建立翻譯專案。
完成後,您還應該在管理介面檢視 Performance report,它會提示您網站上可能存在的非最佳設定。
生產設定
對於生產設定,可以進行後面的章節中描述的調整。最嚴格的設定將觸發警告,如果超級使用者登入的話,警告由頂部條的感嘆標記來說明:
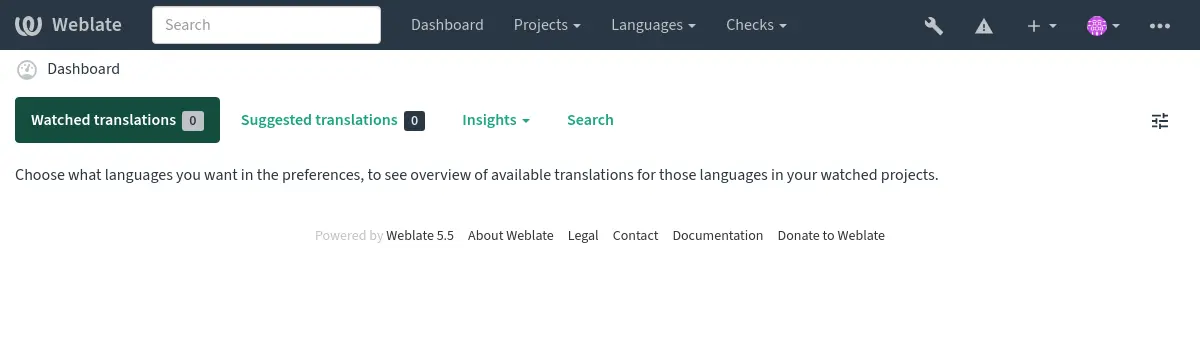
同樣也建議查看由 Django 觸發的檢查(儘管可能不需要修復所有的檢查):
weblate check --deploy
您也可以檢視 效能報告 中的相同檢查清單,“管理效能”部分位於 管理介面。
停用除錯模式
禁止 Django 的除錯模式(DEBUG):
DEBUG = False
在除錯模式開啟時,Django 儲存所有執行的查詢,並將錯誤的回溯顯示給使用者,這在生產設定中是不需要的。
也參考
適當地設定管理員
請在 ADMINS 設定中填入正確的管理員地址,以定義伺服器發生問題時由誰接收電子郵件,例如:
ADMINS = ("Your Name <your_email@example.com>",)
也參考
設定正確的網站網域
在管理介面調整網站名稱和網域,否則 RSS 中的連結或註冊電子郵件位址將不工作。這使用 SITE_DOMAIN 來設定,它應該包含網站網域。
在 4.2 版的變更: 在 4.2 版本之前,替代使用了 Django 網站框架,請參閱 The “sites” framework。
正確地設定 HTTPS
強烈建議使用加密的 HTTPS 協議 執行 Weblate。將其允許後,可以在設定中設定 ENABLE_HTTPS:
ENABLE_HTTPS = True
提示
您還會想要新增 HSTS,更多細節請參閱 SSL/HTTPS。
設定適當的 SECURE_HSTS_SECONDS
如果網站透過 SSL 提供服務,應考慮在 settings.py 中設定 SECURE_HSTS_SECONDS,以啟用 HTTP Strict Transport Security。如下所示,預設值為 0。
SECURE_HSTS_SECONDS = 0
如果設定為非 0 整數,那麼在所有還不曾具有它的回應時, django.middleware.security.SecurityMiddleware 設定 HTTP Strict Transport Security 標頭。
警告
不正確地設定這項會導致您的網站不可逆地(有時)崩潰。請首先閱讀 HTTP Strict Transport Security 說明文件。
使用強大的資料庫引擎
請使用 PostgreSQL 作為正式環境,更多資訊請參閱 適用於 Weblate 的資料庫設定。
使用相鄰的區域運作資料庫,網路的效能與可靠性會影響 Weblate 的使用體驗。
確認資料庫的效能或調校其設定檔,例如使用 PGTune 。
Weblate 部署檢查回報 PostgreSQL 關聯物件的統計資料含有非有限值。請對回報的關聯物件執行
ANALYZE,以重建損毀的統計資料。
設定快取
如果可能,透過調整 CACHES 設定變數使用來自 Django 的 Redis 或 Valkey,例如:
CACHES = {
    "default": {
        "BACKEND": "django_redis.cache.RedisCache",
        "LOCATION": "redis://127.0.0.1:6379/0",
        # If redis is running on same host as Weblate, you might
        # want to use unix sockets instead:
        # 'LOCATION': 'unix:///var/run/redis/redis.sock?db=0',
        "OPTIONS": {
            "CLIENT_CLASS": "django_redis.client.DefaultClient",
            "PARSER_CLASS": "redis.connection.HiredisParser",
        },
    }
}
提示
如變更快取設定,可能也需要為 Celery 調整它們,請參閱 使用 Celery 的背景工作。
頭像快取
除了 Django 的快取, Weblate 還執行頭像快取。建議使用單獨的、檔案後端快取來用於此目的:
CACHES = {
    "default": {
        # Default caching backend setup, see above
        "BACKEND": "django_redis.cache.RedisCache",
        "LOCATION": "unix:///var/run/redis/redis.sock?db=0",
        "OPTIONS": {
            "CLIENT_CLASS": "django_redis.client.DefaultClient",
            "PARSER_CLASS": "redis.connection.HiredisParser",
        },
    },
    "avatar": {
        "BACKEND": "django.core.cache.backends.filebased.FileBasedCache",
        "LOCATION": os.path.join(DATA_DIR, "avatar-cache"),
        "TIMEOUT": 604800,
        "OPTIONS": {
            "MAX_ENTRIES": 1000,
        },
    },
}
電子郵件外送設定
Weblate 需要在幾種情況下傳送電子郵件,這些電子郵件應具有正確的傳送者地址,請設定 SERVER_EMAIL 和 DEFAULT_FROM_EMAIL,與您的環境相符,例如:
SERVER_EMAIL = "admin@example.org"
DEFAULT_FROM_EMAIL = "weblate@example.org"
備註
為了禁止 Weblate 傳送電子郵件,將 EMAIL_BACKEND 設定為 django.core.mail.backends.dummy.EmailBackend。
這將禁止 所有 電子郵件的投遞,包括註冊或密碼重設電子郵件。
允許的網域設定
Django 需要 ALLOWED_HOSTS 儲存您的網站允許服務的網域清單,將其保持空置會屏蔽任何請求。
在沒有設定來相符 HTTP 伺服器的情況下,會得到錯誤資訊,如 Invalid HTTP_HOST header: '1.1.1.1'. You may need to add '1.1.1.1' to ALLOWED_HOSTS.
提示
在 Docker 容器上,這可以使用,為 WEBLATE_ALLOWED_HOSTS。
Django金鑰
SECRET_KEY 設定由 Django 使用來進行 cookies 簽名,應該真正產生自己的值,而不是使用來自舉例的設定的值。
可以使用與 Weblate 一起上市的 weblate-generate-secret-key, 來產生新的金鑰。
也參考
執行維護事項
為了最佳化效能,在後臺執行一些維護任務是個好方法。這由 使用 Celery 的背景工作 自動進行,並且包括下列任務:
設定健康性的檢查(每小時)。
提交待處理的變更(每小時),請參閱 惰性提交 和
commit_pending。更新元件警告(每天)。
更新遠端分支(每晚),請參閱
AUTO_UPDATE。翻譯記憶備份到 JSON(每天),請參閱
dump_memory。全文字和資料庫維護任務(每天和每週任務),請參閱
cleanuptrans。
系統的地區與編碼
系統的地區應該設定為相容 UTF-8 的。在多數 Linux 發佈中這是預設的設定。在您的系統不能相容的情況下,請將地區變更為 UTF-8 變體。
例如通過編輯 /etc/default/locale 並設定 LANG="C.UTF-8"。
在一些情況下,個別獨立的伺服器設定檔會分別在其本機端。在發行版與網站伺服器版本間的差異,請針對您的網頁伺服器套件狀況確認說明文件。
在 Ubuntu 上的 Apache 使用 /etc/apache2/envvars :
export LANG='en_US.UTF-8'
export LC_ALL='en_US.UTF-8'
在 CentOS 上的 Apache 使用 /etc/sysconfig/httpd (或 /opt/rh/httpd24/root/etc/sysconfig/httpd):
LANG='en_US.UTF-8'
執行伺服器
提示
如果您沒有在下面描述的服務經歷,您可能需要嘗試 使用 Docker 安裝。
需要幾個服務來執行Weblate,建議的設定包括:
資料庫伺服器(請參閱 適用於 Weblate 的資料庫設定)
快取伺服器(請參閱 設定快取 )
用於靜態檔案和終止 SSL 的前端 web 伺服器(請參閱 提供靜態檔案)
用於動態內容的 WSGI 伺服器(請參閱 適用於 NGINX 與 uWSGI 的範例設定 )
用於執行背景工作的 Celery (請參閱 使用 Celery 的背景工作 )
備註
這些服務之間由一些相依套件,例如當啟動 Celery 或 uwsgi 行程時,快取和資料庫應該執行。
在多數情況下,需要在單一(虛擬)伺服器上執行所有服務,但在您的安裝是重載的情況下,可以將這些服務拆開。對此的唯一限制是 Celery 和 Wsgi 伺服器需要存取 DATA_DIR。
備註
WSGI 行程和 Celery 行程必須在同一使用者下被執行,否則 DATA_DIR 中的檔案將以混合的所有權來儲存,導致執行期問題。
另請參閱 檔案系統權限 與 使用 Celery 的背景工作。
執行 web 伺服器
執行 Weblate 與執行其他任何基於 Django 的程式沒什麼不同。 Django 通常作為 WSGI 或 fcgi 執行(請參閱下面不同 web 伺服器的範例)。
備註
下方顯示的設定範例檔案位於 Weblate 原始碼樹狀目錄的 weblate/examples/ 下,並由專案維護。原始碼發行套件及本檔案都包含這些檔案,但 Python wheel 只會安裝執行階段檔案。從 PyPI 安裝 Weblate 時,請先取得相符的原始碼發行套件或原始碼簽出,再複製這些範例。
為了測試目的,您可以在 Django 中使用內建的 web 伺服器:
weblate runserver
警告
不要在生產設定中使用此伺服器。它還沒有通過安全稽核或效能測試。另請參閱 runserver 上的 Django 說明文件。
提示
Django 內建伺服器只會在啟用 DEBUG 時提供靜態檔案,因為該伺服器僅供開發使用。正式環境請參閱 WSGI 設定:
提供靜態檔案
在 5.15.2 版的變更: /media/ 不再被用於提供螢幕擷圖。
Django 必須將靜態檔案收集到單一目錄中。若要執行此操作,請執行 weblate collectstatic --noinput。這會將靜態檔案複製到由 STATIC_ROOT 設定指定的目錄(預設為 CACHE_DIR 內的 static 目錄)。正式環境安裝會在收集後的檔名中使用內容雜湊,讓更新後的資源不會沿用瀏覽器或 Proxy 的過期快取。
建議直接從您的 web 伺服器為靜態檔案提供服務,對於後面的路徑應該使用它:
/static/給 Weblate 和管理介面提供靜態檔案(檔案源由
STATIC_ROOT定義)。/favicon.ico應該重寫以提供
/static/favicon.ico。
內容安全性政策(CSP)
Weblate 預設設定會啟用 weblate.middleware.SecurityMiddleware 中介軟體,以設定 Content-Security-Policy、X-XSS-Protection 等安全性相關 HTTP 標頭。預設值已配合 Weblate 及其設定,但您的環境可能仍需自訂。
適用於 NGINX 與 Granian 的範例設定
下列設定執行使用 NGINX 和 Granian web 伺服器一起執行 Weblate:
#
# nginx configuration for Weblate
#
# You will want to change:
#
# - server_name
# - change /home/weblate/weblate-env to location where Weblate Python environment is placed
# - change /home/weblate/data to match your DATA_DIR
# - change /home/weblate/data/cache to match your CACHE_DIR
# - change python3.12 to match your Python version
# - change weblate user to match your Weblate user
#
server {
    listen 80;
    server_name weblate;
    # Not used
    root /var/www/html;

    location ~ ^/favicon.ico$ {
        # CACHE_DIR/static/favicon.ico
        alias /home/weblate/data/cache/static/favicon.ico;
        expires 30d;
    }

    location /static/ {
        # CACHE_DIR/static/
        alias /home/weblate/data/cache/static/;
        expires 30d;
    }

    location / {
        proxy_set_header X-Forwarded-For $proxy_add_x_forwarded_for;
        proxy_set_header X-Forwarded-Proto $scheme;
        proxy_set_header Host $http_host;
        proxy_pass http://127.0.0.1:8888;
        proxy_read_timeout 3600;
    }
}
適用於 NGINX 與 Gunicorn 的範例設定
下列設定在 NGINX web伺服器下使用 Gunicorn 執行 Weblate (原始碼樹中的 weblate/examples/weblate.nginx.gunicorn.conf):
#
# nginx configuration for Weblate
#
# You will want to change:
#
# - server_name
# - change /home/weblate/weblate-env to location where Weblate Python environment is placed
# - change /home/weblate/data to match your DATA_DIR
# - change /home/weblate/data/cache to match your CACHE_DIR
# - change python3.12 to match your Python version
# - change weblate user to match your Weblate user
#
server {
    listen 80;
    server_name weblate;
    # Not used
    root /var/www/html;

    location ~ ^/favicon.ico$ {
        # CACHE_DIR/static/favicon.ico
        alias /home/weblate/data/cache/static/favicon.ico;
        expires 30d;
    }

    location /static/ {
        # CACHE_DIR/static/
        alias /home/weblate/data/cache/static/;
        expires 30d;
    }

    location / {
        proxy_set_header X-Forwarded-For $proxy_add_x_forwarded_for;
        proxy_set_header X-Forwarded-Proto $scheme;
        proxy_set_header Host $http_host;
        proxy_pass http://unix:/run/gunicorn.sock;
        proxy_read_timeout 3600;
    }
}
適用於 NGINX 與 uWSGI 的範例設定
為了執行正式環境的 Web 伺服器,使用與 Weblate 一起安裝的 WSGI 封裝(當使用 Python 環境時,它安裝為 ~/weblate-env/lib/python3.14/site-packages/weblate/wsgi.py)。不要忘記將 Python 搜尋路徑同樣設定為您的 Python 環境(例如在 uWSGI 中使用 virtualenv = /home/user/weblate-env)。
後面的設定將 Weblate 作為 NGINX 網頁伺服器下的 uWSGI 來執行。
NGINX 的設定(原始碼樹中的 weblate/examples/weblate.nginx.conf):
#
# nginx configuration for Weblate
#
# You will want to change:
#
# - server_name
# - change /home/weblate/weblate-env to location where Weblate Python environment is placed
# - change /home/weblate/data to match your DATA_DIR
# - change /home/weblate/data/cache to match your CACHE_DIR
# - change python3.12 to match your Python version
# - change weblate user to match your Weblate user
#
server {
    listen 80;
    server_name weblate;
    # Not used
    root /var/www/html;

    location ~ ^/favicon.ico$ {
        # CACHE_DIR/static/favicon.ico
        alias /home/weblate/data/cache/static/favicon.ico;
        expires 30d;
    }

    location /static/ {
        # CACHE_DIR/static/
        alias /home/weblate/data/cache/static/;
        expires 30d;
    }

    location / {
        include uwsgi_params;
        # Needed for long running operations in admin interface
        uwsgi_read_timeout 3600;
        # Adjust based to uwsgi configuration:
        uwsgi_pass unix:///run/uwsgi/app/weblate/socket;
        # uwsgi_pass 127.0.0.1:8080;
    }
}
uWSGI 的設定(原始碼樹中的 weblate/examples/weblate.uwsgi.ini):
#
# uWSGI configuration for Weblate
#
# You will want to change:
#
# - change /home/weblate/weblate-env to location where Weblate Python environment is placed
# - change /home/weblate/data to match your DATA_DIR
# - change python3.12 to match your Python version
# - change weblate user to match your Weblate user
#
[uwsgi]
plugins       = python3
master        = true
protocol      = uwsgi
socket        = 127.0.0.1:8080
wsgi-file     = /home/weblate/weblate-env/lib/python3.12/site-packages/weblate/wsgi.py

# Add path to Weblate checkout if you did not install
# Weblate by pip
# python-path   = /path/to/weblate

# Path to the Python environment
virtualenv = /home/weblate/weblate-env

# Needed for OAuth/OpenID
buffer-size   = 8192

# Reload when consuming too much of memory
reload-on-rss = 250

# Increase number of workers for heavily loaded sites
workers       = 8

# Enable threads for Sentry error submission
enable-threads = true

# Child processes do not need file descriptors
close-on-exec = true

# Avoid default 0000 umask
umask = 0022

# Run as weblate user
uid = weblate
gid = weblate

# Enable harakiri mode (kill requests after some time)
# harakiri = 3600
# harakiri-verbose = true

# Enable uWSGI stats server
# stats = :1717
# stats-http = true

# Do not log some errors caused by client disconnects
ignore-sigpipe = true
ignore-write-errors = true
disable-write-exception = true
適用於 Apache 的範例設定
建議當 Weblate 使用 WSGI 時使用 prefork MPM。
下面的設定將 Weblate 作為 WSGI 來執行,您需要允許 mod_wsgi (原始碼樹中的 weblate/examples/apache.conf):
#
# VirtualHost for Weblate
#
# You will want to change:
#
# - ServerAdmin and ServerName
# - change /home/weblate/weblate-env to location where Weblate Python environment is placed
# - change /home/weblate/data to match your DATA_DIR
# - change /home/weblate/data/cache to match your CACHE_DIR
# - change python3.12 to match Python version mod-wsgi is compiled for
# - change weblate user to match your Weblate user
#
<VirtualHost *:80>
    ServerAdmin admin@weblate.example.org
    ServerName weblate.example.org

    # CACHE_DIR/static/favicon.ico
    Alias /favicon.ico /home/weblate/data/cache/static/favicon.ico

    # CACHE_DIR/static/
    Alias /static/ /home/weblate/data/cache/static/
    <Directory /home/weblate/data/cache/static/>
        Require all granted
    </Directory>

    # Path to your Weblate Python environment
    WSGIDaemonProcess weblate python-home=/home/weblate/weblate-env user=weblate request-timeout=600
    WSGIProcessGroup weblate
    WSGIApplicationGroup %{GLOBAL}

    WSGIScriptAlias / /home/weblate/weblate-env/lib/python3.12/site-packages/weblate/wsgi.py process-group=weblate
    WSGIPassAuthorization On

    <Directory /home/weblate/weblate-env/lib/python3.12/site-packages/weblate/>
        <Files wsgi.py>
        Require all granted
        </Files>
    </Directory>

</VirtualHost>
備註
Weblate 需要 Python 3,所以請確認您執行 modwsgi 的 Python 3 變體。它通常作為獨立的套件來獲得,例如 libapache2-mod-wsgi-py3。
使用相符的 Python 版本來安裝 Weblate。
適用於 Apache 與 Gunicorn 的範例設定
後面的設定在 Gunicorn 和 Apache 2.4 中執行 Weblate(原始碼樹中的 weblate/examples/apache.gunicorn.conf ):
#
# VirtualHost for Weblate using gunicorn on localhost:8000
#
# You will want to change:
#
# - ServerAdmin and ServerName
# - change /home/weblate/weblate-env to location where Weblate Python environment is placed
# - change /home/weblate/data to match your DATA_DIR
# - change /home/weblate/data/cache to match your CACHE_DIR
# - change weblate user to match your Weblate user
#
<VirtualHost *:443>
    ServerAdmin admin@weblate.example.org
    ServerName weblate.example.org

    # CACHE_DIR/static/favicon.ico
    Alias /favicon.ico /home/weblate/data/cache/static/favicon.ico

    # CACHE_DIR/static/
    Alias /static/ /home/weblate/data/cache/static/
    <Directory /home/weblate/data/cache/static/>
        Require all granted
    </Directory>

    SSLEngine on
    SSLCertificateFile /etc/apache2/ssl/https_cert.cert
    SSLCertificateKeyFile /etc/apache2/ssl/https_key.pem
    SSLProxyEngine On

    ProxyPass /favicon.ico !
    ProxyPass /static/ !

    ProxyPass / http://localhost:8000/
    ProxyPassReverse / http://localhost:8000/
    ProxyPreserveHost On
</VirtualHost>
啟動 Granian 的設定範例
Weblate 有 wsgi 選用依賴(見 Python 相依套件),此依賴會安裝執行 Granian 所需的一切。安裝 Weblate 時,您可以將它指定為:
uv pip install Weblate[all,wsgi]
安裝了 Granian 後您可以執行它。這通常在系統層級完成。下列範例顯示透過 systemd 的啟動:
[Unit]
Description=granian daemon
After=network.target

[Service]
User=weblate
Group=weblate
WorkingDirectory=/home/weblate/weblate-env/
Environment="DJANGO_SETTINGS_MODULE=weblate.settings"
RuntimeDirectory=granian
ExecStart=/home/weblate/weblate-env/bin/granian \
    --no-ws \
    --workers-max-rss 450 \
    --interface wsgi \
    --workers 2 \
    --blocking-threads 8 \
    --backlog 128 \
    --backpressure 16 \
    --runtime-mode mt \
    --port 8888 \
    weblate.wsgi:application

[Install]
WantedBy=multi-user.target
Granian 使用 worker 處理程序平行執行 Python,使用阻塞式執行緒並行處理 WSGI 請求,並使用執行階段執行緒處理網路 I/O。此範例使用 2 個 worker,每個 worker 有 8 個阻塞式執行緒,將每個 worker 限制為最多 16 個並行連線,並讓執行階段執行緒維持 Granian 的預設值。請依可用記憶體、CPU 核心數及資料庫連線上限,調整 worker 與阻塞式執行緒的數量。backpressure 的值應等於或高於阻塞式執行緒數量。
Sample configuration to start Granian with ASGI
ASGI deployment is available as an opt-in alternative to WSGI. Install the
asgi optional dependency:
uv pip install Weblate[all,asgi]
The following systemd unit runs the Django ASGI application:
[Unit]
Description=granian ASGI daemon
After=network.target

[Service]
User=weblate
Group=weblate
WorkingDirectory=/home/weblate/weblate-env/
Environment="DJANGO_SETTINGS_MODULE=weblate.settings"
RuntimeDirectory=granian
ExecStart=/home/weblate/weblate-env/bin/granian \
    --no-ws \
    --workers-max-rss 450 \
    --interface asginl \
    --workers 2 \
    --backlog 128 \
    --backpressure 16 \
    --runtime-mode mt \
    --port 8888 \
    weblate.asgi:application

[Install]
WantedBy=multi-user.target
The sample uses Granian's ASGI interface without lifespan or WebSocket support, because Weblate currently exposes HTTP only. Weblate's middleware supports both deployment modes and uses thread-sensitive adapters where it still relies on synchronous Django APIs. The health check is asynchronous, but most Weblate views remain synchronous, and CPU-intensive or long-running work should still be handled by 使用 Celery 的背景工作.
WSGI remains the default deployment mode, including for the Docker images. Adjust the worker count and backpressure to the available memory, CPU cores, and database connection limit.
啟動 Gunicorn 的設定範例
必須單獨安裝 Gunicorn:
uv pip install gunicorn
一旦安裝了 Gunicorn,您可以執行它。這通常在系統層級完成。下列範例顯示透過 systemd 的啟動:
[Unit]
Description=gunicorn socket

[Socket]
ListenStream=/run/gunicorn.sock

[Install]
WantedBy=sockets.target
[Unit]
Description=gunicorn daemon
Requires=gunicorn.socket
After=network.target

[Service]
User=weblate
Group=weblate
WorkingDirectory=/home/weblate/weblate-env/
Environment="DJANGO_SETTINGS_MODULE=weblate.settings"
ExecStart=/home/weblate/weblate-env/bin/gunicorn \
    --preload \
    --timeout 3600 \
    --graceful-timeout 3600 \
    --worker-class=gthread \
    --workers=2 \
    --threads=16 \
    --bind unix:/run/gunicorn.sock \
    weblate.wsgi:application

[Install]
WantedBy=multi-user.target
在路徑下執行 Weblate
建議當 Weblate 使用 WSGI 時使用 prefork MPM。
為 /weblate 下的 Weblate 提供服務的 Apache 設定的範例。再次使用 mod_wsgi (原始碼樹中的 weblate/examples/apache-path.conf ):
#
# VirtualHost for Weblate, running under /weblate path
#
# You will want to change:
#
# - ServerAdmin and ServerName
# - change /home/weblate/weblate-env to location where Weblate Python environment is placed
# - change /home/weblate/data to match your DATA_DIR
# - change /home/weblate/data/cache to match your CACHE_DIR
# - change python3.12 to match Python version mod-wsgi is compiled for
# - change weblate user to match your Weblate user
#
<VirtualHost *:80>
    ServerAdmin admin@weblate.example.org
    ServerName weblate.example.org

    # CACHE_DIR/static/favicon.ico
    Alias /weblate/favicon.ico /home/weblate/data/cache/static/favicon.ico

    # CACHE_DIR/static/
    Alias /weblate/static/ /home/weblate/data/cache/static/
    <Directory /home/weblate/data/cache/static/>
        Require all granted
    </Directory>

    # Path to your Weblate Python environment
    WSGIDaemonProcess weblate python-home=/home/weblate/weblate-env user=weblate request-timeout=600
    WSGIProcessGroup weblate
    WSGIApplicationGroup %{GLOBAL}

    WSGIScriptAlias /weblate /home/weblate/weblate-env/lib/python3.12/site-packages/weblate/wsgi.py process-group=weblate
    WSGIPassAuthorization On

    <Directory /home/weblate/weblate-env/lib/python3.12/site-packages/weblate/>
        <Files wsgi.py>
        Require all granted
        </Files>
    </Directory>

</VirtualHost>
此外,您必須調整 weblate/settings.py :
URL_PREFIX = "/weblate"
使用 Celery 的背景工作
Weblate 使用 Celery 來執行一般或是背景的排程工作。您應該執行一組 Celery 服務來執行工作,例如它會負責處理以下的運作(此清單非完整):
透過 webhooks 接收來自外部的服務中(請參閱 通知掛勾)。
執行規律的維護工作如備份、清理與每日的附加元件或更新。(請參閱 備份和移動 Weblate、
BACKGROUND_TASKS、 附加元件)。執行 自動翻譯。
傳送摘要通知。
將耗用大量資源的操作從 WSGI 處理程序分流。
提交待處理變更(參閱 惰性提交)。
使用 Valkey 或 Redis 作為後端的典型安裝看上去是這樣的:
CELERY_TASK_ALWAYS_EAGER = False
CELERY_BROKER_URL = "redis://localhost:6379"
CELERY_RESULT_BACKEND = CELERY_BROKER_URL
您應該啟動 Celery 工作處理程序來處理任務,並且開啟排程任務。對於除錯和開發,這可以直接在指令列完成:
celery --app=weblate.utils worker --beat --queues=celery,notify,memory,translate,backup
在WSGI中使用eager模式執行Celery任務
備註
這將會在網頁介面中造成效能的衝擊影響,也會造成一般的觸發功能失效(例如提交暫緩的修正、摘要通知或備份)。
對於開發,您可能希望使用 eager configuration,它可以適當地處理所有任務:
CELERY_TASK_ALWAYS_EAGER = True
CELERY_BROKER_URL = "memory://"
CELERY_TASK_EAGER_PROPAGATES = True
將 Celery 作為系統服務執行
您更可能想要執行 Celery 作為守護程序,這由 Daemonization 來涵蓋。對於使用 systemd 的最通常的 Linux 設定,調整下面列出的範例檔案。這些例子在 weblate/examples/ 下的 Weblate 原始碼樹中的維護。Python wheels 不安裝這些部署樣例。
Systemd 單元作為 /etc/systemd/system/celery-weblate.service 放置:
[Unit]
Description=Celery Service (Weblate)
After=network.target

[Service]
Type=forking
User=weblate
Group=weblate
EnvironmentFile=/etc/default/celery-weblate
WorkingDirectory=/home/weblate
RuntimeDirectory=celery
RuntimeDirectoryPreserve=restart
LogsDirectory=celery
ExecStart=/bin/sh -c '${CELERY_BIN} multi start ${CELERYD_NODES} \
  -A ${CELERY_APP} --pidfile=${CELERYD_PID_FILE} \
  --logfile=${CELERYD_LOG_FILE} --loglevel=${CELERYD_LOG_LEVEL} ${CELERYD_OPTS}'
ExecStop=/bin/sh -c '${CELERY_BIN} multi stopwait ${CELERYD_NODES} \
  --pidfile=${CELERYD_PID_FILE}'
ExecReload=/bin/sh -c '${CELERY_BIN} multi restart ${CELERYD_NODES} \
  -A ${CELERY_APP} --pidfile=${CELERYD_PID_FILE} \
  --logfile=${CELERYD_LOG_FILE} --loglevel=${CELERYD_LOG_LEVEL} ${CELERYD_OPTS}'

[Install]
WantedBy=multi-user.target
環境設定作為 /etc/default/celery-weblate 放置:
# Name of nodes to start
CELERYD_NODES="celery notify memory backup translate"

# Absolute or relative path to the 'celery' command:
CELERY_BIN="/home/weblate/weblate-env/bin/celery"

# App instance to use
# comment out this line if you don't use an app
CELERY_APP="weblate.utils"

# Extra command-line arguments to the worker. You might need to customize
# concurrency depending on the available resources and Weblate usage. Increase
# the concurrency if you get weblate.E019 error, decrease it if you are on a
# low-resource system. A higher prefetch multiplier can improve throughput for
# short tasks, but reserves more tasks in each worker. Command-line values
# override CELERY_WORKER_PREFETCH_MULTIPLIER from settings.py.
CELERYD_OPTS="--beat:celery --queues:celery=celery --concurrency:celery=2 --prefetch-multiplier:celery=1 \
    --queues:notify=notify --concurrency:notify=2 --prefetch-multiplier:notify=4 \
    --queues:memory=memory --concurrency:memory=2 --prefetch-multiplier:memory=1 \
    --queues:translate=translate --concurrency:translate=4 --prefetch-multiplier:translate=1 \
    --queues:backup=backup  --concurrency:backup=1 --prefetch-multiplier:backup=1"

# Logging configuration
# - %n will be replaced with the first part of the nodename.
# - %I will be replaced with the current child process index
#   and is important when using the prefork pool to avoid race conditions.
CELERYD_PID_FILE="/run/celery/weblate-%n.pid"
CELERYD_LOG_FILE="/var/log/celery/weblate-%n%I.log"
CELERYD_LOG_LEVEL="INFO"
使用 logrotate 來旋轉 Celery 記錄的額外設定將被放置為 /etc/logrotate.d/celery:
/var/log/celery/*.log {
        weekly
        missingok
        rotate 12
        compress
        notifempty
}
使用 Celery beat 的週期性任務
Weblate 帶有內建的排程任務設定。任務計劃儲存在資料庫內,任務由 Celery beat 守護程序執行。
提示
您可以在 settings.py 中定義另外的任務,例如請參閱 惰性提交。
監測 Celery 狀態
您可以在 管理介面 中找到 Celery 任務佇列的目前長度,或者您可以使用在指令中使用 celery_queues。如果佇列太長,您也會在管理介面中得到設定錯誤。
警告
Celery 錯誤預設之儲存在 Celery 紀錄中,並且使用者不可見。在您想要瞭解故障概況的情況下,建議設定 收集錯誤報告與監測效能。
單行程 Celery 設定
如果您的記憶體有限,您或許會想要減少 Weblate 處理程序數。使用以下指令可以在單處理程序中執行所有 Celery 任務:
celery --app=weblate.utils worker --beat --queues=celery,notify,memory,translate,backup --pool=solo
透過設定 CELERY_SINGLE_PROCESS,可使用 Docker 的安裝設定為使用單處理程序 Celery 設定。
警告
這會對 Weblate 效能產生顯著影響。
監測 Weblate
Weblate 提供 /healthz/ URL 作為簡單的健康檢查來使用,例如使用 Kubernetes。 Docker 容器具有使用此 URL 的內建執行狀況檢查。
為了檢測Weblate的各項指標,您可以使用 GET /api/metrics/ API端點。
收集錯誤報告與監測效能
與其他任何軟體一樣,Weblate 可能會失敗。為了收集有用的故障狀態,我們建議使用第三方服務來收集此類資訊。這在 Celery 工作失敗的情況下尤其有用,否則將只會向紀錄報告錯誤,而您不會收到有關它們的通知。 Weblate 支援以下服務:
電子郵件
預設的 Weblate 設定說明 Django 透過 django.utils.log.AdminEmailHandler 在遇到伺服器錯誤時傳送電子郵件。這是最省事的設定,但應該出於隱私原因考慮其他選項,因為錯誤電子郵件可能包含敏感資料。關於此內容的更多資訊,可閱讀 Security implications。
要停用此行為,從 Weblate 設定中的 LOGGING 刪除 mail_admins,或在 Docker 環境中停用 WEBLATE_ADMIN_NOTIFY_ERROR。
Sentry
Weblate 內建了對 Sentry 的支援。要使用它,只需在 settings.py 中設定 SENTRY_DSN:
SENTRY_DSN = "https://id@your.sentry.example.com/"
Sentry 也可以透過收集指定比例操作的追蹤及分析資料,監控 Weblate 效能。您可以使用 SENTRY_TRACES_SAMPLE_RATE 及 SENTRY_PROFILES_SAMPLE_RATE 進行設定。
Google Cloud Error Reporting
Weblate 可以將已處理的伺服器錯誤回報給 Google Cloud Error Reporting。請安裝包含 google-errors 額外套件的 Weblate,並在 settings.py 中設定 GOOGLE_CLOUD_ERROR_REPORTING:
GOOGLE_CLOUD_ERROR_REPORTING = {
    "project": "your-google-cloud-project",
}
Weblate 會自動在 weblate 服務下回報錯誤,並使用目前的 Weblate 版本或 Git 修訂版本作為回報的版本。可在 GOOGLE_CLOUD_ERROR_REPORTING 中設定 service 或 version 來覆寫這些值。
OpenTelemetry
Weblate 可以使用 OpenTelemetry 匯出後端追蹤資料。它透過 HTTP 使用 OTLP,並可將追蹤資料傳送至 OpenTelemetry Collector 或相容的供應商端點。
OPENTELEMETRY_ENABLED = True
OPENTELEMETRY_EXPORTER_OTLP_ENDPOINT = "https://collector.example.com/v1/traces"
OPENTELEMETRY_TRACES_SAMPLE_RATE = 0.1
此整合會追蹤 Django 要求、Celery 工作、Redis、對外 HTTP 要求、資料庫呼叫,以及 Weblate 特有的 span。請使用 OPENTELEMETRY_ENABLED、OPENTELEMETRY_EXPORTER_OTLP_ENDPOINT 及 OPENTELEMETRY_TRACES_SAMPLE_RATE 進行設定。
Rollbar
Weblate 具有對 Rollbar 的內建支援。要使用它,只需遵循 Rollbar notifier for Python 的說明即可。
簡而言之,您需要調整 settings.py :
# Add rollbar as last middleware:
MIDDLEWARE = [
    # … other middleware classes …
    "rollbar.contrib.django.middleware.RollbarNotifierMiddleware",
]

# Configure client access
ROLLBAR = {
    "access_token": "POST_SERVER_ITEM_ACCESS_TOKEN",
    "environment": "development" if DEBUG else "production",
    "branch": "main",
    "root": "/absolute/path/to/code/root",
}
將會自動整合所有必要的設定,您將會蒐集到來自伺服器或是使用端的錯誤訊息。
備註
錯誤日誌記錄還包括已正常處理但可能說明存在問題的異常,例如上傳檔案的解析失敗。
Graylog 紀錄管理
在 5.9 版被加入.
Weblate 可以被設定為使用 GELF TCP 協議記錄日誌。這是為 Graylog 整合開發的,但可被用於任何合規的日誌記錄平台。
範例設定 中包含了設定範例,對於 Docker 可以使用 WEBLATE_LOG_GELF_HOST 進行設定。
移轉 Weblate 至另一個伺服器
將 Weblate 移轉到其他伺服器應該非常簡單,然而它將資料儲存在幾個位置,您應該小心移轉。最佳的方式時停止 Weblate 再移轉。
移轉資料庫
最直接的方法是使用資料庫原生工具,因它們通常最有效(如 pg_dump)。或者,如果您的資料庫支援,您也可以使用複製功能。
也參考
在資料庫之間進行移轉的內容,見 從其它資料庫移轉到 PostgreSQL。
移轉 VCS 儲存庫
儲存在 DATA_DIR 下的版本控制系統同樣需要移轉。您可以簡單地複製它們,或使用 rsync 來更有效地移轉。
其他註解
不要忘記移動 Weblate 可能一直在使用的其他服務,如 Valkey、Redis、Cron 任務或自訂的身分驗證後端。