選用 Weblate 模組
您的安裝環境可使用多個選用模組。
Git 匯出器
使用 HTTP(S) 為您提供對底層 Git 儲存庫的唯讀存取。
安裝
將
weblate.gitexport加入settings.py的已安裝應用程式清單:INSTALLED_APPS += ("weblate.gitexport",)
透過安裝後移轉資料庫,將現有的儲存庫匯出:
weblate migrate
提示
Git 匯出器在我們的官方 Docker 映像中處於開啟狀態。要關閉它,使用:
WEBLATE_REMOVE_APPS=weblate.gitexport
使用
模組自動鉤入 Weblate,並且在 元件設定 中設定匯出儲存庫 URL。儲存庫在 Weblate URL的 /git/ 部分下是可以存取的,例如 https://example.org/git/weblate/main/。
公開可用專案的儲存庫可以被複製而無需認證:
git clone 'https://example.org/git/weblate/main/'
受限瀏覽儲存庫的權限(對於 私密 存取控制 專案或者當開啟 REQUIRE_LOGIN 時)需要可在 使用者個人資料 獲得的 API 權杖:
git clone 'https://user:KEY@example.org/git/weblate/main/'
備註
Weblate 自行提供 Git 儲存庫,但它不提供 Git LFS 物件。對使用 Git LFS 的儲存庫,從上游儲存庫複製並將 Weblate 新增為另一個遠端。如果只需要 Git-tracked 檔案,可以使用 GIT_LFS_SKIP_SMUDGE=1 引數從 Weblate 複製跳過下載 Git LFS 物件。
提示
預設情況下,使用者 群組的使用者與匿名使用者預設透過 存取儲存庫 和 高階使用者 角色存取公開專案。
帳單
這在 Hosted Weblate 上用於確定付費套餐、跟蹤發票和使用限制。
安裝
1. Add weblate.billing to installed apps in
settings.py:
INSTALLED_APPS += ("weblate.billing",)
執行資料庫移轉,以選擇性安裝模組所需的額外資料庫結構:
weblate migrate
付費套餐建立和分配
您必須先建立計費方案,才能啟用計費功能。前往 管理 區段(扳手圖示)並開啟 工具 畫面,再進入 Django 管理介面。
在 Django 管理介面中找到 BILLING 區段,然後新增計費方案。例如,可以新增費用為零的 Free 方案。
若要將計費方案指派給既有專案,也可以在 Django 管理介面 中使用 Customer billings 選項完成。
最後,Django 管理介面 提供 發票 選項用於記錄您的客戶付款。
使用
安裝後您可以在管理介面控制帳單。啟用了帳單模組的使用者將在他們的 使用者設定檔 中看到新的 帳單 分頁。
此外,計費模組允許非超級使用者建立新專案及元件(請參閱 新增翻譯專案和元件)。必須符合下列條件:
計費用量仍在設定限制內(超額使用會阻止建立專案或元件),而且已付款(如果方案費用不為零)
使用者對計費方案涵蓋的工作空間具備 新增專案至工作空間 權限。
建立專案時,使用者可以選擇專案所屬的工作空間。在有計費功能的工作空間中建立的專案,會計入指派給該工作空間的計費方案。具備 編輯工作空間設定 權限的使用者可以檢視及支付計費方案;計費通知電子郵件會寄給這些使用者。詳細資訊請參閱 帳單。
法律模組
這用在 Hosted Weblate 上,來提供所需的法律檔案。它開始時提供空白文件,會希望您填充文件中後面的範本:
legal/documents/tos.html服務條款文件
legal/documents/privacy.html隱私政策文件
legal/documents/summary.html服務條款與隱私政策的簡短概覽
legal/documents/contracts.html分包商資訊
法律模組會將這些範本嵌入 Weblate,並使用 legal/documents/tos.html 進行服務條款確認。這與 LEGAL_URL 和 PRIVACY_URL 不同;未啟用法律模組時,後兩者用於從頁尾連結至外部託管的法律檔案。啟用法律模組時,Weblate 預設會連結至內部法律頁面。
變更服務條款文件時,請調整 LEGAL_TOS_DATE 迫使使用者接受更新的文件。
備註
可以在這個 Git 儲存庫 <https://github.com/WeblateOrg/wllegal/tree/main/wllegal/templates/legal/documents> 中取得 Weblate s.r.o. 運營的 Hosted Weblate 的法律檔案。
The bundled terms of service and related legal documents are specific to services operated by Weblate s.r.o. They can serve as an implementation example, but should not be used as a basis for legal documents of other services.
安裝
1. Add weblate.legal to installed apps in
settings.py:
INSTALLED_APPS += ("weblate.legal",)

# Optional:

# Social auth pipeline to confirm TOS upon registration/subsequent sign in
SOCIAL_AUTH_PIPELINE += ("weblate.legal.pipeline.tos_confirm",)

# Middleware to enforce TOS confirmation of signed in users
MIDDLEWARE += [
    "weblate.legal.middleware.RequireTOSMiddleware",
]
執行資料庫移轉,以選擇性安裝模組所需的額外資料庫結構:
weblate migrate
Provide legal document templates matching your service, as described in Customizing legal documents and styles.
提示
在 Docker 部署中,用 WEBLATE_LEGAL_INTEGRATION 開啟法律模組而不是編輯 settings.py。用 tos-confirm 啟用法律模組和服務條款確認強制,或者用 wllegal 額外載入Weblate s.r.o. 運營服務使用的託管的法律檔案範本。這些範本不用於一般用途。要在 Docker 中提供自己的範本,請將它們放在 /app/data/python/customize/templates/legal/documents 中, 見 取代標誌與其它靜態檔案。
變更環境變數後,請重新建立 Docker 容器,例如使用 docker compose up -d。重新啟動既有容器不會套用已變更的環境值。
使用
After installation and customization, the legal documents are shown in the Weblate UI.
法律文件範本是一般 Django 範本。只有使用 {% translate %} 或 {% blocktranslate %} 等 Django 翻譯標籤時才會翻譯文字;純 HTML 文字會依原樣顯示。
法律頁面及登入與註冊概覽會提供 terms_url 和 privacy_url 變數,用於連結至服務條款和隱私權政策文件。
Customizing legal documents and styles
Provide your own legal documents by overriding these templates in a 建立 Python 模組:
templates/legal/documents/tos.htmltemplates/legal/documents/privacy.htmltemplates/legal/documents/summary.htmltemplates/legal/documents/contracts.htmltemplates/legal/styles.htmlstatic/weblate_customization/legal.css
Place the customization app before weblate.legal and any other app
providing legal template overrides in INSTALLED_APPS so that
Django selects its templates. Only templates you provide are overridden; the
remaining legal templates continue to use the defaults from later apps.
The legal/styles.html template is included in the HTML head of every
legal page. Use it to load a stylesheet from your customization app:
{% load static %}

<link rel="stylesheet" href="{% static 'weblate_customization/legal.css' %}" />
Run weblate collectstatic --noinput after adding or changing the static
file.
In Docker deployments, place document templates in
/app/data/python/customize/templates/legal/documents,
styles.html in
/app/data/python/customize/templates/legal/styles.html, and the
stylesheet in /app/data/python/customize/static/legal.css. The
stylesheet template then uses {% static 'legal.css' %}. Restart the
container to apply the changes, see 取代標誌與其它靜態檔案.
By default, legal document wrappers use the tos CSS class. Weblate does not
attach any styling to this class; target it from your custom stylesheet, or set
LEGAL_DOCUMENT_CSS_CLASS to another class matching your document
markup. Set the setting to an empty string if no wrapper class is needed.
使用 LEGAL_HIDDEN_DOCUMENTS,從法律選單隱藏分包商等選用法律頁面。直接要求隱藏頁面時會傳回 404 回應。如果隱藏 terms 或 privacy,則使用 terms_url 或 privacy_url 的連結會在已設定時退回使用 LEGAL_URL 或 PRIVACY_URL,否則會省略連結。
若要搭配條款確認功能使用外部託管的法律檔案,請設定 LEGAL_HIDDEN_DOCUMENTS 以隱藏 terms 和 privacy,並設定 LEGAL_URL 和 PRIVACY_URL。確認頁面隨後會連結至這些外部檔案,而不需要覆寫 legal/documents/tos.html 範本。
頭像
頭像在伺服器端下載並快取,來減少對預設服務的網站的洩露。透過為其設定的電子郵件地址來取回頭像的內建支援,可以使用 ENABLE_AVATARS 來關閉。
Weblate 目前支援:
在地化 CDN
JavaScript 在地化 CDN 和 翻譯檔案 CDN 附加元件會將檔案寫入 LOCALIZE_CDN_PATH;Weblate 不會提供這些檔案。請將提供 LOCALIZE_CDN_URL 的網頁伺服器或 CDN 設定為公開且唯讀的靜態檔案主機。
請將每個已發佈的 CDN 檔案視為公開資料。URL 中附加元件專用的 UUID 不是存取控制機制。請勿對包含私人字串、尚未發行的產品文字、客戶資料、內部 URL、API 範例、儲存庫路徑、翻譯者註解,或不應公開的檔案格式中繼資料之元件啟用 CDN 附加元件。
翻譯檔案 CDN 附加元件會以 Weblate 支援的格式發佈原始翻譯檔案。瀏覽器或其他用戶端可能會將部分格式解讀為 HTML、SVG、XML、JavaScript、YAML 或特定應用程式的設定。請從與 Weblate 及翻譯使用端應用程式分離的專用網域提供 CDN。請勿與 CDN 網域共用驗證 Cookie。
建議的伺服器設定:
只提供
LOCALIZE_CDN_PATH所設定的目錄;請勿公開 Weblate 儲存庫、備份、媒體、設定或整個資料目錄。停用目錄列舉。
使用 HTTPS 並使網路伺服器對 CDN 主機唯讀。
傳送值為
nosniff的 X-Content-Type-Options。採用保守的 MIME 類型設定。將未知翻譯格式以 text/plain 或 application/octet-stream 提供;只有
weblate.js應以 JavaScript 提供。對於不應在瀏覽器中轉譯的原始翻譯格式,請考慮新增值為
attachment的 Content-Disposition。只為需要從瀏覽器存取檔案的網站設定
Access-Control-Allow-Origin。設定符合更新需求的快取存留時間,並在過時翻譯必須迅速消失時清除 CDN 快取。
下列 nginx 程式碼片段只提供已設定的 CDN 目錄,並對原始翻譯檔案套用保守的預設值:
#
# nginx configuration for the Weblate localization CDN
#
# You will want to change:
#
# - server_name to match the host configured in LOCALIZE_CDN_URL
# - root to match LOCALIZE_CDN_PATH
# - Access-Control-Allow-Origin to the sites that need browser access
# - TLS configuration if HTTPS is not terminated before nginx
#
server {
    listen 80;
    server_name cdn.example.com;

    # LOCALIZE_CDN_PATH
    root /home/weblate/data/l10n-cdn;

    autoindex off;
    disable_symlinks on;

    location = / {
        return 404;
    }

    # The JavaScript localization add-on publishes this loader.
    location ~ "^/[0-9a-f]{32}/weblate\.js$" {
        try_files $uri =404;

        types {
            application/javascript js;
        }
        default_type application/javascript;

        add_header X-Content-Type-Options nosniff always;
        # add_header Access-Control-Allow-Origin "https://www.example.com" always;

        expires 1h;
    }

    # Other CDN files are translation files. Serve them conservatively so raw
    # formats are not interpreted as active browser content.
    location / {
        try_files $uri =404;

        types {
        }
        default_type text/plain;

        add_header X-Content-Type-Options nosniff always;
        add_header Content-Disposition "attachment" always;
        # add_header Access-Control-Allow-Origin "https://www.example.com" always;

        expires 1h;
    }
}
使用 GnuPG 為 Git 提交簽名
所有的提交均可由 Weblate 執行個體的 GnuPG 金鑰為其簽名。
開啟
WEBLATE_GPG_IDENTITY。(Weblate 將在需要時產生一個 GnuPG 金鑰,並使用它為所有的翻譯提交簽名。)這個特性需要安裝 GnuPG 2.1 或更新版。
您可以在
DATA_DIR中找到金鑰,而公開金鑰顯示在“關於”頁面上: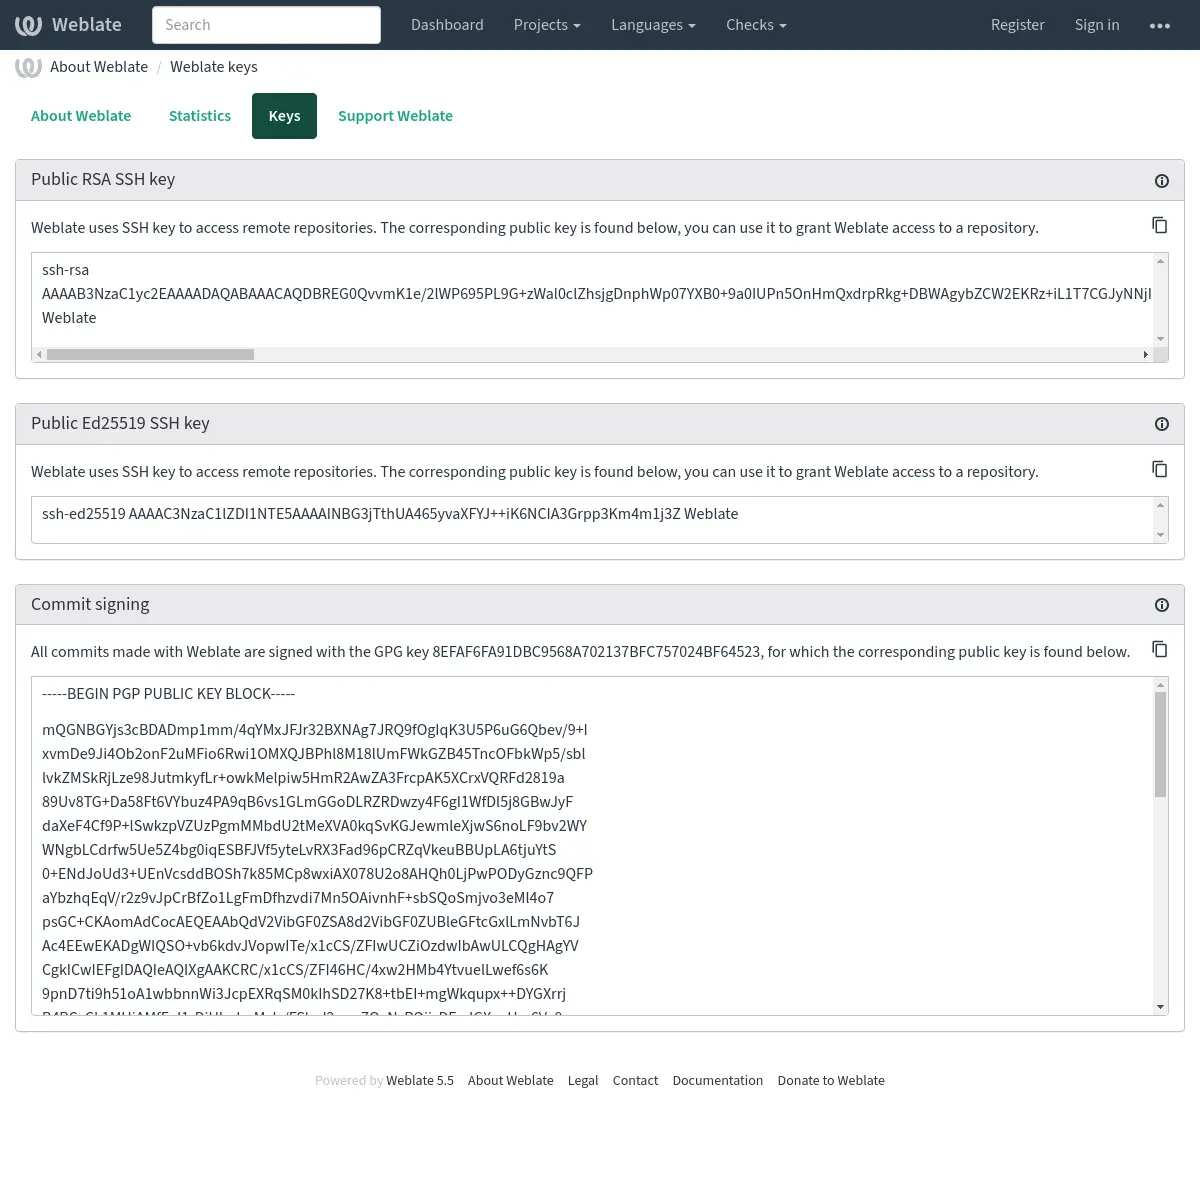
另外您還可以將現有的金鑰匯入 Weblate 中,當呼叫 pgp 時只設定
HOME=$DATA_DIR/home。
提示
Weblate 會將關鍵材料快取很長一段時間。如果您透過 WEBLATE_GPG_IDENTITY 讓 Weblate 產生一個金鑰,接著用相同身分匯入金鑰來使用現有金鑰的話,建議清空 redis 快取來檢視此類變更的效果。
備註
在多個主機間共享 DATA_DIR 時,請遵照 https://wiki.gnupg.org/NFS 說明讓 GnuPG 簽名可靠地工作。
速率限制
在 4.6 版的變更: 速率限制不再適用於已登入的超級使用者。
Weblate 中有幾個操作受速率限制。每個範圍的速率限制單獨評估。一個範圍中,RATELIMIT_WINDOW 秒內最多允許 RATELIMIT_ATTEMPTS 次嘗試。超過這個速率會因 RATELIMIT_LOCKOUT 而封禁那個範圍;Weblate 不會將單一範圍的封禁轉變為整個網站的 IP 封鎖。超出單一範圍, 如 TRANSLATE 或 SEARCH 的限制也不會造成 LOGIN 或 SECOND_FACTOR 等不相關範圍被封禁。此外,還有適用特定範圍的設定,例如 RATELIMIT_CONTACT_ATTEMPTS 或 RATELIMIT_TRANSLATE_ATTEMPTS 。下方表格是可用範圍的完整清單。
後面的操作受到速率限制:
名稱 |
範圍 |
允許的嘗試 |
速率限制視窗 |
鎖定時間 |
|---|---|---|---|---|
註冊 |
|
5 |
300 |
600 |
傳送訊息給管理員 |
|
2 |
300 |
600 |
登入時的密碼驗證 |
|
5 |
300 |
600 |
第二要素身分驗證 |
|
5 |
300 |
600 |
網站範圍搜尋 |
|
6 |
60 |
60 |
翻譯 |
|
30 |
60 |
600 |
新增至詞彙表 |
|
30 |
60 |
600 |
開始翻譯到一種新語言 |
|
2 |
300 |
600 |
建立新專案 |
|
5 |
600 |
600 |
連線 GitHub 帳號 |
|
100 |
3600 |
600 |
每個範圍內,速率限制的依據在使用者登入時為會話,在未登入時為 IP 地址。
如果使用者沒能在 AUTH_LOCK_ATTEMPTS 的次數內登入,那麼帳號的密碼驗證將關閉,直到完成了重置密碼過程為止。
這些設定也可以在 Docker 容器中應用,在設定名稱中新增 WEBLATE_ 字首 例如 RATELIMIT_ATTEMPTS 變成 WEBLATE_RATELIMIT_ATTEMPTS。
API 具有另外的速率限制設定,請參閱 API 速率限制。