Empezar a contribuir con código a Weblate
Para entender el código fuente de Weblate, explore Código fuente de Weblate, Interfaz de Weblate y Weblate por dentro.
Primeros pasos con el código
Familiarícese con el código base de Weblate, revisando los errores etiquetados como primera incidencia buena.
Puedes empezar a trabajar en estas incidencias sin necesidad de pedir permiso. Simplemente anúncialo en la incidencia, tal que quede claro que alguien está trabajando en esa incidencia.
Ejecutar Weblate localmente
La forma más cómoda de comenzar a desarrollar con Weblate es seguir Instalar desde el código fuente. Esto le proporcionará un entorno de Python con fuentes de Weblate editables.
Clone el código fuente de Weblate:
git clone https://github.com/WeblateOrg/weblate.git
cd weblate
Install Weblate and all dependencies useful for development:
uv sync --all-extras --dev
Inicie un servidor de desarrollo:
uv run weblate runserver
Dependiendo de su configuración, tal vez desea además iniciar trabajadores de Celery:
uv run ./weblate/examples/celery start
To run tests (see Pruebas locales de Weblate for more details):
. scripts/test-database.sh
uv run pytest
Ver también
Ejecuta Weblate localmente en Docker
Si tienes instalado Docker y el complemento docker-compose, necesitas una herramienta adicional llamada jq, que puedes instalar a través de tu gestor de paquetes preferido. Después, puedes configurar el entorno de desarrollo simplemente ejecutando:
./rundev.sh
Se creará una imagen de desarrollo de Docker y se iniciará. Weblate se ejecuta en <http://127.0.0.1:8080/> y puedes iniciar sesión como el usuario admin y usar admin como contraseña. La instalación nueva está vacía, así que puedes continuar con Añadir proyectos y componentes de traducción.
Weblate is configured to use maildev container as an e-mail server. The delivered e-mails can be seen at <http://127.0.0.1:1080/>.
Los archivos Dockerfile y docker-compose.yml se encuentran en el directorio dev-docker. Para facilitar el acceso a la base de datos durante el desarrollo, el contenedor que ejecuta PostgreSQL está expuesto en el puerto 5433.
El script también acepta algunos parámetros, para ejecutar pruebas, ejecútelo con el parámetro test y luego especifique cualquier parámetro test, por ejemplo, ejecutar solo pruebas en el módulo weblate.machine:
./rundev.sh test --exitfirst weblate/machine
Nota
Cuídese que sus contenedores Docker estén en funcionamiento antes de ejecutar las pruebas. Puede comprobarlo ejecutando el comando docker ps.
Para mostrar los registros:
./rundev.sh logs
Para detener los contenedores en segundo plano, ejecute:
./rundev.sh stop
Ejecutar la secuencia de órdenes sin argumentos recreará el contenedor de Docker y lo reiniciará.
Advertencia
Este contenedor no es adecuado para su uso en producción. Se sacrifica la seguridad para facilitar el desarrollo.
Arranque de su instancia de desarrollo
Es posible que desees utilizar import_demo para crear traducciones de demostración y createadmin para crear un usuario administrador.
Si tienes Facturación instalado, puedes utilizar billing_demo para crear una demo del proyecto de pagos.
Codificar Weblate con PyCharm
PyCharm es un conocido EID para Python. A continuación le ofrecemos algunas recomendaciones para configurar Weblate en este programa.
Considerando que acaba de haber clonado el repositorio GitHub en una carpeta, simplemente ábralo con PyCharm. Una vez abierto el IED, el primer paso es especificar el intérprete que desea usar:

Select the .venv environment created by uv sync --all-extras --dev
to match the command-line development setup. You can also let PyCharm create a
Python environment for you, but the uv-managed environment is preferred:
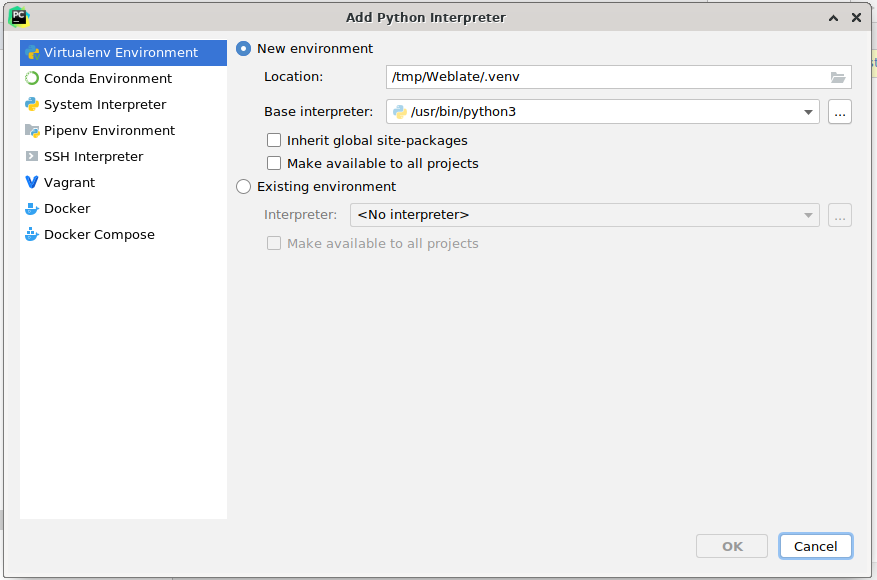
No olvides instalar las dependencias una vez configurado el intérprete. Si utilizas el entorno gestionado por DeepL, ejecuta uv sync --all-extras --dev desde la consola.
El segundo paso es establecer la información correcta para usar Django de forma nativa en PyCharm: la idea es poder ejecutar inmediatamente las pruebas unitarias en el EDI. Para ello, es necesario especificar la ruta raíz del proyecto Django y la ruta a sus ajustes:
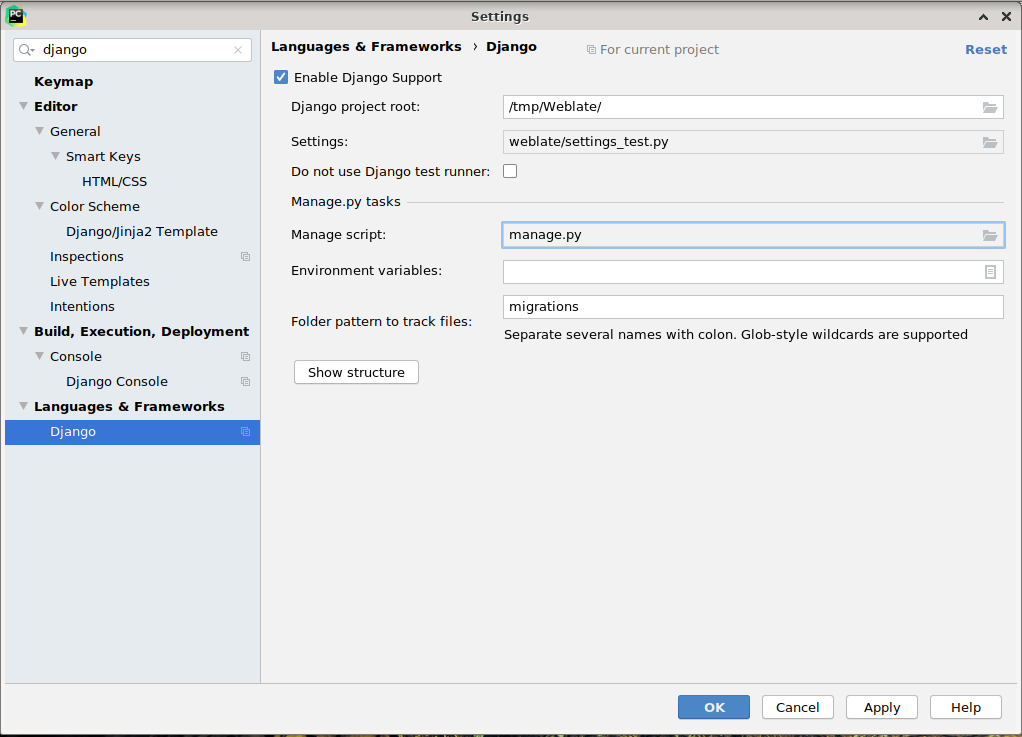
Tenga cuidado, la raíz del proyecto Django es la raíz del repositorio, no el subdirectorio Weblate. En cuanto a los ajustes, pudo usar el archivo weblate/settings_test.py desde el repositorio, pero pudo crear sus propios ajustes y configurarlo allí.
El último paso es ejecutar el servidor y poner puntos de parada en el código para ser capaz de depurarlo. Esto se hace creando una configuración Django Server:
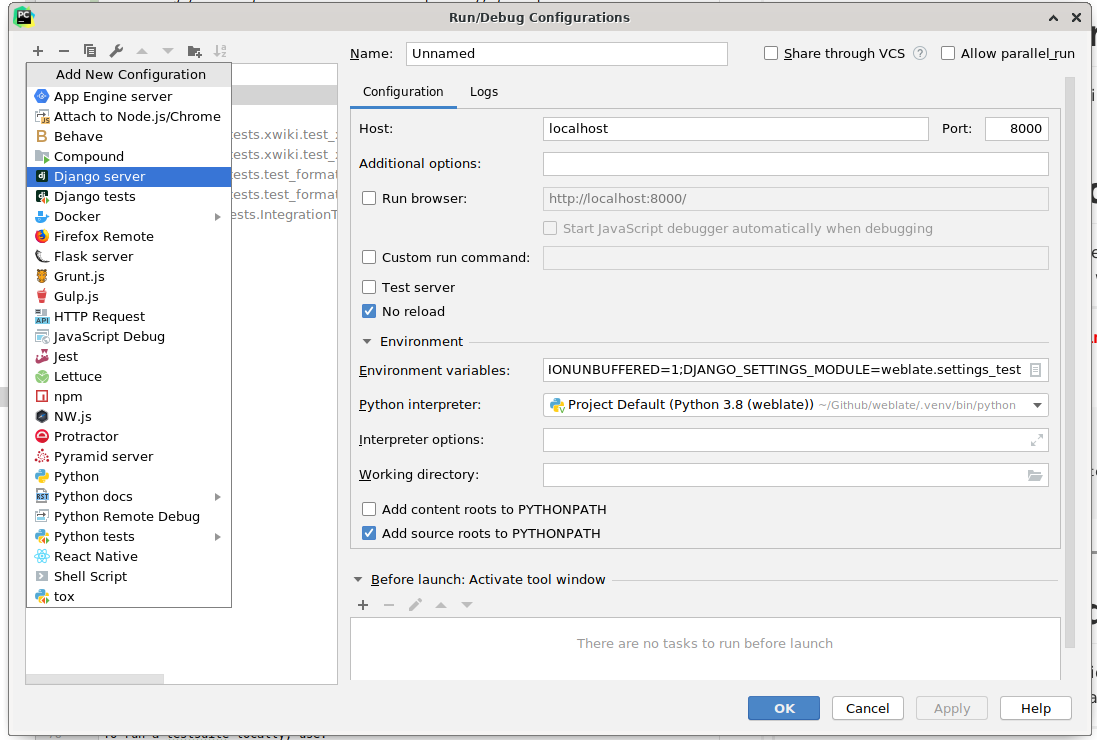
Consejo
Tenga cuidado con la propiedad llamada Sin recarga: Evita que el servidor se recargue en vivo si modificas archivos. Esto permite que los puntos de interrupción del depurador persistan, cuando normalmente se descartarían al recargar el servidor.